Netgear WNR3500Lv2 User Manual - Page 34
Adding Both WPS-Capable Clients and Non-WPS-Capable Clients, admin, password
 |
View all Netgear WNR3500Lv2 manuals
Add to My Manuals
Save this manual to your list of manuals |
Page 34 highlights
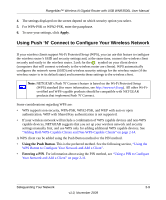
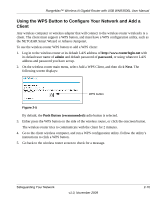
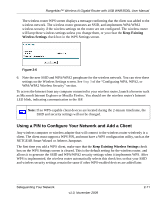
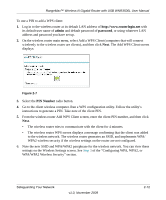
RangeMax™ Wireless-N Gigabit Router with USB WNR3500L User Manual Adding Both WPS-Capable Clients and Non-WPS-Capable Clients If you have a wireless network with both WPS-capable clients and non-WPS-capable clients, you should set up your wireless network manually. Then, use Push 'N' Connect (WPS) to quickly and easily add additional WPS-capable clients. First, you must set up your wireless network manually (see "Manually Configuring Your Wireless Settings" on page 2-4). Note: Your wireless settings remain the same when you add another WPS-enabled client, as long as the Keep Existing Wireless Settings checkbox is selected in the Advanced Wireless screen (listed under the Advanced heading in the wireless router main menu). If you clear this checkbox, when you add the client, a new SSID and passphrase will be generated, and all existing connected wireless clients will be disassociated and disconnected from the wireless router. To add a wireless client device that is WPS-enabled: 1. Log in to the wireless router at its default LAN address of http://www.routerlogin.net with its default user name of admin and default password of password, or using whatever LAN address and password you have set up. 2. On the wireless router main menu, select Add a WPS Client (computers that will connect wirelessly to the wireless router are clients), and then click Next. The Add WPS Client screen displays. 3. By default, the WPS button is selected. Either click the onscreen button, or press the WPS button on the side of the wireless router. The wireless router tries to communicate with the client for 2 minutes. 4. Go to the client wireless computer, and run a WPS configuration utility. Follow the utility's instructions to click a WPS button. 5. Go back to the wireless router screen to check for a message. The wireless router WPS screen will display a message confirming that the client was added to the wireless network. To view a list of all devices connected to your wireless router (including wireless and Ethernetconnected), see "Viewing a List of Attached Devices" on page 4-9. To connect a non-WPS enabled client to the wireless router: 1. On the device you want to connect to the router, open the networking utility. Safeguarding Your Network v1.0, November 2009 2-14
-
 1
1 -
2
-
3
-
4
-
5
-
6
-
7
-
8
-
9
-
10
-
11
-
12
-
13
-
14
-
15
-
16
-
17
-
18
-
19
-
20
-
21
-
22
-
23
-
24
-
25
-
26
-
27
-
28
-
 29
29 -
 30
30 -
 31
31 -
 32
32 -
 33
33 -
 34
34 -
 35
35 -
 36
36 -
 37
37 -
 38
38 -
 39
39 -
40
-
41
-
42
-
43
-
44
-
45
-
46
-
47
-
48
-
49
-
50
-
51
-
52
-
53
-
54
-
55
-
56
-
57
-
58
-
59
-
60
-
61
-
62
-
63
-
64
-
65
-
66
-
67
-
68
-
69
-
70
-
71
-
72
-
73
-
74
-
75
-
76
-
77
-
78
-
79
-
80
-
81
-
82
-
83
-
84
-
85
-
86
-
87
-
88
-
89
-
90
-
91
-
92
-
93
-
94
-
95
-
96
-
97
-
98
-
99
-
100
-
101
-
102
-
103
-
104
-
105
-
106
-
107
-
108
-
109
-
110
-
111
-
112
-
113
-
114
-
115
-
116
-
117
-
118
-
119
-
120
-
121
-
122
-
123
-
124
-
125
-
126
-
127
-
128
-
129
-
130
-
131
-
132
-
133
 |
 |
