Nikon VSA78203 User Guide - Page 23
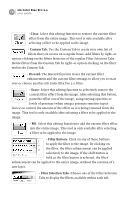
Minimize button, Paint, Settings, Keep as layer, Launch with Photoshop, Show More button
 |
UPC - 018208253111
View all Nikon VSA78203 manuals
Add to My Manuals
Save this manual to your list of manuals |
Page 23 highlights
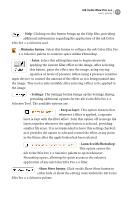
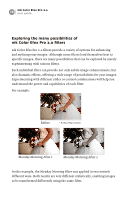
nik Color Efex Pro 2.0 user guide 17 - Help: Clicking on this button brings up the Help files, providing additional information regarding the application of the nik Color Efex Pro 2.0 Selective tool. - Minimize button: Select this button to collapse the nik Color Efex Pro 2.0 Selective palette to conserve space within Photoshop. - Paint: Select this editing function to begin selectively applying the current filter effect to the image. After selecting this button, paint the effect into the image, using varying opacities or levels of pressure (when using a pressure sensitive input device) to control the amount of the effect as it is being painted into the image. This tool is only available after selecting a filter to be applied to the image. - Settings: The Settings button brings up the Settings Dialog, providing additional options for the nik Color Efex Pro 2.0 Selective Tool. The available options are: - Keep as layer: This option ensures that whenever a filter is applied, a separate layer is kept with the filter effect. Turn this option off to merge the layers together whenever the apply button is selected, providing smaller file sizes. It is recommended to leave this setting checked, as it provides the option to edit and control the effect at any point in the future after the apply button has been selected. - Launch with Photoshop: This option causes the nik Color Efex Pro 2.0 Selective palette to open whenever Photoshop opens, allowing for quick access to the selective application of any nik Color Efex Pro 2.0 filter. - Show More button: Click on the Show More button to either hide or show the editing tools within the nik Color Efex Pro 2.0 Selective palette.
-
 1
1 -
2
-
3
-
4
-
5
-
6
-
7
-
8
-
9
-
10
-
11
-
12
-
13
-
14
-
15
-
16
-
17
-
 18
18 -
 19
19 -
 20
20 -
 21
21 -
 22
22 -
 23
23 -
 24
24 -
 25
25 -
 26
26 -
 27
27 -
 28
28 -
29
-
30
-
31
-
32
-
33
-
34
-
35
-
36
-
37
-
38
-
39
-
40
-
41
-
42
-
43
-
44
-
45
-
46
-
47
-
48
-
49
-
50
-
51
-
52
-
53
-
54
-
55
-
56
-
57
-
58
-
59
-
60
-
61
-
62
-
63
-
64
-
65
-
66
-
67
-
68
-
69
 |
 |