Oki PRO8432WT Pro8432WT - User Guide - Page 101
with paper so that the image drums do, not expose to the light., unlock.
 |
View all Oki PRO8432WT manuals
Add to My Manuals
Save this manual to your list of manuals |
Page 101 highlights
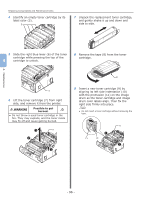
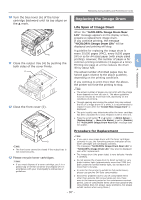
3 Insert your finger into the recess on the right side of the printer and pull the front cover open lever (1) to open the front cover (2) forward. Replacing Consumables and Maintenance Units 6 Cover the image drums you took out with paper so that the image drums do not expose to the light. 1 2 4 Press the output tray open button (3) and open the output tray (4). CAUTION Possible to get burned. ●● The fuser unit is extremely hot. Do not touch it. 3 4 7 Turn the blue locks (5) on each side of 4 the belt unit in direction of the arrow to unlock. 5 5 4. Maintenance 5 Take all the four image drums out of a printer, and then place them on a flat surface. 8 Remove the belt unit by holding the blue lever (6). 6 - 101 -
-
 1
1 -
2
-
3
-
4
-
5
-
6
-
7
-
8
-
9
-
10
-
11
-
12
-
13
-
14
-
15
-
16
-
17
-
18
-
19
-
20
-
21
-
22
-
23
-
24
-
25
-
26
-
27
-
28
-
29
-
30
-
31
-
32
-
33
-
34
-
35
-
36
-
37
-
38
-
39
-
40
-
41
-
42
-
43
-
44
-
45
-
46
-
47
-
48
-
49
-
50
-
51
-
52
-
53
-
54
-
55
-
56
-
57
-
58
-
59
-
60
-
61
-
62
-
63
-
64
-
65
-
66
-
67
-
68
-
69
-
70
-
71
-
72
-
73
-
74
-
75
-
76
-
77
-
78
-
79
-
80
-
81
-
82
-
83
-
84
-
85
-
86
-
87
-
88
-
89
-
90
-
91
-
92
-
93
-
94
-
95
-
 96
96 -
 97
97 -
 98
98 -
 99
99 -
 100
100 -
 101
101 -
 102
102 -
 103
103 -
 104
104 -
 105
105 -
 106
106 -
107
-
108
-
109
-
110
-
111
-
112
-
113
-
114
-
115
-
116
-
117
-
118
-
119
-
120
-
121
-
122
-
123
-
124
-
125
-
126
-
127
-
128
 |
 |

- 101 -
Replacing Consumables and Maintenance Units
4
4. Maintenance
3
Insert your finger into the recess on
the right side of the printer and pull the
front cover open lever (1) to open the
front cover (2) forward.
1
2
4
Press the output tray open button (3)
and open the output tray (4).
CAUTION
Possible to get
burned.
●
The fuser unit is extremely hot. Do not touch
it.
3
4
5
Take all the four image drums out of a
printer, and then place them on a flat
surface.
6
Cover the image drums you took out
with paper so that the image drums do
not expose to the light.
7
Turn the blue locks (5) on each side of
the belt unit in direction of the arrow to
unlock.
5
5
8
Remove the belt unit by holding the blue
lever (6).
6