Oki PRO8432WT Pro8432WT - User Guide - Page 27
Configuration, ENTER
 |
View all Oki PRO8432WT manuals
Add to My Manuals
Save this manual to your list of manuals |
Page 27 highlights
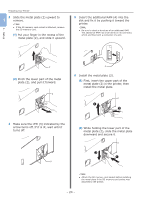
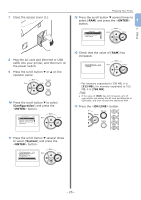
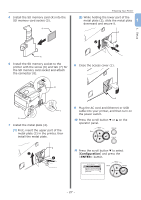
5 Install the SD memory card (4) into the SD memory card socket (5). 4 Preparing Your Printer (2) While holding the lower part of the 1 metal plate (2), slide the metal plate downward and secure it. 2 1. Setup 5 6 Install the SD memory socket to the printer with the screw (6) and tab (7) for the SD memory card socket and attach the connector (8). 8 Close the access cover (1). 8 7 6 7 Install the metal plate (2). (1) First, insert the upper part of the metal plate (2) in the printer, then install the metal plate. 2 1 9 Plug the AC cord and Ethernet or USB cable into your printer, and then turn on the power switch. 10 Press the scroll button or on the operator panel. 11 Press the scroll button to select [Configuration] and press the button. - 27 -
-
 1
1 -
2
-
3
-
4
-
5
-
6
-
7
-
8
-
9
-
10
-
11
-
12
-
13
-
14
-
15
-
16
-
17
-
18
-
19
-
20
-
21
-
 22
22 -
 23
23 -
 24
24 -
 25
25 -
 26
26 -
 27
27 -
 28
28 -
 29
29 -
 30
30 -
 31
31 -
 32
32 -
33
-
34
-
35
-
36
-
37
-
38
-
39
-
40
-
41
-
42
-
43
-
44
-
45
-
46
-
47
-
48
-
49
-
50
-
51
-
52
-
53
-
54
-
55
-
56
-
57
-
58
-
59
-
60
-
61
-
62
-
63
-
64
-
65
-
66
-
67
-
68
-
69
-
70
-
71
-
72
-
73
-
74
-
75
-
76
-
77
-
78
-
79
-
80
-
81
-
82
-
83
-
84
-
85
-
86
-
87
-
88
-
89
-
90
-
91
-
92
-
93
-
94
-
95
-
96
-
97
-
98
-
99
-
100
-
101
-
102
-
103
-
104
-
105
-
106
-
107
-
108
-
109
-
110
-
111
-
112
-
113
-
114
-
115
-
116
-
117
-
118
-
119
-
120
-
121
-
122
-
123
-
124
-
125
-
126
-
127
-
128
 |
 |
