Oki PRO8432WT Pro8432WT - User Guide - Page 17
Preparing Your Printer, Unpacking, Installing Consumables
 |
View all Oki PRO8432WT manuals
Add to My Manuals
Save this manual to your list of manuals |
Page 17 highlights
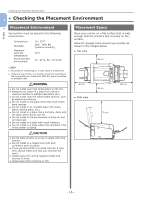
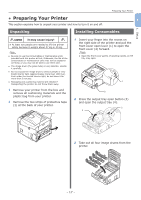
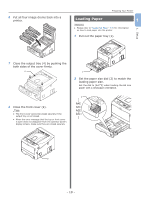
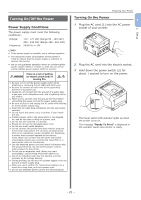
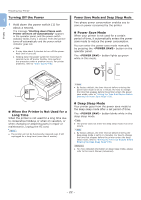
Preparing Your Printer ●●Preparing Your Printer 1 This section explains how to unpack your printer and how to turn it on and off. Unpacking Installing Consumables 1. Setup CAUTION It may cause injury! ●● At least two people are needed to lift the printer safely because it weighs about 37 Kg or 40 Kg. Note ●● Be sure to use the consumables or maintenance units provided with this printer at first. Otherwise, the life of the consumables or maintenance units may not be displayed correctly, or you may not be able to use them later. ●● The image drum (the green tube) is very delicate. Handle it carefully. ●● Do not expose the image drum to direct sunlight or very bright interior light (approximately more than 1500 lux). Even under the normal interior light, do not leave it for more than 5 minutes. ●● Packaging and cushioning material are needed if transporting the printer. Do not throw them away. 1 Remove your printer from the box and remove all cushioning materials and the plastic bag from your printer. 2 Remove the two strips of protective tape (1) at the back of your printer. 1 1 Insert your finger into the recess on the right side of the printer and pull the front cover open lever (1) to open the front cover (2) forward. Note ●● Open the front cover gently. If opening rapidly, an MP tray may open. 1 2 2 Press the output tray open button (3) and open the output tray (4). 3 4 3 Take out all four image drums from the printer. - 17 -
-
 1
1 -
2
-
3
-
4
-
5
-
6
-
7
-
8
-
9
-
10
-
11
-
 12
12 -
 13
13 -
 14
14 -
 15
15 -
 16
16 -
 17
17 -
 18
18 -
 19
19 -
 20
20 -
 21
21 -
 22
22 -
23
-
24
-
25
-
26
-
27
-
28
-
29
-
30
-
31
-
32
-
33
-
34
-
35
-
36
-
37
-
38
-
39
-
40
-
41
-
42
-
43
-
44
-
45
-
46
-
47
-
48
-
49
-
50
-
51
-
52
-
53
-
54
-
55
-
56
-
57
-
58
-
59
-
60
-
61
-
62
-
63
-
64
-
65
-
66
-
67
-
68
-
69
-
70
-
71
-
72
-
73
-
74
-
75
-
76
-
77
-
78
-
79
-
80
-
81
-
82
-
83
-
84
-
85
-
86
-
87
-
88
-
89
-
90
-
91
-
92
-
93
-
94
-
95
-
96
-
97
-
98
-
99
-
100
-
101
-
102
-
103
-
104
-
105
-
106
-
107
-
108
-
109
-
110
-
111
-
112
-
113
-
114
-
115
-
116
-
117
-
118
-
119
-
120
-
121
-
122
-
123
-
124
-
125
-
126
-
127
-
128
 |
 |
