Oki PRO8432WT Pro8432WT - User Guide - Page 33
Connecting by Manual Setup from, Control Panel, ENTER]:Execute, ENTER, WirelessInfrastructure, Setting
 |
View all Oki PRO8432WT manuals
Add to My Manuals
Save this manual to your list of manuals |
Page 33 highlights
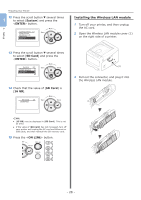
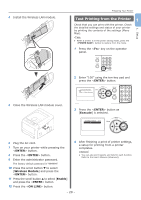
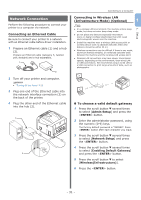
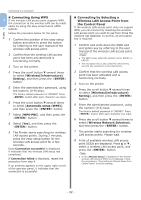
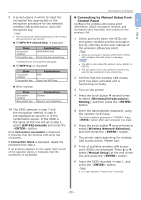
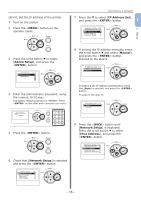
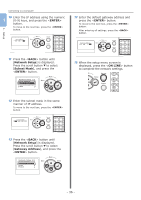
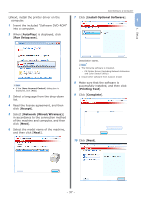
9 A screen opens in which to input the encryption key appropriate to the encryption procedure for the selected wireless LAN access point; input the encryption key. Memo ●● The encryption key differs depending on the wireless LAN access point and security. If [WPA Pre-shared Key] is displayed Item Encryption method Encryption key Explanation WPA/WPA2-PSK Enter the pre-shared key. * Configure from the machine's web page. If [WEP Key] is displayed Item Encryption method Encryption key Explanation WEP Input the WEP key. Other settings Item Encryption method Encryption key Explanation Disable Input is not necessary. 10 The SSID selected in step 7 and the encryption method in step 8 are displayed as security in of the confirmation screen. If the SSID is the same as the one set up in step 1, select [ENTER]:Execute and press the button. Once Connection successful is displayed, it indicates that the wireless LAN setup has completed. If Connection failed is displayed, repeat the procedure from step 4. If an antenna appears on the upper right corner of the operator panel, it indicates that the connection is successful. Connecting to a Computer „„Connecting by Manual Setup from Control Panel 1 Configure the wireless LAN access point information (SSID, encryption method, and encryption key) manually, and connect to the wireless LAN. 1. Setup 1 Check and write down the SSID, the encryption method and the encryption key by referring to the user manual of the wireless LAN access point. Note ●● When the encryption method is WPA-EAP or WPA2EAP, configure from the printer's web page. Memo ●● The SSID is also called the network name, ESSID, or ESS-ID. ●● The encryption key is also called the network key, security key, password, or pre-shared key. 2 Confirm that the wireless LAN access point has been activated and is functioning normally. 3 Turn on the printer. 4 Press the scroll button several times to select [Wireless(Infrastructure) Setting], and then press the button. 5 Enter the administrator password, using the numeric (0-9) keys. The factory default password is "999999". Press button after each character you input. 6 Press the scroll button several times to select [Wireless Network Selection], and then press the button. 7 The printer starts searching for wireless LAN access points. Please wait. 8 A list of available wireless LAN access point SSIDs are displayed. Press or , select [Manual Setup] at the end of the list, and press the button. 9 Input the SSID recorded in step 1, and press the button. Note ●● It is case sensitive. Please enter it correctly. - 33 -
-
 1
1 -
2
-
3
-
4
-
5
-
6
-
7
-
8
-
9
-
10
-
11
-
12
-
13
-
14
-
15
-
16
-
17
-
18
-
19
-
20
-
21
-
22
-
23
-
24
-
25
-
26
-
27
-
 28
28 -
 29
29 -
 30
30 -
 31
31 -
 32
32 -
 33
33 -
 34
34 -
 35
35 -
 36
36 -
 37
37 -
 38
38 -
39
-
40
-
41
-
42
-
43
-
44
-
45
-
46
-
47
-
48
-
49
-
50
-
51
-
52
-
53
-
54
-
55
-
56
-
57
-
58
-
59
-
60
-
61
-
62
-
63
-
64
-
65
-
66
-
67
-
68
-
69
-
70
-
71
-
72
-
73
-
74
-
75
-
76
-
77
-
78
-
79
-
80
-
81
-
82
-
83
-
84
-
85
-
86
-
87
-
88
-
89
-
90
-
91
-
92
-
93
-
94
-
95
-
96
-
97
-
98
-
99
-
100
-
101
-
102
-
103
-
104
-
105
-
106
-
107
-
108
-
109
-
110
-
111
-
112
-
113
-
114
-
115
-
116
-
117
-
118
-
119
-
120
-
121
-
122
-
123
-
124
-
125
-
126
-
127
-
128
 |
 |
