Oki PRO8432WT Pro8432WT - User Guide - Page 90
Machine Issues, Menus, Media Type, Media Weight, Print Information, Admin Setup, Network, Setup
 |
View all Oki PRO8432WT manuals
Add to My Manuals
Save this manual to your list of manuals |
Page 90 highlights
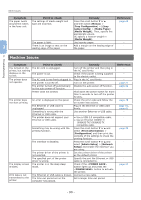
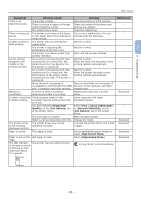
3. Troubleshooting Other Issues Symptom The paper twists around the rollers in the fuser unit. Point to check The settings of media weight and type are incorrect. The paper is light. 3 There is an image or text on the leading edge of the paper. Remedy Press the scroll button or and then select [Menus] > [Tray Configuration] > [(tray name) Config] > [Media Type]/ [Media Weight]. Then, specify the appropriate values. Or, specify a heavier weight in [Media Weight]. Use heavier paper. Add a margin on the leading edge of the paper. Reference page 45 - Machine Issues Symptom You turned on the printer, but nothing displays on the screen. The printer does not operate. The printer does not start printing. The display screen is blank. Print data is not transmitted to the printer. Point to check The AC cord is unplugged. The power is out. The AC cord is not firmly plugged in. The printer is turned off. The printer turned off automatically by the auto power off function. Printer does not answer. An error is displayed on the panel. The Ethernet or USB cable is unplugged. Something is wrong with the Ethernet or USB cable. The printer does not support your Ethernet or USB cable. Something may be wrong with the printing function. The interface is disabled. The printer driver of the printer is not selected. The specified port of the printer driver is wrong. The printer is in the deep sleep mode. The Ethernet or USB cable is broken. The time-out period set on the computer has passed. Remedy Turn off the printer and then plug in the AC cord firmly. Check if the power is being supplied to the electric outlet. Plug in the AC cord firmly. Turn on the printer. Disable the auto power off function. Hold down the power switch for more than 5 seconds to turn off the printer forcibly. Check the error code and follow the on-screen instructions. Plug in the Ethernet or USB cable firmly. Use another Ethernet or USB cable. ●● Use a USB 2.0 compatible cable. ●● Use an Ethernet 10BASE-T/ 100BASE-TX/1000BASE-TX compatible cable. Press the scroll button or and select [Print Information] > [Configuration] and then print the contents of the settings to check the printing function. Press the scroll button or and select [Admin Setup] > [Network Setup] and enable the interface you are using. Set the printer driver of the printer as the default printer. Specify the port the Ethernet or USB cable is connected to. Check if the button lights up and press the button to activate the printer. Connect a new cable. Set a longer time-out period. Reference - page 21 page 62 - page 78 page 31, page 41 - page 29 - page 22 - - 90 -
-
 1
1 -
2
-
3
-
4
-
5
-
6
-
7
-
8
-
9
-
10
-
11
-
12
-
13
-
14
-
15
-
16
-
17
-
18
-
19
-
20
-
21
-
22
-
23
-
24
-
25
-
26
-
27
-
28
-
29
-
30
-
31
-
32
-
33
-
34
-
35
-
36
-
37
-
38
-
39
-
40
-
41
-
42
-
43
-
44
-
45
-
46
-
47
-
48
-
49
-
50
-
51
-
52
-
53
-
54
-
55
-
56
-
57
-
58
-
59
-
60
-
61
-
62
-
63
-
64
-
65
-
66
-
67
-
68
-
69
-
70
-
71
-
72
-
73
-
74
-
75
-
76
-
77
-
78
-
79
-
80
-
81
-
82
-
83
-
84
-
 85
85 -
 86
86 -
 87
87 -
 88
88 -
 89
89 -
 90
90 -
 91
91 -
 92
92 -
 93
93 -
 94
94 -
 95
95 -
96
-
97
-
98
-
99
-
100
-
101
-
102
-
103
-
104
-
105
-
106
-
107
-
108
-
109
-
110
-
111
-
112
-
113
-
114
-
115
-
116
-
117
-
118
-
119
-
120
-
121
-
122
-
123
-
124
-
125
-
126
-
127
-
128
 |
 |
