Oki PRO8432WT Pro8432WT - User Guide - Page 52
Printing in Custom Sizes, Menus, ENTER, Paper Size, Custom
 |
View all Oki PRO8432WT manuals
Add to My Manuals
Save this manual to your list of manuals |
Page 52 highlights
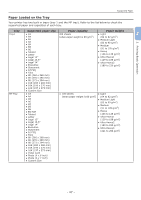
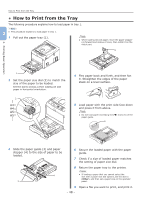
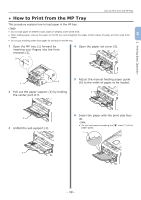
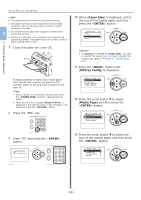
2. Printing Basic Operation Printing in Custom Sizes ●●Printing in Custom Sizes To load custom size paper, you need to register the width and length of the paper before printing. The range of the sizes you can set differs according to the paper tray. 2 Tray Available size range Tray1 Width: 105 to 297 mm (4.1 to 11.7 inches) Length: 148, 182 to 431 mm (5.8, 7.2 to 17.0 inches) MP tray Width: 64 to 297 mm (2.5 to 11.7 inches) Length: 90 to 431 mm (3.5 to 17.0 inches) 4 Press the scroll button several times to select [Tray Config] of the paper tray in which you loaded paper and then press the button. Note ●● [Custom] is displayed only when [Paper Size] is set to [Custom]. 1 Press the scroll button or on the operator panel. 5 Check that [Paper Size] is selected and press the button. 2 Press the scroll button several times to select [Menus] and press the button. 6 Press the scroll button several times to select [Custom] and then press the button. 3 Check that [Tray Configuration] is selected and press the button. 7 Press the button. - 52 -
-
 1
1 -
2
-
3
-
4
-
5
-
6
-
7
-
8
-
9
-
10
-
11
-
12
-
13
-
14
-
15
-
16
-
17
-
18
-
19
-
20
-
21
-
22
-
23
-
24
-
25
-
26
-
27
-
28
-
29
-
30
-
31
-
32
-
33
-
34
-
35
-
36
-
37
-
38
-
39
-
40
-
41
-
42
-
43
-
44
-
45
-
46
-
 47
47 -
 48
48 -
 49
49 -
 50
50 -
 51
51 -
 52
52 -
 53
53 -
 54
54 -
 55
55 -
 56
56 -
 57
57 -
58
-
59
-
60
-
61
-
62
-
63
-
64
-
65
-
66
-
67
-
68
-
69
-
70
-
71
-
72
-
73
-
74
-
75
-
76
-
77
-
78
-
79
-
80
-
81
-
82
-
83
-
84
-
85
-
86
-
87
-
88
-
89
-
90
-
91
-
92
-
93
-
94
-
95
-
96
-
97
-
98
-
99
-
100
-
101
-
102
-
103
-
104
-
105
-
106
-
107
-
108
-
109
-
110
-
111
-
112
-
113
-
114
-
115
-
116
-
117
-
118
-
119
-
120
-
121
-
122
-
123
-
124
-
125
-
126
-
127
-
128
 |
 |
