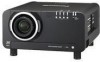
Panasonic D10000U Operating Instructions - Page 106
Using the, Remote 2 terminal
 |
UPC - 791871111413
View all Panasonic D10000U manuals
Add to My Manuals
Save this manual to your list of manuals |
Page 106 highlights
Using the Remote 2 terminal Using the REMOTE 2 terminal provided on the connection terminals of the main unit, it is possible to operate the projector from a control panel etc. furnished in a distant location where infrared remote control signal cannot be received. Example of a control panel layout Remote terminal External control Remote terminal/External control STANDBY ON LAMP RGB1 VIDEO Projector set up in a meeting room RGB2 S-VIDEO DVI-D Control panel located in a different room Pin assignments and control Be sure to short-circuit Pins # and - when controlling. D-Sub 9-pin (female) external appearance Names of terminals Open (H) Short (L) # GND GND $ POWER OFF ON % RGB1 Other RGB1 & RGB2 Other RGB2 ( VIDEO Other VIDEO ) S-VIDEO Other S-VIDEO * DVI-D Other DVI-D + SHUTTER OFF ON - RST / SET Controlled by Controlled by remote control external contact Note • When pin # and pin - are short-circuited, the following buttons on the projector's control panel and on the remote control cannot be used. POWER button, SHUTTER button In addition, the RS-232C commands and network functions that correspond to these functions cannot be used either. • When pin # and pin - are short-circuited and then any one of pins % to * is short-circuited to pin #, the following buttons on the projector's control panel and on the remote control cannot be used. POWER button, input selection buttons (RGB1, RGB2, DVI-D, AUX, VIDEO, S-VIDEO), SHUTTER button In addition, the RS-232C commands and network functions that correspond to these functions cannot be used either. 106 - ENGLISH
-
 1
1 -
2
-
3
-
4
-
5
-
6
-
7
-
8
-
9
-
10
-
11
-
12
-
13
-
14
-
15
-
16
-
17
-
18
-
19
-
20
-
21
-
22
-
23
-
24
-
25
-
26
-
27
-
28
-
29
-
30
-
31
-
32
-
33
-
34
-
35
-
36
-
37
-
38
-
39
-
40
-
41
-
42
-
43
-
44
-
45
-
46
-
47
-
48
-
49
-
50
-
51
-
52
-
53
-
54
-
55
-
56
-
57
-
58
-
59
-
60
-
61
-
62
-
63
-
64
-
65
-
66
-
67
-
68
-
69
-
70
-
71
-
72
-
73
-
74
-
75
-
76
-
77
-
78
-
79
-
80
-
81
-
82
-
83
-
84
-
85
-
86
-
87
-
88
-
89
-
90
-
91
-
92
-
93
-
94
-
95
-
96
-
97
-
98
-
99
-
100
-
 101
101 -
 102
102 -
 103
103 -
 104
104 -
 105
105 -
 106
106 -
 107
107 -
 108
108 -
 109
109 -
 110
110 -
 111
111 -
112
-
113
-
114
-
115
-
116
-
117
-
118
-
119
-
120
-
121
-
122
-
123
-
124
-
125
-
126
-
127
-
128
-
129
-
130
-
131
-
132
 |
 |
