Panasonic D10000U Operating Instructions - Page 75
Option2 settings
 |
UPC - 791871111413
View all Panasonic D10000U manuals
Add to My Manuals
Save this manual to your list of manuals |
Page 75 highlights
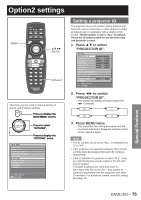
Option2 settings MENU ENTER DEFAULT This menu can be used to make a variety of picture and projector settings. MENU Press to display the MAIN MENU screen. Press to select "OPTION2". Press to display the "OPTION2" menu. MAIN MENU PICTURE POSITION ADVANCED MENU DISPLAY LANGUAGE OPTION1 OPTION2 TEST PATTERN SIGNAL LIST NETWORK SECURITY MENU SELECT ENTER SUB MENU Setting a projector ID The projector has an ID number setting function that helps the user to control two or more projectors either simultaneously or separately with a single remote control. The ID number is set to "ALL" by default. Hence the ID number need not be set when only one projector is used. 1. Press ▲▼ to select "PROJECTOR ID". OPTION2 PROJECTOR ID INSTALLATION ALTITUDE DIRECTION LAMP SELECT LAMP RELAY RS-232C SYSTEM INFORMATION AIR FILTER CLEANING DATE AND TIME STARTUP LOGO PASSWORD MENU SELECT CHANGE 2 FRONT-F LOW H QUAD OFF LOGO1 2. Press ◄► to switch "PROJECTOR ID". • The setting will change as follows each time ◄► is pressed. ALL 1 64 2 3. Press MENU twice. • This concludes the setting procedure and the on-screen indications disappear and the normal screen appears again. Note • The ID number can be set to "ALL", or selected from "1" to "64". • If the projectors are given ID numbers, their remote controls must be assigned the same ID numbers, respectively. • If the ID number of a projector is set to "ALL", it can be controlled by the remote control or the PC with any ID number. If multiple projectors are used and some of them have their IDs set to "ALL", they cannot be controlled separately from the projectors with other ID numbers. For details on remote control ID setting, see page 18. Special Features ENGLISH - 75
-
 1
1 -
2
-
3
-
4
-
5
-
6
-
7
-
8
-
9
-
10
-
11
-
12
-
13
-
14
-
15
-
16
-
17
-
18
-
19
-
20
-
21
-
22
-
23
-
24
-
25
-
26
-
27
-
28
-
29
-
30
-
31
-
32
-
33
-
34
-
35
-
36
-
37
-
38
-
39
-
40
-
41
-
42
-
43
-
44
-
45
-
46
-
47
-
48
-
49
-
50
-
51
-
52
-
53
-
54
-
55
-
56
-
57
-
58
-
59
-
60
-
61
-
62
-
63
-
64
-
65
-
66
-
67
-
68
-
69
-
 70
70 -
 71
71 -
 72
72 -
 73
73 -
 74
74 -
 75
75 -
 76
76 -
 77
77 -
 78
78 -
 79
79 -
 80
80 -
81
-
82
-
83
-
84
-
85
-
86
-
87
-
88
-
89
-
90
-
91
-
92
-
93
-
94
-
95
-
96
-
97
-
98
-
99
-
100
-
101
-
102
-
103
-
104
-
105
-
106
-
107
-
108
-
109
-
110
-
111
-
112
-
113
-
114
-
115
-
116
-
117
-
118
-
119
-
120
-
121
-
122
-
123
-
124
-
125
-
126
-
127
-
128
-
129
-
130
-
131
-
132
 |
 |
