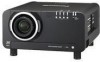
Panasonic D10000U Operating Instructions - Page 70
Auto signal, Automatic adjustment, Only RGB input
 |
UPC - 791871111413
View all Panasonic D10000U manuals
Add to My Manuals
Save this manual to your list of manuals |
Page 70 highlights
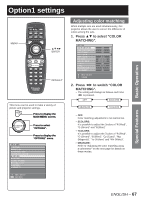
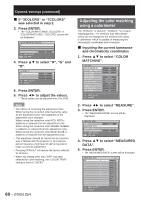
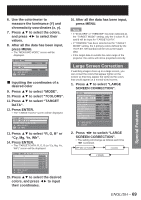
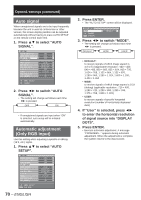
Option1 settings (continued) Auto signal When unregistered signals are to be input frequently because the unit is used at conferences or other venues, the screen display position can be adjusted automatically without having to press AUTO SETUP on the remote control each time. 1. Press ▲▼ to select "AUTO SIGNAL". OPTION1 COLOR MATCHING LARGE SCREEN CORRECTION AUTO SIGNAL AUTO SETUP BACK COLOR DVI EDID AUX DVI EDID P IN P FUNC1 OSD POSITION OSD MEMORY OFF OFF OFF BLUE EDID2(PC) EDID2(PC) OFF P IN P 2 ON MENU SELECT CHANGE 2. Press ◄► to switch "AUTO SIGNAL". • The setting will change as follows each time ◄► is pressed. OFF ON • If unregistered signals are input when "ON" is selected, auto setup will be initiated automatically. Automatic adjustment (Only RGB input) Use this setting when adjusting a specific or oblong (16:9, etc.) signal. 1. Press ▲▼ to select "AUTO SETUP". OPTION1 COLOR MATCHING LARGE SCREEN CORRECTION AUTO SIGNAL AUTO SETUP BACK COLOR DVI EDID AUX DVI EDID P IN P FUNC1 OSD POSITION OSD MEMORY OFF OFF OFF BLUE EDID2(PC) EDID2(PC) OFF P IN P 2 ON MENU SELECT ENTER SUB MENU 70 - ENGLISH 2. Press ENTER. • The "AUTO SETUP" screen will be displayed. AUTO SETUP MODE CHANGE ENTER EXECUTE DEFAULT 3. Press ◄► to switch "MODE". • The setting will change as follows each time ◄► is pressed. DEFAULT WIDE USER • DEFAULT: to receive signals of which image aspect is 4:3 or 5:4 (applicable resolution : 640 × 400, 640 × 480, 800 × 600, 832 × 624, 960 × 720, 1 024 × 768, 1 152 × 864, 1 152 × 870, 1 280 × 960, 1 280 × 1 024, 1 600 × 1 200, 1 400 × 1 050 • WIDE: to receive signals of which image aspect is 16:9 (oblong) (applicable resolution : 720 × 400, 1 280 × 720, 1 280 × 800, 1 280 × 768, 1 376 × 768, 1 600 × 1 024) • USER: to receive signals of specific horizontal resolution (number of horizontally displayed dots) 4. If "User" is selected, press ◄► to enter the horizontal resolution of signal source into "DISPLAY DOTS". 5. Press ENTER. • Execute automatic adjustment. A message "PROGRESS..." appears during automatic adjustment. When the adjustment is complete, the system returns to the input screen.
-
 1
1 -
2
-
3
-
4
-
5
-
6
-
7
-
8
-
9
-
10
-
11
-
12
-
13
-
14
-
15
-
16
-
17
-
18
-
19
-
20
-
21
-
22
-
23
-
24
-
25
-
26
-
27
-
28
-
29
-
30
-
31
-
32
-
33
-
34
-
35
-
36
-
37
-
38
-
39
-
40
-
41
-
42
-
43
-
44
-
45
-
46
-
47
-
48
-
49
-
50
-
51
-
52
-
53
-
54
-
55
-
56
-
57
-
58
-
59
-
60
-
61
-
62
-
63
-
64
-
 65
65 -
 66
66 -
 67
67 -
 68
68 -
 69
69 -
 70
70 -
 71
71 -
 72
72 -
 73
73 -
 74
74 -
 75
75 -
76
-
77
-
78
-
79
-
80
-
81
-
82
-
83
-
84
-
85
-
86
-
87
-
88
-
89
-
90
-
91
-
92
-
93
-
94
-
95
-
96
-
97
-
98
-
99
-
100
-
101
-
102
-
103
-
104
-
105
-
106
-
107
-
108
-
109
-
110
-
111
-
112
-
113
-
114
-
115
-
116
-
117
-
118
-
119
-
120
-
121
-
122
-
123
-
124
-
125
-
126
-
127
-
128
-
129
-
130
-
131
-
132
 |
 |
