Panasonic D10000U Operating Instructions - Page 52
Gamma setting, Sharpness setting
 |
UPC - 791871111413
View all Panasonic D10000U manuals
Add to My Manuals
Save this manual to your list of manuals |
Page 52 highlights
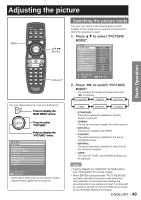
Adjusting the picture (continued) 8. Press ◄► to adjust the level. Item Operation Adjustment Adjustment range Deepens Press ► button. red. R Weakens Press ◄ button. red. Deepens Press ► button. green. G Weakens Press ◄ button. green. Maximum value HIGH : 255 LOW : 127 Minimum value HIGH : 0 LOW : -127 Deepens Press ► button. blue. B Weakens Press ◄ button. blue. Default HIGH : 255 LOW : 0 Note • All colors will not be displayed properly unless adequate adjustment is made. If the adjustment does not look suitable, you can press DEFAULT to return the setting for the selected item only to the factory default setting. • The color temperature cannot be adjusted for the internal test pattern (p. 83). Be sure to project the input signal when adjusting the color temperature. Gamma setting This switches the gamma mode. 1. Press ▲▼ to select "GAMMA". PICTURE PICTURE MODE CONTRAST BRIGHTNESS COLOR TINT COLOR TEMP. GAMMA SHARPNESS NOISE REDUCTION DYNAMIC IRIS SYSTEM SELECTOR NATURAL 0 0 10 1 DEFAULT DEFAULT 0 OFF OFF AUTO 1 MENU SELECT CHANGE 2. Press ◄► to switch "GAMMA". • The setting will change as follows each time ◄► is pressed. DEFAULT USER1 USER2 2.5 2.2 Note • Separate software is required to select "USER1" and "USER2". Consult your dealer. • "DEFAULT" cannot be selected when the picture mode has been set to "USER". Sharpness setting This adjusts the sharpness of the pictures. 1. Press ▲▼ to select "SHARPNESS". PICTURE PICTURE MODE CONTRAST BRIGHTNESS COLOR TINT COLOR TEMP. GAMMA SHARPNESS NOISE REDUCTION DYNAMIC IRIS SYSTEM SELECTOR NATURAL 0 0 10 1 DEFAULT DEFAULT 0 OFF OFF AUTO 1 MENU SELECT CHANGE 3. Press ◄► to adjust the level. Operation Adjustment Adjustment range Press ► button. Press ◄ button. Contours become sharper. 0 to 15 Contours become softer. Note • The possible setting range will vary depending on the input signal. 52 - ENGLISH
-
 1
1 -
2
-
3
-
4
-
5
-
6
-
7
-
8
-
9
-
10
-
11
-
12
-
13
-
14
-
15
-
16
-
17
-
18
-
19
-
20
-
21
-
22
-
23
-
24
-
25
-
26
-
27
-
28
-
29
-
30
-
31
-
32
-
33
-
34
-
35
-
36
-
37
-
38
-
39
-
40
-
41
-
42
-
43
-
44
-
45
-
46
-
 47
47 -
 48
48 -
 49
49 -
 50
50 -
 51
51 -
 52
52 -
 53
53 -
 54
54 -
 55
55 -
 56
56 -
 57
57 -
58
-
59
-
60
-
61
-
62
-
63
-
64
-
65
-
66
-
67
-
68
-
69
-
70
-
71
-
72
-
73
-
74
-
75
-
76
-
77
-
78
-
79
-
80
-
81
-
82
-
83
-
84
-
85
-
86
-
87
-
88
-
89
-
90
-
91
-
92
-
93
-
94
-
95
-
96
-
97
-
98
-
99
-
100
-
101
-
102
-
103
-
104
-
105
-
106
-
107
-
108
-
109
-
110
-
111
-
112
-
113
-
114
-
115
-
116
-
117
-
118
-
119
-
120
-
121
-
122
-
123
-
124
-
125
-
126
-
127
-
128
-
129
-
130
-
131
-
132
 |
 |
