Panasonic D10000U Operating Instructions - Page 68
Adjusting the color matching, using a colorimeter
 |
UPC - 791871111413
View all Panasonic D10000U manuals
Add to My Manuals
Save this manual to your list of manuals |
Page 68 highlights
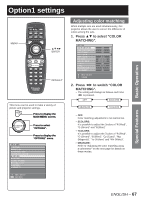
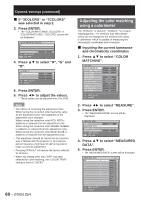
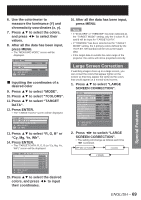
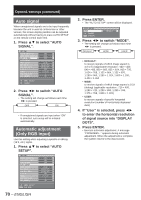
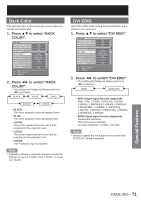
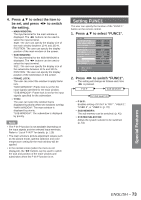
Option1 settings (continued) ■ If "3COLORS" or "7COLORS" was selected in step 2. 3. Press ENTER. • The "COLOR MATCHING: 3COLORS" or "COLOR MATCHING: 7COLORS" screen will be displayed. COLOR MATCHING:3COLORS R G B AUTO TESTPATTERN ON MENU SELECT ENTER SUB MENU 4. Press ▲▼ to select "R", "G" and "B". 3COLORS:R R G B MENU SELECT ADJUST 2048 0 0 5. Press ENTER. 6. Press ◄► to adjust the values. • These values can be adjusted from 0 to 2048. Note • The effects of correcting the adjustment color: When tuning the correction color that is the same as the adjustment color: the brightness of the adjustment color changes. When tuning the correction color RED: RED is added to or reduced from the adjustment color. When tuning the correction color GREEN: GREEN is added to or reduced from the adjustment color. When tuning the correction color BLUE: BLUE is added to or reduced from the adjustment color. • This adjustment should be carried out by a person who is familiar with the projector or by a service person because a high level of skill is required to make successful adjustment. • Pressing DEFAULT will restore the factory defaults for all items. • When any setting other than "OFF" has been selected for color matching, the "COLOR TEMP." setting is fixed at "USER1". 68 - ENGLISH Adjusting the color matching using a colorimeter The "R (Red)", "G (Green)", "B (Blue)", "Cy (Cyan)", "Mg (Magenta)", "Ye (Yellow)" and "Wh (White)" colors can be changed to the desired hues using a colorimeter which is capable of measuring the chromaticity coordinates and luminance. ■ Inputting the current luminance and chromaticity coordinates 1. Press ▲▼ to select "COLOR MATCHING". OPTION1 COLOR MATCHING LARGE SCREEN CORRECTION AUTO SIGNAL AUTO SETUP BACK COLOR DVI EDID AUX DVI EDID P IN P FUNC1 OSD POSITION OSD MEMORY OFF OFF OFF BLUE EDID2(PC) EDID2(PC) OFF P IN P 2 ON MENU SELECT CHANGE 2. Press ◄► to select "MEASURE". 3. Press ENTER. • The "MEASURE MODE" screen will be displayed. MEASURE MODE MODE MEASURED DATA TARGET DATA AUTO TESTPATTERN MENU SELECT ENTER SUB MENU 709MODE ON 4. Press ▲▼ to select "MEASURED DATA". 5. Press ENTER. • The "MEASURED DATA" screen will be displayed. MEASURED DATA Bk Y x y R Y x y G Y x y B Y x y MENU SELECT ADJUST 1/2 2 0.350 0.360 300 0.670 0.330 2500 0.350 .0630 200 0.150 0.050
-
 1
1 -
2
-
3
-
4
-
5
-
6
-
7
-
8
-
9
-
10
-
11
-
12
-
13
-
14
-
15
-
16
-
17
-
18
-
19
-
20
-
21
-
22
-
23
-
24
-
25
-
26
-
27
-
28
-
29
-
30
-
31
-
32
-
33
-
34
-
35
-
36
-
37
-
38
-
39
-
40
-
41
-
42
-
43
-
44
-
45
-
46
-
47
-
48
-
49
-
50
-
51
-
52
-
53
-
54
-
55
-
56
-
57
-
58
-
59
-
60
-
61
-
62
-
 63
63 -
 64
64 -
 65
65 -
 66
66 -
 67
67 -
 68
68 -
 69
69 -
 70
70 -
 71
71 -
 72
72 -
 73
73 -
74
-
75
-
76
-
77
-
78
-
79
-
80
-
81
-
82
-
83
-
84
-
85
-
86
-
87
-
88
-
89
-
90
-
91
-
92
-
93
-
94
-
95
-
96
-
97
-
98
-
99
-
100
-
101
-
102
-
103
-
104
-
105
-
106
-
107
-
108
-
109
-
110
-
111
-
112
-
113
-
114
-
115
-
116
-
117
-
118
-
119
-
120
-
121
-
122
-
123
-
124
-
125
-
126
-
127
-
128
-
129
-
130
-
131
-
132
 |
 |
