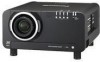
Panasonic D10000U Operating Instructions - Page 63
Press ENTER to select ON.
 |
UPC - 791871111413
View all Panasonic D10000U manuals
Add to My Manuals
Save this manual to your list of manuals |
Page 63 highlights
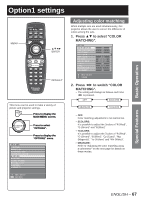
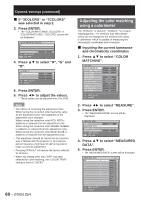
4. Press ▲▼ to specify the area to be adjusted. • To joint the top: set "UPPER" to "ON". • To joint the bottom: set "LOWER" to "ON". • To joint the left: set "LEFT" to "ON". • To joint the right: set "RIGHT" to "ON". 5. Press ENTER to toggle "ON" and "OFF". 6. Press ◄► to adjust the compensation width and start position. ■ To display the adjustment marker 7. Press ▲▼ to select "MARKER". EDGE BLENDING UPPER START 0 OFF WIDTH 128 LOWER START 0 OFF WIDTH 128 LEFT START 0 OFF WIDTH 128 RIGHT START 0 OFF WIDTH 128 MARKER OFF BRIGHT ADJUST MENU SELECT ENTER CHANGE 8. Press ENTER to select "ON". • A marker for adjusting the picture position appears. The optimal point is the position where the red line of one frame overlaps the green line of the other frame. The correction widths of the jointed frames must be the same value all the time. The optimal joint cannot be achieved if the jointed frames have different correction widths. The optimal point is where these lines overlap. Green line Red line 9. Press ▲▼ to select "BRIGHT ADJUST". EDGE BLENDING UPPER START 0 OFF WIDTH 128 LOWER START 0 OFF WIDTH 128 LEFT START 0 OFF WIDTH 128 RIGHT START 0 OFF WIDTH 128 MARKER OFF BRIGHT ADJUST MENU SELECT ENTER SUB MENU 10. Press ENTER. • The "BRIGHT ADJUST" screen will be displayed. BRIGHT ADJUST BRIGHT INSIDE BRIGHT OUTSIDE UPPER 0 LOWER 0 LEFT 0 RIGHT 0 MENU SELECT ADJUST 11. Press ▲▼ to select "BRIGHT INSIDE". 12. Press ENTER. • The "BRIGHT INSIDE" adjustment screen will be displayed. BRIGHT INSIDE INTERLOCKED Wh R G B MENU SELECT CHANGE ON 0 0 0 0 • When "INTERLOCKED" is set to "OFF", individual adjustment of "R", "G" and "B" will be possible. 13. Press ▲▼ to select an item, and press ◄► to adjust the setting. • Once adjustment is complete, press MENU to return to "BRIGHT ADJUST". 14. Press ▲▼ to select the part of "UPPER", "LOWER", "RIGHT", "LEFT". ENGLISH - 63 Basic Operation
-
 1
1 -
2
-
3
-
4
-
5
-
6
-
7
-
8
-
9
-
10
-
11
-
12
-
13
-
14
-
15
-
16
-
17
-
18
-
19
-
20
-
21
-
22
-
23
-
24
-
25
-
26
-
27
-
28
-
29
-
30
-
31
-
32
-
33
-
34
-
35
-
36
-
37
-
38
-
39
-
40
-
41
-
42
-
43
-
44
-
45
-
46
-
47
-
48
-
49
-
50
-
51
-
52
-
53
-
54
-
55
-
56
-
57
-
 58
58 -
 59
59 -
 60
60 -
 61
61 -
 62
62 -
 63
63 -
 64
64 -
 65
65 -
 66
66 -
 67
67 -
 68
68 -
69
-
70
-
71
-
72
-
73
-
74
-
75
-
76
-
77
-
78
-
79
-
80
-
81
-
82
-
83
-
84
-
85
-
86
-
87
-
88
-
89
-
90
-
91
-
92
-
93
-
94
-
95
-
96
-
97
-
98
-
99
-
100
-
101
-
102
-
103
-
104
-
105
-
106
-
107
-
108
-
109
-
110
-
111
-
112
-
113
-
114
-
115
-
116
-
117
-
118
-
119
-
120
-
121
-
122
-
123
-
124
-
125
-
126
-
127
-
128
-
129
-
130
-
131
-
132
 |
 |
