Panasonic D10000U Operating Instructions - Page 18
Setting projector ID, number to remote control, Using a, wired remote, control
 |
UPC - 791871111413
View all Panasonic D10000U manuals
Add to My Manuals
Save this manual to your list of manuals |
Page 18 highlights
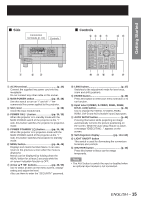
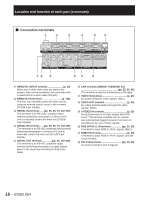
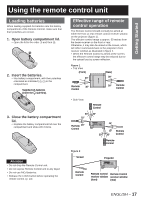
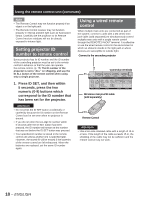
Using the remote control unit (continued) Note • The Remote Control may not function properly if an object is in the light path. • The Remote Control receiver may not function properly in intense ambient light such as fluorescent lamps. Carefully site the projector so its Remote Control receiver windows will not be directly exposed to intense light. Setting projector ID number to remote control Every projector has its ID number and the ID number of the controlling projector must be set to the remote control in advance so that the user can operate the remote control. (p. 75) The ID number of the projector is set to "ALL" on shipping, and use the ID ALL button of the remote control when using only a single projector. 1. Press ID SET, and then within 5 seconds, press the two numeric (0-9) buttons which correspond to the ID number that has been set for the projector. Attention • Do not press the ID SET button accidentally or carelessly because the ID number on the Remote Control can be set even when no projector is around. • If you do not enter the two-digit ID number within 5 seconds after the ID SET button has been pressed, the ID number will remain at the number that was set before the ID SET button was pressed. • Your specified ID number is stored in the remote control unit unless another one is specified later. However, the stored ID will be erased if the batteries of the remote control are left exhausted. When the batteries are replaced, set the same ID number again. Using a wired remote control When multiple main units are connected as part of the system, connect to units with a M3 stereo mini jack cable (sold separately) to simultaneously control multiple main units with a single remote control through the REMOTE1 IN/OUT terminal. It is effective to use the wired remote control in the environment in which an obstacle stands in the light path or where devices are susceptible to outside light. Connect to the secondary projector Connection terminals M3 stereo mini pin-PIN cable (sold separately) Remote Control Attention • Use a two-wire shielded cable with a length of 15 m or less. If the length of the cable exceeds 15 m, the shielding of the cable may not be sufficient and the remote control may not work. 18 - ENGLISH
-
 1
1 -
2
-
3
-
4
-
5
-
6
-
7
-
8
-
9
-
10
-
11
-
12
-
 13
13 -
 14
14 -
 15
15 -
 16
16 -
 17
17 -
 18
18 -
 19
19 -
 20
20 -
 21
21 -
 22
22 -
 23
23 -
24
-
25
-
26
-
27
-
28
-
29
-
30
-
31
-
32
-
33
-
34
-
35
-
36
-
37
-
38
-
39
-
40
-
41
-
42
-
43
-
44
-
45
-
46
-
47
-
48
-
49
-
50
-
51
-
52
-
53
-
54
-
55
-
56
-
57
-
58
-
59
-
60
-
61
-
62
-
63
-
64
-
65
-
66
-
67
-
68
-
69
-
70
-
71
-
72
-
73
-
74
-
75
-
76
-
77
-
78
-
79
-
80
-
81
-
82
-
83
-
84
-
85
-
86
-
87
-
88
-
89
-
90
-
91
-
92
-
93
-
94
-
95
-
96
-
97
-
98
-
99
-
100
-
101
-
102
-
103
-
104
-
105
-
106
-
107
-
108
-
109
-
110
-
111
-
112
-
113
-
114
-
115
-
116
-
117
-
118
-
119
-
120
-
121
-
122
-
123
-
124
-
125
-
126
-
127
-
128
-
129
-
130
-
131
-
132
 |
 |
