Panasonic D10000U Operating Instructions - Page 79
Special Features, Lamp relay, RS-232C setting
 |
UPC - 791871111413
View all Panasonic D10000U manuals
Add to My Manuals
Save this manual to your list of manuals |
Page 79 highlights
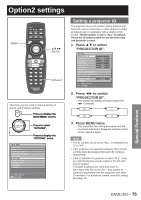
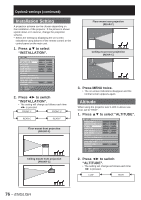
Lamp relay If using the projector for a continuous period of 24 hours or more, this setting can be used to automatically switch the lamps that are turned on in order to reduce the lamp deterioration that can occur as a result of continuous use. 1. Press ▲▼ to select "LAMP RELAY". OPTION2 PROJECTOR ID INSTALLATION ALTITUDE DIRECTION LAMP SELECT LAMP RELAY RS-232C SYSTEM INFORMATION AIR FILTER CLEANING DATE AND TIME STARTUP LOGO PASSWORD MENU SELECT CHANGE 2 FRONT-F LOW H QUAD OFF LOGO1 2. Press ◄► to switch "LAMP RELAY". • The time interval for lamps to be switched will change as shown in the diagram below each time ◄► is pressed. OFF 00:00 23:00 01:00 Note • When "SINGLE", "DUAL" or "TRIPLE" is selected as the "LAMP SELECT" setting, the lamps will switch in accordance with the setting time. If "QUAD" is selected, three lamps will illuminate for 8 hours after the specified time. • The setting time will be the local time. (p. 81) RS-232C setting This sets communication parameters for the projector. 1. Press ▲▼ to select "RS-232C". OPTION2 PROJECTOR ID INSTALLATION ALTITUDE DIRECTION LAMP SELECT LAMP RELAY RS-232C SYSTEM INFORMATION AIR FILTER CLEANING DATE AND TIME STARTUP LOGO PASSWORD MENU SELECT ENTER SUB MENU 2 FRONT-F LOW H QUAD OFF LOGO1 2. Press ENTER. • The "RS-232C" screen will be displayed. RS-232C SERIAL IN (IN) BAUDRATE (IN) PARITY (OUT) BAUDRATE (OUT) PARITY VPS SYSTEM GROUP MENU SELECT CHANGE RS-232C 38400 EVEN 38400 EVEN MASTER A MASTER 3. Press ▲▼ to select "SERIAL IN". 4. Press ◄► to switch "SERIAL IN". • The setting will change as follows each time ◄► is pressed. RS-232C RS-422 5. Press ▲▼ to select communication conditions. 6. Press ◄► to confirm the setting. 7. Press MENU three times. • The on-screen indications disappear, and the system returns to the normal screen. Special Features ENGLISH - 79
-
 1
1 -
2
-
3
-
4
-
5
-
6
-
7
-
8
-
9
-
10
-
11
-
12
-
13
-
14
-
15
-
16
-
17
-
18
-
19
-
20
-
21
-
22
-
23
-
24
-
25
-
26
-
27
-
28
-
29
-
30
-
31
-
32
-
33
-
34
-
35
-
36
-
37
-
38
-
39
-
40
-
41
-
42
-
43
-
44
-
45
-
46
-
47
-
48
-
49
-
50
-
51
-
52
-
53
-
54
-
55
-
56
-
57
-
58
-
59
-
60
-
61
-
62
-
63
-
64
-
65
-
66
-
67
-
68
-
69
-
70
-
71
-
72
-
73
-
 74
74 -
 75
75 -
 76
76 -
 77
77 -
 78
78 -
 79
79 -
 80
80 -
 81
81 -
 82
82 -
 83
83 -
 84
84 -
85
-
86
-
87
-
88
-
89
-
90
-
91
-
92
-
93
-
94
-
95
-
96
-
97
-
98
-
99
-
100
-
101
-
102
-
103
-
104
-
105
-
106
-
107
-
108
-
109
-
110
-
111
-
112
-
113
-
114
-
115
-
116
-
117
-
118
-
119
-
120
-
121
-
122
-
123
-
124
-
125
-
126
-
127
-
128
-
129
-
130
-
131
-
132
 |
 |
