Pioneer AVH-4200NEX Owner s Manual - Page 3
Audio adjustments, Theme menu, Video settings, Favorite menu, Other functions, Connection, - update
 |
View all Pioneer AVH-4200NEX manuals
Add to My Manuals
Save this manual to your list of manuals |
Page 3 highlights
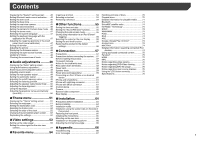
Contents Displaying the "System" setting screen...........45 Creating a shortcut 54 Handling and care of discs 70 Setting Bluetooth audio source activation.......45 Selecting a shortcut 54 Playable discs 70 Setting the ever scroll 45 Removing a shortcut 54 Detailed information for playable media..........71 Setting the beep tone 45 Setting the rear view camera 45 Setting the second camera 46 Setting the camera for Camera View mode.....46 Setting the demo mode 47 Selecting the system language 47 Setting the keyboard language with the application for iPhone 47 Adjusting the response positions of the touch panel (touch panel calibration 47 Setting the dimmer 47 Adjusting the picture 48 Displaying the firmware version 48 Displaying the open source licenses 48 Updating firmware 48 Checking the connections of leads 48 ■Audio adjustments...........49 Displaying the "Audio" setting screen 49 Using fader/balance adjustment 49 Switching sound muting/attenuation 49 Adjusting source levels 49 Setting the rear speaker output 49 Setting the subwoofer output 49 Adjusting the cutoff frequency value 49 Selecting the listening position 49 Adjusting the speaker output levels finely........50 Adjusting the time alignment 50 Using the equalizer 50 Adjusting the equalizer curve automatically (Auto EQ 50 ■Theme menu 51 Displaying the "Theme" setting screen............51 Selecting the wallpaper 51 Setting the illumination color 52 Selecting the theme color 52 Selecting the style of the clock 52 Changing the preinstalled splash screen........52 Replicating the settings 52 ■Video settings 53 ■Other functions 55 Setting the time and date 55 Setting the "Sound Retriever" function 55 Changing the wide screen mode 55 Storing song information to an iPod (iTunes® Tagging 55 Selecting the video for the rear display............55 Setting the anti-theft function 56 Restoring this product to the default settings 56 ■ Connection 57 Precautions 57 Precautions before connecting the system......57 Before installing this product 57 To prevent damage 57 Notice for the blue/white lead 58 Rear panel (main terminals 58 Power cord 58 Speaker leads 59 Power amp (sold separately 59 Connecting an iPod / iPhone or an Android device 60 iPhone and smartphone 61 iPhone with Lightning connector 61 iPhone with 30-pin connector 61 Android device 62 Camera 62 External video component 63 Rear display 64 ■ Installation 64 Precautions before installation 64 Before installing 64 Installation notes 64 Installation using the screw holes on the side of this product 65 Fastening the front panel 65 Installing the microphone 65 Mounting on the sun visor 65 Installation on the steering column 66 Bluetooth 74 SiriusXM® satellite radio 74 HD Radio™ Technology 74 SDHC 74 WMA/WMV 74 FLAC 74 DivX 74 AAC 74 Google, Google Play, Android 74 Android Auto 74 MIXTRAX 74 Detailed information regarding connected iPod devices 74 Using app-based connected content 75 Pandora 75 HDMI 75 MHL 76 Notice regarding video viewing 76 Notice regarding DVD-Video viewing 76 Notice regarding MP3 file usage 76 Notice regarding open source licenses...........76 Using the LCD screen correctly 76 Specifications 76 Setting up the video player 53 Adjusting the microphone angle 66 ■ Setting the video signal for the rear view camera 54 Appendix 66 ■Favorite menu 54 Troubleshooting 66 Error messages 67 3
-
 1
1 -
 2
2 -
 3
3 -
 4
4 -
 5
5 -
 6
6 -
 7
7 -
 8
8 -
 9
9 -
10
-
11
-
12
-
13
-
14
-
15
-
16
-
17
-
18
-
19
-
20
-
21
-
22
-
23
-
24
-
25
-
26
-
27
-
28
-
29
-
30
-
31
-
32
-
33
-
34
-
35
-
36
-
37
-
38
-
39
-
40
-
41
-
42
-
43
-
44
-
45
-
46
-
47
-
48
-
49
-
50
-
51
-
52
-
53
-
54
-
55
-
56
-
57
-
58
-
59
-
60
-
61
-
62
-
63
-
64
-
65
-
66
-
67
-
68
-
69
-
70
-
71
-
72
-
73
-
74
-
75
-
76
-
77
-
78
-
79
-
80
-
81
-
82
-
83
-
84
-
85
-
86
-
87
-
88
-
89
-
90
-
91
-
92
-
93
-
94
-
95
-
96
-
97
-
98
-
99
-
100
-
101
-
102
-
103
-
104
-
105
-
106
-
107
-
108
-
109
-
110
-
111
-
112
-
113
-
114
-
115
-
116
-
117
-
118
-
119
-
120
-
121
-
122
-
123
-
124
-
125
-
126
-
127
-
128
-
129
-
130
-
131
-
132
-
133
-
134
-
135
-
136
-
137
-
138
-
139
-
140
-
141
-
142
-
143
-
144
-
145
-
146
-
147
-
148
-
149
-
150
-
151
-
152
-
153
-
154
-
155
-
156
-
157
-
158
-
159
-
160
-
161
-
162
-
163
-
164
-
165
-
166
-
167
-
168
-
169
-
170
-
171
-
172
-
173
-
174
-
175
-
176
-
177
-
178
-
179
-
180
-
181
-
182
-
183
-
184
-
185
-
186
-
187
-
188
-
189
-
190
-
191
-
192
-
193
-
194
-
195
-
196
-
197
-
198
-
199
-
200
-
201
-
202
-
203
-
204
-
205
-
206
-
207
-
208
-
209
-
210
-
211
-
212
-
213
-
214
-
215
-
216
-
217
-
218
-
219
-
220
-
221
-
222
-
223
-
224
-
225
-
226
-
227
-
228
-
229
-
230
-
231
-
232
-
233
-
234
-
235
-
236
-
237
-
238
-
239
-
240
-
241
-
242
-
243
-
244
 |
 |