Pioneer AVH-4200NEX Owner s Manual - Page 56
Setting the anti-theft function, Restoring this product to the, default settings - forgot password
 |
View all Pioneer AVH-4200NEX manuals
Add to My Manuals
Save this manual to your list of manuals |
Page 56 highlights
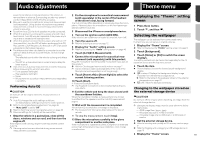
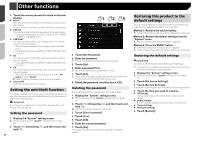
Other functions 3 Touch the source you want to show on the rear display. Mirror The video on the front screen of this product is output to the rear display. - Not all videos or sounds can be output to the rear display. DVD/CD The video and sound of a disc are output to the rear display. - Compatible video types are DVD-V, Video-CD, DivX, MPEG1, MPEG-2, and MPEG-4 only. USB/iPod1 The video and sound of the USB storage device or iPod are output to the rear display. - The port that supports the rear display will only be USB port 1. - Compatible file types are MPEG-4, H.264, WMV, MKV, and FLV only. SD The video and sound of the SD memory cards are output to the rear display. - Compatible file types are MPEG-4, H.264, WMV, MKV, and FLV only. AV The video and/or sound of the AV input source are output to the rear display. - The video image and sound are output only when "AV Input" is set to "Source". Refer to Starting procedure (for AV source) on page 41. Source OFF Nothing is output to the rear display. Setting the anti-theft function You can set a password for this product. If the back-up lead is cut after the password is set, this product prompts for the password at the time of next boot up. Important If you forgot your password, contact the nearest authorized Pioneer Service Station. Setting the password 1 Display the "System" setting screen. Refer to Displaying the "System" setting screen on page 45 2 Touch 1 , followed by 2 , and then touch and hold 3 . 56 123 3 Touch [Set Password]. 4 Enter the password. p 5 to 16 characters can be entered for a password. 5 Touch [Go]. 6 Enter a password hint. p Up to 40 characters can be entered for a hint. 7 Touch [Go]. p If you want to change the password currently set, enter the current password and then enter the new one. 8 Check the password, and then touch [OK]. Deleting the password The current password and password hint can be deleted. 1 Display the "System" setting screen. Refer to Displaying the "System" setting screen on page 45 2 Touch 1 , followed by 2 , and then touch and hold 3 . Refer to Setting the password on page 56. 3 Touch [Clear Password]. 4 Touch [Yes]. 5 Touch [OK]. 6 Enter the current password. 7 Touch [Go]. A message indicating that the security setting is canceled appears. Restoring this product to the default settings You can restore settings or recorded content to the default settings. Various methods are used to clear user data. Method 1: Remove the vehicle battery p Some of the settings and recorded contents will not be reset. Method 2: Restore the default settings from the "System" menu Refer to Restoring the default settings on page 56. Method 3: Press the RESET button Refer to Resetting the microprocessor on page 6 p Some of the settings and recorded contents will not be reset. Restoring the default settings CAUTION Do not turn off the engine while restoring the settings. p This setting is available only when you stop your vehicle in a safe place and apply the parking brake. 1 Display the "System" setting screen. Refer to Displaying the "System" setting screen on page 45 2 Touch [AV Source Settings]. 3 Touch [Restore Settings]. A message confirming whether to initialize the settings appears. 4 Touch the item you want to initialize. All Settings Almost all settings or recorded content returns to the default. Audio Settings p This setting is available when the source is turned off. Theme Settings Bluetooth Settings 5 Touch [Restore].
-
 1
1 -
2
-
3
-
4
-
5
-
6
-
7
-
8
-
9
-
10
-
11
-
12
-
13
-
14
-
15
-
16
-
17
-
18
-
19
-
20
-
21
-
22
-
23
-
24
-
25
-
26
-
27
-
28
-
29
-
30
-
31
-
32
-
33
-
34
-
35
-
36
-
37
-
38
-
39
-
40
-
41
-
42
-
43
-
44
-
45
-
46
-
47
-
48
-
49
-
50
-
 51
51 -
 52
52 -
 53
53 -
 54
54 -
 55
55 -
 56
56 -
 57
57 -
 58
58 -
 59
59 -
 60
60 -
 61
61 -
62
-
63
-
64
-
65
-
66
-
67
-
68
-
69
-
70
-
71
-
72
-
73
-
74
-
75
-
76
-
77
-
78
-
79
-
80
-
81
-
82
-
83
-
84
-
85
-
86
-
87
-
88
-
89
-
90
-
91
-
92
-
93
-
94
-
95
-
96
-
97
-
98
-
99
-
100
-
101
-
102
-
103
-
104
-
105
-
106
-
107
-
108
-
109
-
110
-
111
-
112
-
113
-
114
-
115
-
116
-
117
-
118
-
119
-
120
-
121
-
122
-
123
-
124
-
125
-
126
-
127
-
128
-
129
-
130
-
131
-
132
-
133
-
134
-
135
-
136
-
137
-
138
-
139
-
140
-
141
-
142
-
143
-
144
-
145
-
146
-
147
-
148
-
149
-
150
-
151
-
152
-
153
-
154
-
155
-
156
-
157
-
158
-
159
-
160
-
161
-
162
-
163
-
164
-
165
-
166
-
167
-
168
-
169
-
170
-
171
-
172
-
173
-
174
-
175
-
176
-
177
-
178
-
179
-
180
-
181
-
182
-
183
-
184
-
185
-
186
-
187
-
188
-
189
-
190
-
191
-
192
-
193
-
194
-
195
-
196
-
197
-
198
-
199
-
200
-
201
-
202
-
203
-
204
-
205
-
206
-
207
-
208
-
209
-
210
-
211
-
212
-
213
-
214
-
215
-
216
-
217
-
218
-
219
-
220
-
221
-
222
-
223
-
224
-
225
-
226
-
227
-
228
-
229
-
230
-
231
-
232
-
233
-
234
-
235
-
236
-
237
-
238
-
239
-
240
-
241
-
242
-
243
-
244
 |
 |