Pioneer AVH-4200NEX Owner s Manual - Page 8
Basic operation - reset
 |
View all Pioneer AVH-4200NEX manuals
Add to My Manuals
Save this manual to your list of manuals |
Page 8 highlights
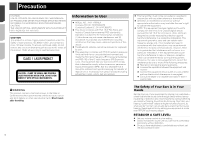
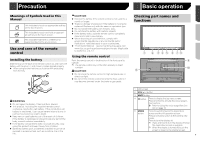
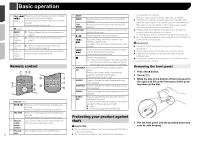
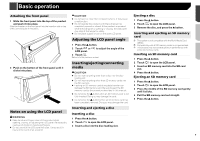
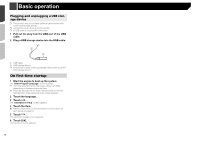
Basic operation 6 TRK ( /) button 7 button 8 RESET button 9 Discloading slot 10 SD card slot 11 Auto EQ microphone input jack Press to return to the previous track (chapter) or go to the next track (chapter). Press and hold to perform fast reverse or fast forward. Press to answer or end a call. Refer to Resetting the microprocessor on page 6 Refer to Inserting and ejecting a disc on page 9 Refer to Inserting and ejecting an SD memory card on page 9 Use to connect a microphone for acoustical measurement (sold separately). Remote control 1 23 b 8 6 7 4c 9 a 5 1 Volume (+/-) 2 REAR SRC Press to cycle through all the available rear sources. Press and hold to turn the rear source off. 3 SRC/OFF Press to cycle through all the available front sources. Press and hold to turn the front source off. 4 Source mode select switch Use to switch the source mode between the front source and the rear source. 5 Thumb Use to select a menu on the DVD menu. pad 8 6 MUTE 7 MENU TOP MENU 8 RETURN 9 Press to display the DVD menu during DVD playback. Press to return to the top menu during DVD playback. Press to return to the specified point and start playback from there. Press to pause or resume playback. or For audio: Press and hold to perform fast reverse or fast forward. For video: Press to perform fast reverse or fast forward. or Press to return to the previous track (chapter) or go to the next track (chapter). Press to answer or end a call. Press to stop playback. p If you resume playback, playback will start from the point where you stopped. Touch the key again to stop playback completely. 10 FOLDER/P. Press to select the next or previous title or CH folder. Press to recall radio station frequencies assigned to preset channel keys. Press to answer or end a call. 11 AUDIO Press to change the audio language during DVD playback. SUBTITLE Press to change the subtitle language during DVD playback. ANGLE Press to change the viewing angle during DVD playback. 12 BAND/ ESC Press to select the tuner band when tuner is selected as a source. Press to switch between media file types when playing the following types of data: Disc External storage device (USB, SD) being written to USB/SD. Doing so may cause the data to become corrupted. After the front panel has been detached, the attaching plate will move back to its original position automatically. Be careful not to let hands or other objects get caught behind the monitor as it is moving back. Please make sure that the front panel is in its original position while the vehicle is in motion. It is dangerous to drive with the front panel sticking out. Do not place beverages or other objects on top of the front panel while it is fully open. Important Handle the front panel with care when removing or attaching it. Avoid subjecting the front panel to excessive shock. Keep the front panel out of direct sunlight and high temperatures. If removed, replace the front panel on the product before starting up your vehicle. Removing the front panel 1 Press the button. 2 Touch . 3 Slide the dial at the bottom of the front panel to the right, and lift up the front panel while pushing down on the dial. Protecting your product against theft CAUTION Do not attempt to detach the front panel while DISC/SD is in the eject position. Do not attempt to detach the front panel while data is 4 Put the front panel into the provided protective case for safe keeping.
-
 1
1 -
2
-
 3
3 -
 4
4 -
 5
5 -
 6
6 -
 7
7 -
 8
8 -
 9
9 -
 10
10 -
 11
11 -
 12
12 -
 13
13 -
14
-
15
-
16
-
17
-
18
-
19
-
20
-
21
-
22
-
23
-
24
-
25
-
26
-
27
-
28
-
29
-
30
-
31
-
32
-
33
-
34
-
35
-
36
-
37
-
38
-
39
-
40
-
41
-
42
-
43
-
44
-
45
-
46
-
47
-
48
-
49
-
50
-
51
-
52
-
53
-
54
-
55
-
56
-
57
-
58
-
59
-
60
-
61
-
62
-
63
-
64
-
65
-
66
-
67
-
68
-
69
-
70
-
71
-
72
-
73
-
74
-
75
-
76
-
77
-
78
-
79
-
80
-
81
-
82
-
83
-
84
-
85
-
86
-
87
-
88
-
89
-
90
-
91
-
92
-
93
-
94
-
95
-
96
-
97
-
98
-
99
-
100
-
101
-
102
-
103
-
104
-
105
-
106
-
107
-
108
-
109
-
110
-
111
-
112
-
113
-
114
-
115
-
116
-
117
-
118
-
119
-
120
-
121
-
122
-
123
-
124
-
125
-
126
-
127
-
128
-
129
-
130
-
131
-
132
-
133
-
134
-
135
-
136
-
137
-
138
-
139
-
140
-
141
-
142
-
143
-
144
-
145
-
146
-
147
-
148
-
149
-
150
-
151
-
152
-
153
-
154
-
155
-
156
-
157
-
158
-
159
-
160
-
161
-
162
-
163
-
164
-
165
-
166
-
167
-
168
-
169
-
170
-
171
-
172
-
173
-
174
-
175
-
176
-
177
-
178
-
179
-
180
-
181
-
182
-
183
-
184
-
185
-
186
-
187
-
188
-
189
-
190
-
191
-
192
-
193
-
194
-
195
-
196
-
197
-
198
-
199
-
200
-
201
-
202
-
203
-
204
-
205
-
206
-
207
-
208
-
209
-
210
-
211
-
212
-
213
-
214
-
215
-
216
-
217
-
218
-
219
-
220
-
221
-
222
-
223
-
224
-
225
-
226
-
227
-
228
-
229
-
230
-
231
-
232
-
233
-
234
-
235
-
236
-
237
-
238
-
239
-
240
-
241
-
242
-
243
-
244
 |
 |