Pioneer AVH-4200NEX Owner s Manual - Page 46
System settings
 |
View all Pioneer AVH-4200NEX manuals
Add to My Manuals
Save this manual to your list of manuals |
Page 46 highlights
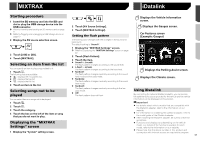
System settings 1 Display the "System" setting screen. Refer to Displaying the "System" setting screen on page 45 2 Touch [Camera settings]. 3 Touch [Reverse Gear Setting]. Battery: The polarity of the connected lead is positive. Ground: The polarity of the connected lead is negative. p If no camera connection is made and the camera polarity setting is wrong, a black screen is displayed as the rear view camera image immediately after startup. In such a case, press and hold the MUTE button to release the rear view camera screen and then change the camera polarity setting to "Battery". Setting the reversed image display for the rear view image You can set whether to reverse the rear view camera images to be displayed on the front screen. The default setting is "Off". p This setting is available only when you stop your vehicle in a safe place and apply the parking brake. p This function is available when "Back Camera Input" is set to "On". Refer to Setting rear view camera activation on page 45 1 Display the "System" setting screen. Refer to Displaying the "System" setting screen on page 45 2 Touch [Camera settings]. 3 Touch [Back Camera: Reverse Video] to switch "On" or "Off". Setting the parking assist guidelines Displaying the parking assist guidelines You can set whether to display the parking assist guidelines on the rear view camera images when backing up your vehicle. The default setting is "Off". 1 Display the "System" setting screen. Refer to Displaying the "System" setting screen on page 45 2 Touch [Camera settings]. 46 3 Touch [Parking Assist Guide] to switch "On" or "Off". Adjusting the parking assist guidelines CAUTION When adjusting the guidelines, be sure to park the vehicle in a safe place and apply the parking brake. Before getting out of the car to place the markings, be sure to turn the ignition switch off (ACC OFF). The range projected by the rear view camera is limited. Also, the vehicle width and distance guidelines displayed on the rear view camera image may differ from the actual vehicle width and distance. (The guidelines are straight lines.) The image quality may deteriorate depending on the usage environment, such as at night or in dark surroundings. 1 Park your vehicle in a safe place and apply the parking brake. 2 Using packing tape or similar, place markings as follows. 2 m (6 ft. 7 in.) Markings 50 cm (1 ft. 8 in.) 25 cm (9-7/8 in.) Markings 25 cm (9-7/8 in.) Rear bumper 3 Display the "System" setting screen. Refer to Displaying the "System" setting screen on page 45 4 Touch [Camera settings]. 5 Touch [Parking Assist Guide Adjust]. 6 Set the guidelines by dragging the four points. Adjust the guidelines so that the guidelines can be overlaid to the markings p Touch / / / / / to adjust the guidelines if necessary. Touch [Default] to reset the settings. Setting the second camera You can view images of the second camera (a front camera etc.) on the screen of this product. Setting the second camera activation The default setting is "Off". p This function is synchronized with "AV Input" setting. 1 Display the "System" setting screen. Refer to Displaying the "System" setting screen on page 45 2 Touch [Camera settings]. 3 Touch [2nd Camera Input] to switch "On" or "Off". Setting the reversed image The default setting is "Off". p This setting is available only when you stop your vehicle in a safe place and apply the parking brake. p This function is available when "AV Input" is set to "Camera" or "2nd Camera Input" is set to "On". 1 Display the "System" setting screen. Refer to Displaying the "System" setting screen on page 45 2 Touch [Camera settings]. 3 Touch [2nd Camera: Reverse video] to switch "On" or "Off". Setting the camera for Camera View mode To display Camera View at all times, "Camera View" needs to be set to "On". (The same mode is turned on when is touched on the camera view screen. The setting value is synchronized.) The default setting is "Off". p To set the rear view camera as the camera for Camera View mode, set "Back Camera Input" to "On". Refer to Setting rear view camera activation on page 45 p When using the second camera, set "AV Input" to "Camera" or "2nd Camera Input" to "On" (both settings are synchronized).
-
 1
1 -
2
-
3
-
4
-
5
-
6
-
7
-
8
-
9
-
10
-
11
-
12
-
13
-
14
-
15
-
16
-
17
-
18
-
19
-
20
-
21
-
22
-
23
-
24
-
25
-
26
-
27
-
28
-
29
-
30
-
31
-
32
-
33
-
34
-
35
-
36
-
37
-
38
-
39
-
40
-
 41
41 -
 42
42 -
 43
43 -
 44
44 -
 45
45 -
 46
46 -
 47
47 -
 48
48 -
 49
49 -
 50
50 -
 51
51 -
52
-
53
-
54
-
55
-
56
-
57
-
58
-
59
-
60
-
61
-
62
-
63
-
64
-
65
-
66
-
67
-
68
-
69
-
70
-
71
-
72
-
73
-
74
-
75
-
76
-
77
-
78
-
79
-
80
-
81
-
82
-
83
-
84
-
85
-
86
-
87
-
88
-
89
-
90
-
91
-
92
-
93
-
94
-
95
-
96
-
97
-
98
-
99
-
100
-
101
-
102
-
103
-
104
-
105
-
106
-
107
-
108
-
109
-
110
-
111
-
112
-
113
-
114
-
115
-
116
-
117
-
118
-
119
-
120
-
121
-
122
-
123
-
124
-
125
-
126
-
127
-
128
-
129
-
130
-
131
-
132
-
133
-
134
-
135
-
136
-
137
-
138
-
139
-
140
-
141
-
142
-
143
-
144
-
145
-
146
-
147
-
148
-
149
-
150
-
151
-
152
-
153
-
154
-
155
-
156
-
157
-
158
-
159
-
160
-
161
-
162
-
163
-
164
-
165
-
166
-
167
-
168
-
169
-
170
-
171
-
172
-
173
-
174
-
175
-
176
-
177
-
178
-
179
-
180
-
181
-
182
-
183
-
184
-
185
-
186
-
187
-
188
-
189
-
190
-
191
-
192
-
193
-
194
-
195
-
196
-
197
-
198
-
199
-
200
-
201
-
202
-
203
-
204
-
205
-
206
-
207
-
208
-
209
-
210
-
211
-
212
-
213
-
214
-
215
-
216
-
217
-
218
-
219
-
220
-
221
-
222
-
223
-
224
-
225
-
226
-
227
-
228
-
229
-
230
-
231
-
232
-
233
-
234
-
235
-
236
-
237
-
238
-
239
-
240
-
241
-
242
-
243
-
244
 |
 |