Pioneer AVIC-X910BT Owner's Manual - Page 30
Plugging and unplugging a, USB storage device, Basic operation
 |
UPC - 000125629513
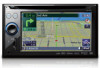
View all Pioneer AVIC-X910BT manuals
Add to My Manuals
Save this manual to your list of manuals |
Page 30 highlights
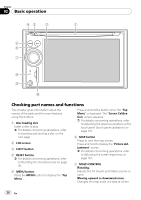
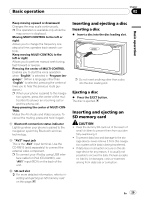
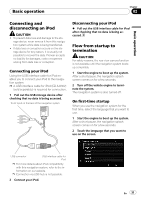
Chapter 02 Basic operation Inserting an SD memory card % Insert an SD memory card into the SD card slot. Insert it with the contact surface facing to the left and press the card until it clicks and completely locks. p This system is not compatible with Multi Media Card (MMC). p Compatibility with all SD memory cards is not guaranteed. p This unit may not achieve optimum performance with some SD memory cards. p Do not insert anything other than SD memory cards or dummy SD cards into the SD card slot. Plugging and unplugging a USB storage device CAUTION ! To prevent data loss and damage to the sto- rage device, never remove it from this navigation system while data is being transferred. ! If data loss or corruption occurs on the storage device for any reason, it is usually not possible to recover the data. Pioneer accepts no liability for damages, costs or expenses arising from data loss or corruption. ! Never remove the USB storage device immediately after plugging it. It may cause that the navigation system cannot recognize the external storage device (USB, SD). Plugging in a USB storage device % Plug a USB storage device into the USB connector. USB connector Ejecting an SD memory card 1 Press the SD memory card until it clicks. The SD memory card is ejected. 2 Pull out the SD memory card. p Insert the dummy SD card to keep the SD card slot free of dust when the SD memory card is not inserted. USB storage device p Compatibility with all USB storage device is not guaranteed. This navigation system may not achieve optimum performance with some USB storage devices. p Connection via USB hub is not possible. Unplugging a USB storage device % Pull out the USB storage device after checking that no data is being accessed. 30 En
-
 1
1 -
2
-
3
-
4
-
5
-
6
-
7
-
8
-
9
-
10
-
11
-
12
-
13
-
14
-
15
-
16
-
17
-
18
-
19
-
20
-
21
-
22
-
23
-
24
-
 25
25 -
 26
26 -
 27
27 -
 28
28 -
 29
29 -
 30
30 -
 31
31 -
 32
32 -
 33
33 -
 34
34 -
 35
35 -
36
-
37
-
38
-
39
-
40
-
41
-
42
-
43
-
44
-
45
-
46
-
47
-
48
-
49
-
50
-
51
-
52
-
53
-
54
-
55
-
56
-
57
-
58
-
59
-
60
-
61
-
62
-
63
-
64
-
65
-
66
-
67
-
68
-
69
-
70
-
71
-
72
-
73
-
74
-
75
-
76
-
77
-
78
-
79
-
80
-
81
-
82
-
83
-
84
-
85
-
86
-
87
-
88
-
89
-
90
-
91
-
92
-
93
-
94
-
95
-
96
-
97
-
98
-
99
-
100
-
101
-
102
-
103
-
104
-
105
-
106
-
107
-
108
-
109
-
110
-
111
-
112
-
113
-
114
-
115
-
116
-
117
-
118
-
119
-
120
-
121
-
122
-
123
-
124
-
125
-
126
-
127
-
128
-
129
-
130
-
131
-
132
-
133
-
134
-
135
-
136
-
137
-
138
-
139
-
140
-
141
-
142
-
143
-
144
-
145
-
146
-
147
-
148
-
149
-
150
-
151
-
152
-
153
-
154
-
155
-
156
-
157
-
158
-
159
-
160
-
161
-
162
-
163
-
164
-
165
-
166
-
167
-
168
-
169
-
170
-
171
-
172
-
173
-
174
-
175
-
176
-
177
-
178
-
179
-
180
-
181
-
182
-
183
-
184
-
185
-
186
-
187
-
188
-
189
-
190
-
191
-
192
-
193
-
194
-
195
-
196
-
197
-
198
-
199
-
200
-
201
-
202
-
203
-
204
-
205
-
206
-
207
-
208
-
209
-
210
-
211
-
212
-
213
-
214
 |
 |
