Pioneer AVIC-X910BT Owner's Manual - Page 31
Connecting and, disconnecting an iPod, Flow from startup to, termination, Basic operation
 |
UPC - 000125629513
View all Pioneer AVIC-X910BT manuals
Add to My Manuals
Save this manual to your list of manuals |
Page 31 highlights
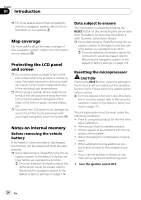
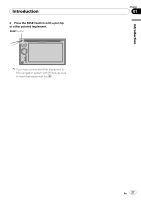
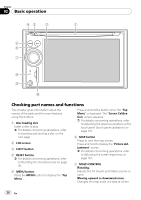
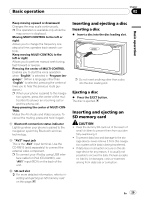
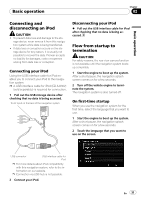
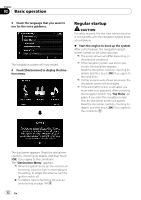
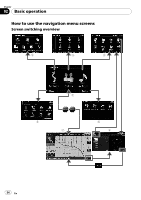
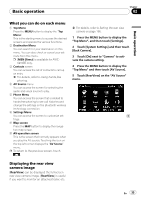
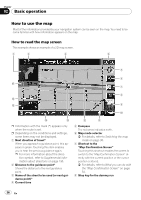
Basic operation Chapter 02 Basic operation Connecting and disconnecting an iPod CAUTION ! To prevent data loss and damage to the sto- rage device, never remove it from this navigation system while data is being transferred. ! If data loss or corruption occurs on the storage device for any reason, it is usually not possible to recover the data. Pioneer accepts no liability for damages, costs or expenses arising from data loss or corruption. Connecting your iPod Using the USB interface cable for iPod enables you to connect your iPod to the navigation system. p A USB interface cable for iPod (CD-IU230V) (sold separately) is required for connection. 1 Pull out the USB storage device after checking that no data is being accessed. To AV input on the back of the navigation system Disconnecting your iPod % Pull out the USB interface cable for iPod after checking that no data is being accessed. Flow from startup to termination CAUTION For safety reasons, the rear view camera function is not available until the navigation system boots up completely. 1 Start the engine to boot up the system. After a short pause, the navigation splash screen comes on for a few seconds. 2 Turn off the vehicle engine to terminate the system. The navigation system is also turned off. On first-time startup When you use the navigation system for the first time, select the language that you want to use. 1 Start the engine to boot up the system. After a short pause, the navigation splash screen comes on for a few seconds. 2 Touch the language that you want to use on the screen. USB connector USB interface cable for iPod p For more details about iPod compatibility with this navigation system, refer to the information on our website. p Connection via USB hub is not possible. 2 Connect your iPod. En 31
-
 1
1 -
2
-
3
-
4
-
5
-
6
-
7
-
8
-
9
-
10
-
11
-
12
-
13
-
14
-
15
-
16
-
17
-
18
-
19
-
20
-
21
-
22
-
23
-
24
-
25
-
 26
26 -
 27
27 -
 28
28 -
 29
29 -
 30
30 -
 31
31 -
 32
32 -
 33
33 -
 34
34 -
 35
35 -
 36
36 -
37
-
38
-
39
-
40
-
41
-
42
-
43
-
44
-
45
-
46
-
47
-
48
-
49
-
50
-
51
-
52
-
53
-
54
-
55
-
56
-
57
-
58
-
59
-
60
-
61
-
62
-
63
-
64
-
65
-
66
-
67
-
68
-
69
-
70
-
71
-
72
-
73
-
74
-
75
-
76
-
77
-
78
-
79
-
80
-
81
-
82
-
83
-
84
-
85
-
86
-
87
-
88
-
89
-
90
-
91
-
92
-
93
-
94
-
95
-
96
-
97
-
98
-
99
-
100
-
101
-
102
-
103
-
104
-
105
-
106
-
107
-
108
-
109
-
110
-
111
-
112
-
113
-
114
-
115
-
116
-
117
-
118
-
119
-
120
-
121
-
122
-
123
-
124
-
125
-
126
-
127
-
128
-
129
-
130
-
131
-
132
-
133
-
134
-
135
-
136
-
137
-
138
-
139
-
140
-
141
-
142
-
143
-
144
-
145
-
146
-
147
-
148
-
149
-
150
-
151
-
152
-
153
-
154
-
155
-
156
-
157
-
158
-
159
-
160
-
161
-
162
-
163
-
164
-
165
-
166
-
167
-
168
-
169
-
170
-
171
-
172
-
173
-
174
-
175
-
176
-
177
-
178
-
179
-
180
-
181
-
182
-
183
-
184
-
185
-
186
-
187
-
188
-
189
-
190
-
191
-
192
-
193
-
194
-
195
-
196
-
197
-
198
-
199
-
200
-
201
-
202
-
203
-
204
-
205
-
206
-
207
-
208
-
209
-
210
-
211
-
212
-
213
-
214
 |
 |