Thermador ME301YP Instructions for Use - Page 28
Preparing self clean, Starting self clean, Canceling self clean, Maintenance, Replacing an oven
 |
View all Thermador ME301YP manuals
Add to My Manuals
Save this manual to your list of manuals |
Page 28 highlights
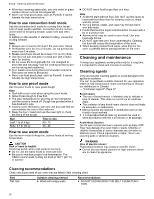
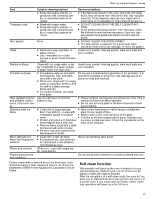
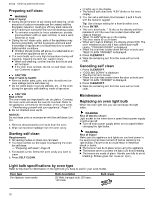
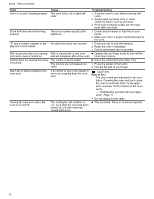
en-us Cleaning and maintenance Preparing self clean WARNING Risk of injury! ¡ During the elimination of soil during self-cleaning, small amounts of carbon monoxide can be created and the fiberglass insulation could give off very small amounts of formaldehyde during the first several cleaning cycles. ▶ To minimize exposure to these substances, provide good ventilation with an open window, or use a ventilation fan or hood. ¡ During the self clean cycle, parts of the appliance may become potentially harmful to persons who lack adult knowledge of appliances and adult reactions to potentially harmful conditions. ▶ Children should not be left alone or unattended in an area where appliances are in use. ¡ The oven heats up to very high temperature during self cleaning. Opening the door can result in injury. ▶ When self-cleaning, confirm that the door locks and will not open. ▶ If the door does not lock, do not run self clean. Contact Customer support. CAUTION Risk of harm to health! ¡ Remove broiler pans, pots, and other utensils and ex- cess spillage before self-cleaning. ¡ Do not leave food or cooking utensils, etc., in the oven during the pyrolytic self-cleaning mode of operation. CAUTION Risk of fire! The oven vents are important for air circulation. Covering the oven vents will cause the oven to overheat. Refer to the appliance overview for the location of the oven vents. → "Familiarizing yourself with your appliance", Page 11 ▶ Do not obstruct oven vents. NOTICE! Do not clean parts or accessories with the self clean function. 1. Remove all accessories and racks from the oven. 2. Wipe out excessive spillage from the oven cavity. Starting self clean Requirements ¡ All heating modes or timers are canceled. ¡ You have carried out the steps for preparing the oven for self clean. → "Preparing self clean", Page 28 1. For double ovens: Select the oven cavity you want to clean. 2. Press SELF CLEAN. a lights up on the display. a The default self clean time "4:00" blinks on the timer display. 3. You can set a self clean time between 2 and 4 hours with the numeric keypad. Tip: Use a longer setting for a heavily soiled oven. 4. Press ENTER. a The oven door locks. blinks on the display and then remains lit until the oven has cooled down after self clean is finished. a "SELF CLEAN" lights up on the display. a The timer starts to count down. a When self clean is finished, the display shows 0:00. The oven remains locked until it has cooled down sufficiently. "COOLING DOWN" is displayed. a When the oven has cooled down the door unlocks and "SELF CLEAN FINISHED" is displayed. 5. Press CLEAR/OFF. 6. Wipe the remaining ash from the oven with a moist cloth. Canceling self clean 1. Press CLEAR/OFF. a "COOLING DOWN" is displayed. a The door remains locked. a When the oven has cooled down the door unlocks and "SELF CLEAN FINISHED" is displayed. 2. Press CLEAR/OFF. 3. Wipe the remaining ash from the oven with a moist cloth. Maintenance Replacing an oven light bulb When the oven light fails you can exchange the light bulbs. WARNING Risk of electric shock! Light socket is live when door is open if main power supply is not turned off. ▶ Turn off main power supply at the service panel before changing the light bulbs. WARNING Risk of injury! Make sure the appliance and lights are cool and power to the appliance has been turned off before replacing the light bulb(s). Failure to do so could result in electrical shock or burns. ▶ The lenses must be in place when using the appliance. ▶ The lenses serve to protect the light bulb from breaking. ▶ The lenses are made of glass. Handle carefully to avoid breaking. Broken glass can cause an injury. Light bulb specifications by oven type Refer to this chart for information on the light bulb you have to use for your oven model. Oven type One light per oven cavity Bulb description 25 Watt, halogen bulb, G9 base, 120 Volts Bulb image 28
-
 1
1 -
2
-
3
-
4
-
5
-
6
-
7
-
8
-
9
-
10
-
11
-
12
-
13
-
14
-
15
-
16
-
17
-
18
-
19
-
20
-
21
-
22
-
 23
23 -
 24
24 -
 25
25 -
 26
26 -
 27
27 -
 28
28 -
 29
29 -
 30
30 -
 31
31 -
 32
32 -
 33
33 -
34
-
35
-
36
-
37
-
38
-
39
-
40
-
41
-
42
-
43
-
44
-
45
-
46
-
47
-
48
-
49
-
50
-
51
-
52
-
53
-
54
-
55
-
56
-
57
-
58
-
59
-
60
-
61
-
62
-
63
-
64
-
65
-
66
-
67
-
68
-
69
-
70
-
71
-
72
-
73
-
74
-
75
-
76
-
77
-
78
-
79
-
80
-
81
-
82
-
83
-
84
 |
 |
