Thermador PRG366WH Instructions for Use - Page 13
Checking the burner cap placement, Installing the burner grates, Registering your BSH product
 |
View all Thermador PRG366WH manuals
Add to My Manuals
Save this manual to your list of manuals |
Page 13 highlights
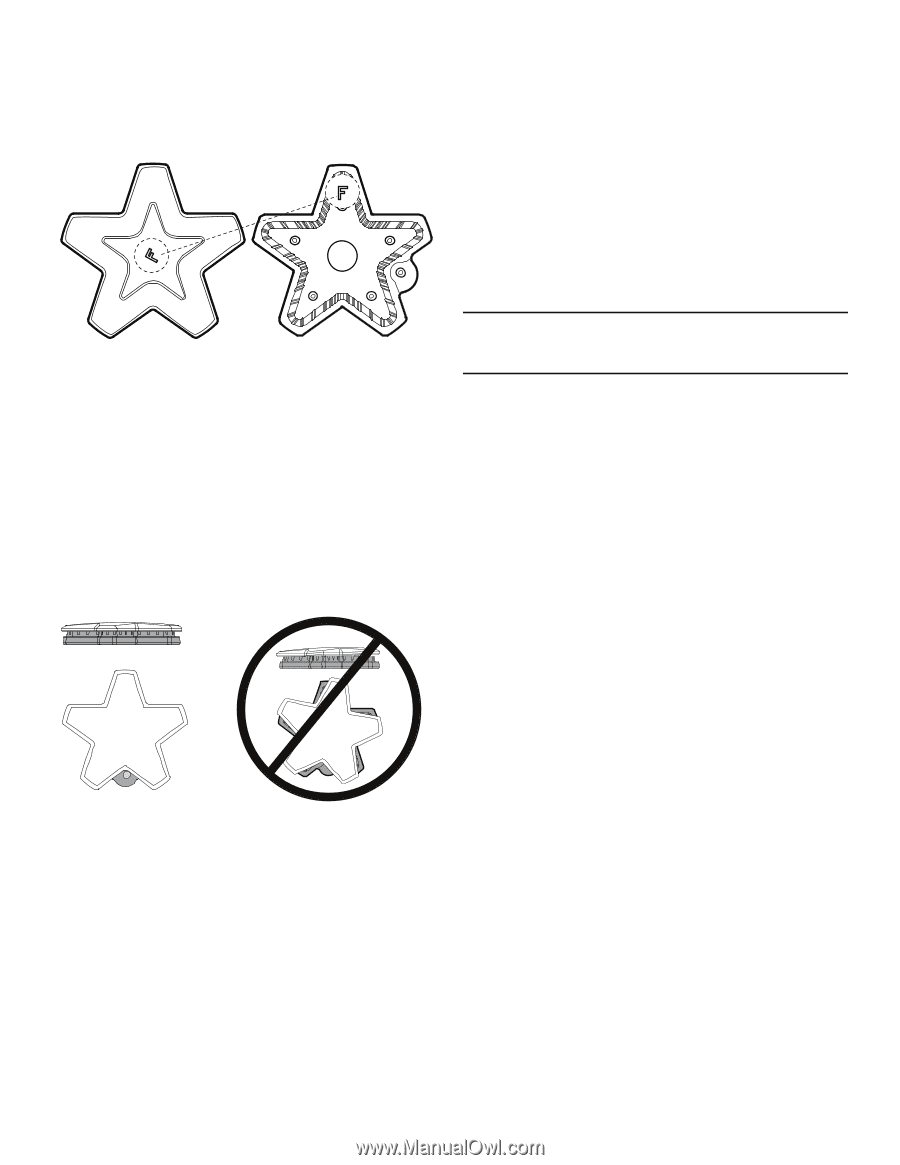
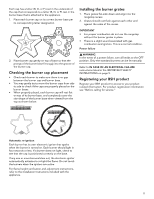
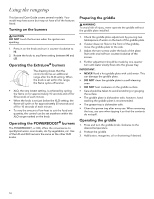
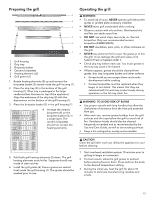
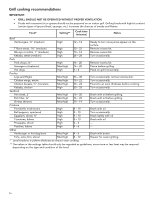
Each cap has a letter (B, D, or F) cast in the underside of the cap that corresponds to a letter (B, D, or F) cast in the burner base that is attached to the appliance. 1. Place each burner cap on its correct burner base per its corresponding letter designation. 2. Place burner cap gently on top of base so that the prongs of the burner base fit snugly into the groove of the burner cap. Checking the burner cap placement • Check each burner to make sure there is no gap between the burner cap and burner base. • You may gently try to move the burner caps from side to side to check if the caps are properly placed on the burner bases. • When properly placed, each burner cap will rest flat on top of its burner base, and completely cover the star-shape of the burner base when viewed from the top as shown below. Installing the burner grates 1. Place grates flat-side down and align into the rangetop recess. 2. Grates should rest flush against each other and against the sides of the recess. IMPORTANT • For proper combustion do not use the rangetop without the burner grates in place. • There is a slight sound associated with gas combustion and ignition. This is a normal condition. Power failure 9 WARNING In the event of a power failure, turn all knobs to the OFF position. Only the standard burners can be lit manually. Refer to IN CASE OF AN ELECTRICAL FAILURE instructions listed in the IMPORTANT SAFETY INSTRUCTIONS on page 5. Registering your BSH product Register your BSH product to access to your product related information. For product registration information see "Before calling for service." Automatic re-ignition Each burner has its own electronic igniter that sparks when the burner is turned on. Each burner should light in four seconds or less. If a burner does not light, check to see that the cap is positioned correctly on the base. If any one or more burners blow out, the electronic igniter automatically activates to re-light the flame. Do not touch the burners when the igniters are active. For flame height verification and adjustment instructions, refer to the Installation Instructions included with the appliance. 11
-
 1
1 -
2
-
3
-
4
-
5
-
6
-
7
-
 8
8 -
 9
9 -
 10
10 -
 11
11 -
 12
12 -
 13
13 -
 14
14 -
 15
15 -
 16
16 -
 17
17 -
 18
18 -
19
-
20
-
21
-
22
-
23
-
24
-
25
-
26
-
27
-
28
-
29
-
30
-
31
-
32
-
33
-
34
-
35
-
36
-
37
-
38
-
39
-
40
-
41
-
42
-
43
-
44
-
45
-
46
-
47
-
48
-
49
-
50
-
51
-
52
-
53
-
54
-
55
-
56
-
57
-
58
-
59
-
60
-
61
-
62
-
63
-
64
-
65
-
66
-
67
-
68
-
69
-
70
-
71
-
72
-
73
 |
 |