Thermador PRG366WH Instructions for Use - Page 21
Setting the oven offset, Setting the cooking mode and oven temperature, Setting the timers
 |
View all Thermador PRG366WH manuals
Add to My Manuals
Save this manual to your list of manuals |
Page 21 highlights
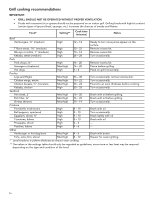
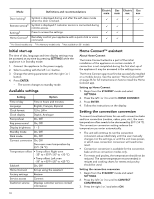
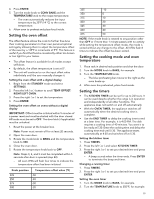
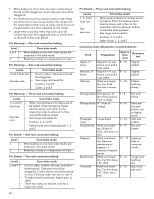
4. Press ENTER. 5. Turn the mode knob to CONV BAKE and the TEMPERATURE knob to the recipe temperature. - The oven automatically reduces the input temperature by 25°F (14 °C) to the correct temperature. 6. Allow oven to preheat and place food inside. Setting the oven offset The offset feature allows the cook to further fine-tune their cooking parameters to their own personal optimal settings by allowing them to adjust the temperature offset of the oven by +/-35°F in increments of 5°F. This feature is useful if you find that food is consistently either too brown or too light for your tastes. • The offset feature is available for all modes except self-clean. • By default, the offset temperature is set at 0°. • The unit will continue to run the input offset value indefinitely until the user manually changes it. Setting the oven offset with a digital display 1. Begin from the STANDBY mode and select SETTINGS. 2. Press the left ( or ) button to scroll TEMP OFFSET: RIGHT/LEFT OVEN. 3. Press the right ( or ) to set the temperature. 4. Press ENTER. Setting the oven offset on ovens without a digital display IMPORTANT: Offset must be initiated within 5 minutes of a power reset and must be started with the door closed. All knobs must be set to OFF. The door latch (if applicable) must be unlocked. 1. Reset the power at the breaker box. Note: Power must remain off for at least 20 seconds. 2. Open the oven door. 3. Rotate the mode knob to BROIL and the temperature knob to 350. 4. Close the oven door. 5. Rotate the temperature knob back to OFF. Note: Steps 3, 4, and 5 must be completed within 5 seconds after door is opened (step #2). - All oven LEDs will flash four times to indicate the temperature offset has been initiated. Knob position Temperature offset value (°F) 225 -50 250 -40 275 -30 300 -20 325 -10 350 0 375 10 400 20 425 30 450 40 475 50 NOTE: If the mode knob is rotated to any position other than OFF or if more than 1 minute passes with no activity while setting the temperature offset mode, the mode is exited without any change to the offset. All LEDs flash 8 times to indicate the offset has been exited. Setting the cooking mode and oven temperature 1. Place rack in desired rack position and shut the door. 2. Turn the MODE knob to BAKE, for example. 3. Turn the TEMPERATURE knob. - The blue preheating bar moves to the right as the oven heats up. 4. After oven has preheated, place food inside. Setting the timers • The KITCHEN TIMER can be set for up to 24 hours. It can be used despite whether the range is in operation and independently of all other functions. The appliance does not switch on and off automatically. • With the OVEN TIMER, the appliance switches off automatically when the desired cooking time is complete. • Use the END TIMER to delay the cooking time to end at a later time. For example, it is 4:00 PM. The dish requires a cooking time of 40 minutes. You want it to be ready at 5:30. Enter the cooking time and delay the cooking time end until 5:30. The appliance starts automatically at 4:50 and switches off at 5:30. Setting the kitchen timer 1. Press TIMERS. 2. Press the left ( or ) and select KITCHEN TIMER. 3. Press the right ( or ) to set your desired time and press ENTER. - A beep sounds when the timer ends. Press ENTER to terminate the beep and timer. Changing a running timer 1. Press TIMERS. 2. Press the right ( or ) to set your desired time and press ENTER. Setting the oven timer 1. Turn the MODE knob to BAKE, for example. 2. Turn the TEMPERATURE knob to 350°F, for example. 19
-
 1
1 -
2
-
3
-
4
-
5
-
6
-
7
-
8
-
9
-
10
-
11
-
12
-
13
-
14
-
15
-
 16
16 -
 17
17 -
 18
18 -
 19
19 -
 20
20 -
 21
21 -
 22
22 -
 23
23 -
 24
24 -
 25
25 -
 26
26 -
27
-
28
-
29
-
30
-
31
-
32
-
33
-
34
-
35
-
36
-
37
-
38
-
39
-
40
-
41
-
42
-
43
-
44
-
45
-
46
-
47
-
48
-
49
-
50
-
51
-
52
-
53
-
54
-
55
-
56
-
57
-
58
-
59
-
60
-
61
-
62
-
63
-
64
-
65
-
66
-
67
-
68
-
69
-
70
-
71
-
72
-
73
 |
 |