Thermador PRG366WH Instructions for Use - Page 30
Care and maintenance, Setting the oven to self-clean
 |
View all Thermador PRG366WH manuals
Add to My Manuals
Save this manual to your list of manuals |
Page 30 highlights
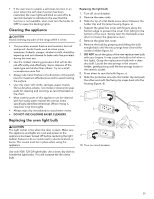
Care and maintenance This guide covers several models. Your model may not have all of the modes listed. For more cleaning recommendations and tips to get the most out of your appliance, refer to the website at www.thermador.com/us/support/customer-care/faqs/ gas-ranges. Setting the oven to self-clean 9 WARNING • During the self-clean cycle, exterior surfaces may become hotter than usual. Parts of the appliance may become potentially harmful to children, and to persons who lack adult knowledge of appliances and lack adult reactions to potentially harmful conditions. Keep these individuals away during self-clean and while the appliance is in use. Care is needed when using other functions. • The elimination of soil during self-cleaning may facilitate the emission of small amounts of chemicals or other substances that may be harmful upon sufficient exposure. To minimize exposure to these substances, provide good ventilation with an open window, or use a ventilation fan or hood. • For the self-cleaning cycle of your range, remove small animals and birds from the kitchen and surrounding areas. Open a nearby window for additional ventilation. During self-clean, fumes are released that may be harmful. BEFORE SETTING THE OVEN TO SELF-CLEAN DO NOT USE OVEN CLEANERS - No commercial oven cleaner or oven liner protective coating of any kind should be used in or around any part of the oven. • When the oven is set for self clean, the standard rangetop burners and the electric griddle and grill may be used. The burners having the ExtraLow® feature cannot be used. • Clean the oven front frame and outer door edges. • Wipe up large spillovers and grease. • Be sure the light bulbs and glass covers are in place. • Turn on the ventilation hood above the range and leave it on until the oven has completed the self-clean cycle. Setting self-clean on 30'' dual fuel Harmony series models 1. Remove all utensils, racks, and rack guides. Ensure the oven door is shut. 2. Turn the mode knob to SELF CLEAN. 3. Turn the temperature knob to CLEAN. - Self-clean duration is 2 hours. 28 Setting self-clean on dual fuel models with a display 1. Remove all utensils, racks, and rack guides. Ensure the oven door is shut. 2. Turn the mode knob to SELF CLEAN and the temperature knob to CLEAN. 3. Press the right ) to set the desired clean level and press ENTER. Soil level Low High Duration (excluding cool off) 1 ½ hours 3 hours 4. After the information text, press ENTER. NOTE: The door closing process takes approximately 20 seconds to complete, at which time the door becomes locked. Check to make certain the door is locked. Do not use self-clean if the oven doesn't lock. At the end of the clean cycle 9 CAUTION The interior of the oven will still be at baking temperatures when the automatic lock cycles to its open position and the oven door can be opened. The door latch will open automatically when the oven is below 500°F (260°C). 1. Turn the mode knob to OFF. 2. Turn the temperature knob to OFF. To set end time of self-clean 1. Remove all utensils, racks, and rack guides. Ensure the oven door is shut. 2. Turn the mode knob to SELF CLEAN. 3. Press the right ( or ) to set the desired clean level and press ENTER. 4. Press TIMERS, press the left ( or ), and select END TIMER. 5. Press the right ( or ) to set the END TIMER, and press ENTER. 6. After the information text, press ENTER. NOTES: • After self-clean completes its cycle, the self-clean function will be prevented from running again for a period of 24 hours.
-
 1
1 -
2
-
3
-
4
-
5
-
6
-
7
-
8
-
9
-
10
-
11
-
12
-
13
-
14
-
15
-
16
-
17
-
18
-
19
-
20
-
21
-
22
-
23
-
24
-
 25
25 -
 26
26 -
 27
27 -
 28
28 -
 29
29 -
 30
30 -
 31
31 -
 32
32 -
 33
33 -
 34
34 -
 35
35 -
36
-
37
-
38
-
39
-
40
-
41
-
42
-
43
-
44
-
45
-
46
-
47
-
48
-
49
-
50
-
51
-
52
-
53
-
54
-
55
-
56
-
57
-
58
-
59
-
60
-
61
-
62
-
63
-
64
-
65
-
66
-
67
-
68
-
69
-
70
-
71
-
72
-
73
 |
 |