Toshiba 50CT User Guide - Page 135
Disassembly Procedures, Flexible Cable Connector
 |
View all Toshiba 50CT manuals
Add to My Manuals
Save this manual to your list of manuals |
Page 135 highlights
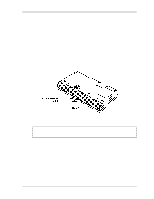
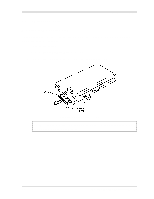
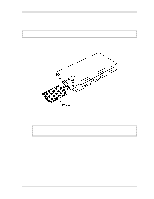
4.1 Overview 4 Replacement Procedures Disassembly Procedures There are three basic types of cable connectors. q Pressure plate connector q Normal pin connector q Flexible Cable Connector To disconnect a Pressure Plate connector, lift up the tabs on either side of the plastic pressure plate and slide the cable out of the connector. To connect the cable to a Pressure Plate connector, make sure the pressure plate is fully lifted and slide the cable into the connector. Secure the cable in place by pushing the sides of the pressure plate down so the plate is flush with the sides of the connector. Gently pull on the cable to make sure the cable is secure. If the connector comes out, connect it again making sure the pressure plate is fully lifted when you insert the cable. Standard pin and flexible cable connectors are used for all other cables. The cables can be connected to and disconnected from these connectors by simply pulling or pushing. Reassembly Procedures After you have disassembled the computer and fixed or repaired the problem that was causing the computer to operate abnormally, you will need to reassemble the computer. While assembling the computer, remember the following general points: q Take your time, making sure you follow the instructions closely. Most problems arise when you hurry to assemble the computer. q Be sure all cables and connectors are securely fastened. q Before securing the FRU or other parts, be sure that no cables will be pinched by screws or the FRU. q Check that all latches are closed securely in place. q Be sure the correct screws are used to secure all FRUs. Using the wrong screw can damage the threads on the screw or the head of the screw and may prevent proper seating of an FRU. After installing an FRU in the computer confirm that the FRU and the computer are functioning properly. 4-4 Libretto 50CT/70CT Maintenance Manual
-
 1
1 -
2
-
3
-
4
-
5
-
6
-
7
-
8
-
9
-
10
-
11
-
12
-
13
-
14
-
15
-
16
-
17
-
18
-
19
-
20
-
21
-
22
-
23
-
24
-
25
-
26
-
27
-
28
-
29
-
30
-
31
-
32
-
33
-
34
-
35
-
36
-
37
-
38
-
39
-
40
-
41
-
42
-
43
-
44
-
45
-
46
-
47
-
48
-
49
-
50
-
51
-
52
-
53
-
54
-
55
-
56
-
57
-
58
-
59
-
60
-
61
-
62
-
63
-
64
-
65
-
66
-
67
-
68
-
69
-
70
-
71
-
72
-
73
-
74
-
75
-
76
-
77
-
78
-
79
-
80
-
81
-
82
-
83
-
84
-
85
-
86
-
87
-
88
-
89
-
90
-
91
-
92
-
93
-
94
-
95
-
96
-
97
-
98
-
99
-
100
-
101
-
102
-
103
-
104
-
105
-
106
-
107
-
108
-
109
-
110
-
111
-
112
-
113
-
114
-
115
-
116
-
117
-
118
-
119
-
120
-
121
-
122
-
123
-
124
-
125
-
126
-
127
-
128
-
129
-
 130
130 -
 131
131 -
 132
132 -
 133
133 -
 134
134 -
 135
135 -
 136
136 -
 137
137 -
 138
138 -
 139
139 -
 140
140 -
141
-
142
-
143
-
144
-
145
-
146
-
147
-
148
-
149
-
150
-
151
-
152
-
153
-
154
-
155
-
156
-
157
-
158
-
159
-
160
-
161
-
162
-
163
-
164
-
165
-
166
-
167
-
168
-
169
-
170
-
171
-
172
-
173
-
174
-
175
-
176
-
177
-
178
-
179
-
180
-
181
-
182
-
183
-
184
-
185
-
186
-
187
-
188
-
189
-
190
-
191
-
192
-
193
-
194
-
195
-
196
 |
 |
