Toshiba Tecra Z40-A1401 User Manual - Page 70
Windows Logon via Fingerprint Authentication
 |
View all Toshiba Tecra Z40-A1401 manuals
Add to My Manuals
Save this manual to your list of manuals |
Page 70 highlights
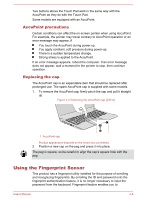
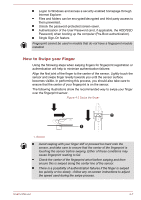
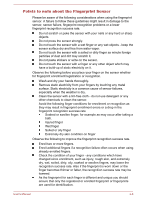
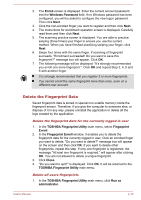
2. User Account Control window is displayed. Click Yes. 3. Swipe your enrolled finger. 4. Select Fingerprint Management option. 5. A list of fingerprint information for all users is shown in the screen. Click the enrolled fingerprint data you want to delete, and then click Delete Selected Items. 6. "Do you want to delete the selected fingerprints?" message box will appear on the screen. Click OK. 7. Click Close. 8. "Do you want to quit?" is displayed. Click OK. It will be returned to the TOSHIBA Fingerprint Utility main menu. Windows Logon via Fingerprint Authentication In place of the usual Windows logon by ID and password, fingerprint authentication also allows logon to Windows. This is useful especially when many users are using the PCs, as user selection can be skipped. Fingerprint Authentication Procedure 1. Start up the computer. 2. The Logon Authorization screen is displayed. Choose any of the enrolled fingers and swipe the fingerprint on the sensor. If authentication is successful, the user will be logged on to Windows. If the fingerprint authentication fails, please logon using the Windows logon password. A warning message will be displayed when authentication is abnormal or authentication is not successful within a fixed duration. Fingerprint Pre-Boot authentication and Single SignOn feature Overview about Fingerprint Pre-Boot authentication The fingerprint authentication system can be used to replace the keyboard based User Password authentication system when booting up. If you do not want to use the fingerprint authentication system for password authentication when booting up, but prefer to use the keyboard-based system instead, follow the on-screen instructions when the Fingerprint System Authentication screen is displayed. This will switch the password input screen across to the keyboard-based one. User's Manual 4-11
-
 1
1 -
2
-
3
-
4
-
5
-
6
-
7
-
8
-
9
-
10
-
11
-
12
-
13
-
14
-
15
-
16
-
17
-
18
-
19
-
20
-
21
-
22
-
23
-
24
-
25
-
26
-
27
-
28
-
29
-
30
-
31
-
32
-
33
-
34
-
35
-
36
-
37
-
38
-
39
-
40
-
41
-
42
-
43
-
44
-
45
-
46
-
47
-
48
-
49
-
50
-
51
-
52
-
53
-
54
-
55
-
56
-
57
-
58
-
59
-
60
-
61
-
62
-
63
-
64
-
 65
65 -
 66
66 -
 67
67 -
 68
68 -
 69
69 -
 70
70 -
 71
71 -
 72
72 -
 73
73 -
 74
74 -
 75
75 -
76
-
77
-
78
-
79
-
80
-
81
-
82
-
83
-
84
-
85
-
86
-
87
-
88
-
89
-
90
-
91
-
92
-
93
-
94
-
95
-
96
-
97
-
98
-
99
-
100
-
101
-
102
-
103
-
104
-
105
-
106
-
107
-
108
-
109
-
110
-
111
-
112
-
113
-
114
-
115
-
116
-
117
-
118
-
119
-
120
-
121
-
122
-
123
-
124
-
125
-
126
-
127
-
128
-
129
-
130
-
131
-
132
-
133
-
134
-
135
-
136
-
137
-
138
-
139
-
140
-
141
-
142
-
143
-
144
-
145
-
146
-
147
-
148
-
149
-
150
-
151
-
152
 |
 |
