Tripp Lite PDU3VSR6L2130 Owner's Manual for SNMPWEBCARD 9332CE - Page 13
Actions > Event Actions > General Actions
 |
View all Tripp Lite PDU3VSR6L2130 manuals
Add to My Manuals
Save this manual to your list of manuals |
Page 13 highlights
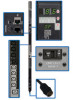
3. Web Console continued 3.6 Actions Menu continued 3.6.1.2 Actions > Event Actions > General Actions Email Actions An Email action is an action that will send emails to selected people in the address book when user-defined events are detected. It is possible to define multiple email actions so that different people are notified when different alarms are detected or different people are notified if the triggering event lasts longer than expected. By default, an email action is set up to notify all email contacts in the address book 30 seconds after an event trigger. The delay setting defines when the first email should be sent, while the count defines the number of emails to be sent. The interval is the delay between the sending of additional emails. If the count is set to 1, the interval time is ignored as only one email will be sent. To add an action, click the [+] button to activate a row and enter the appropriate data. To delete an action, click on the action that is to be deleted and then click the [-] button and confirm the deletion and then the [Save] button to commit the changes. SNMP Set OID Actions An SNMP Set OID action allows for the SNMPWEBCARD to set an SNMP value on another device on the network that will do something or set a value that the other network device will recognize and take some action based upon that SNMP value being set. An example of an application of this action is to have an SNMPWEBCARD in a UPS notify the network PDU that the UPS is power that the PDU is running on battery power. If utilizing a Tripp Lite PDU it is possible to execute the shed setting stored on the PDU to shed (turn off) equipment that is not necessary to extend the runtime of the UPS. The OID to set on Tripp Lite PDU for shedding is OID .1.3.6.1.4.1.850.100.1.8.3.3.0 - type integer and a value of 1 The OID to set on Tripp Lite PDU for ramping is Clear OID .1.3.6.1.4.1.850.100.1.8.3.2.0 -type integer value of 1 To add an action, click the [+] button to activate a row and enter the appropriate data. To delete an action, click on the action that is to be deleted and then click the [-] button and confirm the deletion and then the [Save] button to commit the changes. Figure 3-20: Email Actions 13 Figure 3-21: Set Actions
-
 1
1 -
2
-
3
-
4
-
5
-
6
-
7
-
 8
8 -
 9
9 -
 10
10 -
 11
11 -
 12
12 -
 13
13 -
 14
14 -
 15
15 -
 16
16 -
 17
17 -
 18
18 -
19
-
20
-
21
-
22
-
23
-
24
-
25
-
26
-
27
-
28
-
29
-
30
-
31
-
32
-
33
-
34
-
35
-
36
-
37
-
38
-
39
-
40
-
41
-
42
-
43
-
44
-
45
-
46
-
47
-
48
-
49
-
50
-
51
-
52
-
53
-
54
-
55
-
56
-
57
-
58
-
59
-
60
-
61
-
62
-
63
-
64
-
65
-
66
-
67
-
68
-
69
-
70
-
71
-
72
-
73
-
74
-
75
-
76
-
77
-
78
-
79
-
80
-
81
-
82
-
83
-
84
-
85
-
86
-
87
-
88
-
89
-
90
-
91
-
92
-
93
-
94
-
95
-
96
-
97
-
98
-
99
-
100
 |
 |
