Tripp Lite PDU3VSR6L2130 Owner's Manual for SNMPWEBCARD 9332CE - Page 7
Device Menu, 4 Status Menu
 |
View all Tripp Lite PDU3VSR6L2130 manuals
Add to My Manuals
Save this manual to your list of manuals |
Page 7 highlights
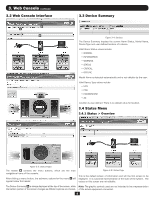
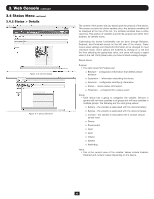
3. Web Console continued 3.4 Status Menu continued 3.4.3 Status > Alarms 3.5 Device Menu The device menu is used to enact different commands or configurations for individual devices. 3.5.1 Device > Controls Figure 3-8: Alarms This submenu provides a listing of all active and/or unacknowledged alarms. By default, only active alarms will be displayed on this page, as the software will automatically mark the alarm acknowledged upon receipt of the matching clear alarm. To change this, deselect the option to auto acknowledge alarms. Upon de-selection of this option, alarms will remain in this list until they are acknowledged individually by clicking on the 'Ack' column for the alarm, or clicking the [Acknowledge all] button. Note: An alarm must be inactive in order for it to be acknowledged and disappear from the alarm list. Figure 3-9: Controls Controls available on the selected device in the device list appear in the 'Select A Control' section of the page. Click on a control and, if parameters are necessary to execute the control, the parameters required will appear to right of the selected control. Enter the data in the value field and the click the [Execute] button on the bottom of the page. Available commands include "Reboot Device," "Initiate Self-Test," "Operating System Restart," "Start Ramp Sequence," "Start Shed Sequence," etc. For a complete list of commands available for your device, refer to the 'Select A Control' menu. 7
-
 1
1 -
 2
2 -
 3
3 -
 4
4 -
 5
5 -
 6
6 -
 7
7 -
 8
8 -
 9
9 -
 10
10 -
 11
11 -
 12
12 -
13
-
14
-
15
-
16
-
17
-
18
-
19
-
20
-
21
-
22
-
23
-
24
-
25
-
26
-
27
-
28
-
29
-
30
-
31
-
32
-
33
-
34
-
35
-
36
-
37
-
38
-
39
-
40
-
41
-
42
-
43
-
44
-
45
-
46
-
47
-
48
-
49
-
50
-
51
-
52
-
53
-
54
-
55
-
56
-
57
-
58
-
59
-
60
-
61
-
62
-
63
-
64
-
65
-
66
-
67
-
68
-
69
-
70
-
71
-
72
-
73
-
74
-
75
-
76
-
77
-
78
-
79
-
80
-
81
-
82
-
83
-
84
-
85
-
86
-
87
-
88
-
89
-
90
-
91
-
92
-
93
-
94
-
95
-
96
-
97
-
98
-
99
-
100
 |
 |
