Tripp Lite PDU3VSR6L2130 Owner's Manual for SNMPWEBCARD 9332CE - Page 3
Installation and Configuration
 |
View all Tripp Lite PDU3VSR6L2130 manuals
Add to My Manuals
Save this manual to your list of manuals |
Page 3 highlights
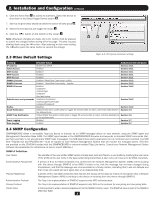
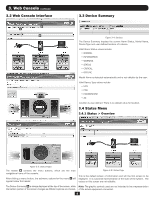
2. Installation and Configuration continued 6. Click the Action field F to access its submenu. Select the device to shut down in the Select Trigger Device section G . 7. Set how long the delay should be before the action will take place H . 8. Select the Event(s) that will trigger the action I . 9. Click the button on the bottom of the screen J . Note: Whenever changes are made, the button must be pressed to submit the changes before moving off of the page. This also includes deleting fields using the button. After selecting an item and clicking the button press the button to commit the change. G H I 2.3 Other Default Settings Figure 2-2: UPS System Shutdown Settings Setting IP address Telnet Access SSH Access HTTP Access HTTP Access SNMPv1 Access SNMPv2 Access SNMPv3 Access Default users and passwords Radius Email Notification SNMP Trap Notification Event Logging Data Logging Default Value Additional Information Obtain from DHCP Section 3.8.1 Enabled Section 3.8.1 Enabled Section 3.8.1 Enabled Section 3.8.1 Enabled Section 3.8.1 Enabled-Read-Only Community-public Section 3.8.2 Enabled-Read-Write Community-tripplite Section 3.8.2 Enabled localadmin localmanager localguest Section 3.8.2 See table below localadmin/localadmin localmanager/localmanger localguest/localguest Section 3.8.2 Disabled Section 3.8.2 Default email action profile setup to trigger 30 seconds after an alarm. Add email destinations to Section 3.6 the address book. Default SNMP Trap action profile setup to trigger 30 seconds after an alarm. Add trap destinations Section 3.6 to the address book. Enabled Section 3.7 Enabled Section 3.7 2.4 SNMP Configuration SNMPWEBCARD allows a compatible Tripp Lite device to function as an SNMP-managed device on your network, using the SNMP agent and Management Information Base (MIB). The SNMP agent resides in the SNMPWEBCARD firmware and responds to standard SNMP commands (Get, Get Next and Set). It can also generate SNMP traps (messages). The MIB determines which parameters can be monitored and controlled. Two MIB files-Tripplite.mib and RFC1628.mib-must be loaded on each Network Management Station that will monitor the managed device. (The files are provided on the CD-ROM included with the SNMPWEBCARD or network-enabled Tripp Lite device. Consult your Network Management Station software documentation for instructions on how to import MIB files.) SNMPv3 Definitions User Name The identifier of the user profile. SNMP version 3 maps Gets, Sets and Traps to a user profile by matching the user name of the profile to the user name in the data packet being transmitted. A user name can have up to 32 ASCII characters. Authentication Passphrase A phrase of 8 to 32 ASCII characters that verifies that the Network Management System (NMS) communicating with this device through SNMPv3 is the NMS it claims to be, that the message has not been changed during transmission, and that the message was communicated in a timely manner, indicating that it was not delayed and that it was not copied and sent again later at an inappropriate time. Privacy Passphrase A phrase of 8 to 32 ASCII characters that ensures the privacy of the data (by means of encryption) that a Network Management System (NMS) is sending to this device or receiving from this device through SNMPv3. Authentication Protocol The Tripp Lite implementation of SNMPv3 supports only MD5 authentication. Privacy Protocol The Tripp Lite implementation of SNMPv3 supports only DES as the protocol for encrypting and decrypting data. Public Value A field provided to enter a username/password hint for SNMPv3 Admin users. This SNMPv3 value is part of the SNMPv3 USM User Table. 3
-
 1
1 -
 2
2 -
 3
3 -
 4
4 -
 5
5 -
 6
6 -
 7
7 -
 8
8 -
 9
9 -
10
-
11
-
12
-
13
-
14
-
15
-
16
-
17
-
18
-
19
-
20
-
21
-
22
-
23
-
24
-
25
-
26
-
27
-
28
-
29
-
30
-
31
-
32
-
33
-
34
-
35
-
36
-
37
-
38
-
39
-
40
-
41
-
42
-
43
-
44
-
45
-
46
-
47
-
48
-
49
-
50
-
51
-
52
-
53
-
54
-
55
-
56
-
57
-
58
-
59
-
60
-
61
-
62
-
63
-
64
-
65
-
66
-
67
-
68
-
69
-
70
-
71
-
72
-
73
-
74
-
75
-
76
-
77
-
78
-
79
-
80
-
81
-
82
-
83
-
84
-
85
-
86
-
87
-
88
-
89
-
90
-
91
-
92
-
93
-
94
-
95
-
96
-
97
-
98
-
99
-
100
 |
 |
