Viking VCSO210SS Use and Care Manual - Page 30
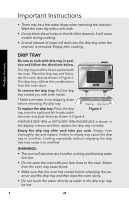
Drip Tray
 |
View all Viking VCSO210SS manuals
Add to My Manuals
Save this manual to your list of manuals |
Page 30 highlights
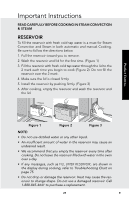
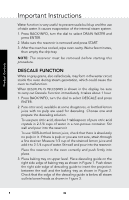
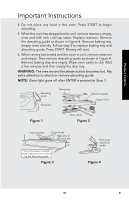
Important Instructions • There may be a few water drops when removing the reservoir. Wipe the oven dry with a soft cloth. • Do not block the air holes on the lid of the reservoir. It will cause trouble during cooking. • A small amount of water will drain into the drip tray when the reservoir is removed. Empty after cooking. Product Controls DRIP TRAY Be sure to cook with drip tray in position and follow the directions below. The drip tray and the lid are packed with the oven. Place the drip tray and lid under the oven door as shown in Figure 4. This drip tray collects the condensation from the oven door. To remove the drip tray: Pull the drip tray toward you with both hands. * Make sure water is not dripping down before removing the drip tray. Dip tray Dip tray lid To replace the drip tray: Place the drip Figure 4 tray onto the right and left hooks under the oven and push firmly as shown in Figure 4. If Replace drip tray or Empty drip tray and replace is shown in the display, remove and then replace the drip tray correctly. Empty the drip tray after each time you cook. Empty, rinse thoroughly, dry and replace. Failure to empty may cause the drip tray to overflow. Cooking repeatedly without emptying the drip tray may cause it to overflow. WARNINGS: • The oven will become very hot after cooking and draining water function. • Do not open the oven with your face close to the oven. Steam from the oven may cause burns. • Make sure that the oven has cooled before emptying the reservoir and the drip tray and then wipe the oven cavity. • Do not touch the water directly as water in the drip tray may be hot. E 28
-
 1
1 -
2
-
3
-
4
-
5
-
6
-
7
-
8
-
9
-
10
-
11
-
12
-
13
-
14
-
15
-
16
-
17
-
18
-
19
-
20
-
21
-
22
-
23
-
24
-
 25
25 -
 26
26 -
 27
27 -
 28
28 -
 29
29 -
 30
30 -
 31
31 -
 32
32 -
 33
33 -
 34
34 -
 35
35 -
36
-
37
-
38
-
39
-
40
-
41
-
42
-
43
-
44
-
45
-
46
-
47
-
48
-
49
-
50
-
51
-
52
-
53
-
54
-
55
-
56
-
57
-
58
-
59
-
60
-
61
-
62
-
63
-
64
-
65
-
66
-
67
-
68
-
69
-
70
-
71
-
72
-
73
-
74
-
75
-
76
-
77
-
78
-
79
-
80
-
81
-
82
-
83
-
84
 |
 |
