Vivitar DVR 949HD User Manual - Page 43
Standard, Sepia, Monochrome, Vivid, Color Effect, SAVE & EXIT, Normal, Sharp
 |
View all Vivitar DVR 949HD manuals
Add to My Manuals
Save this manual to your list of manuals |
Page 43 highlights
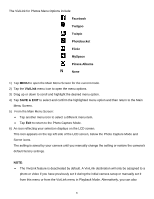
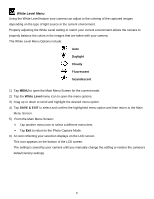
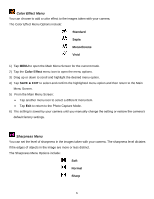
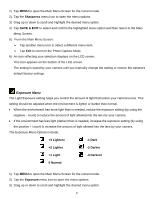
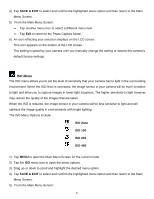
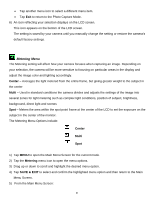
Color Effect Menu You can choose to add a color effect to the images taken with your camera. The Color Effect Menu Options include: Standard Sepia Monochrome Vivid 1) Tap MENU to open the Main Menu Screen for the current mode. 2) Tap the Color Effect menu icon to open the menu options. 3) Drag up or down to scroll and highlight the desired menu option. 4) Tap SAVE & EXIT to select and confirm the highlighted menu option and then return to the Main Menu Screen. 5) From the Main Menu Screen: Tap another menu icon to select a different menu item. Tap Exit to return to the Photo Capture Mode. 6) The setting is saved by your camera until you manually change the setting or restore the camera's default factory settings. Sharpness Menu You can set the level of sharpness in the images taken with your camera. The sharpness level dictates if the edges of objects in the image are more or less distinct. The Sharpness Menu Options include: Soft Normal Sharp 42
-
 1
1 -
2
-
3
-
4
-
5
-
6
-
7
-
8
-
9
-
10
-
11
-
12
-
13
-
14
-
15
-
16
-
17
-
18
-
19
-
20
-
21
-
22
-
23
-
24
-
25
-
26
-
27
-
28
-
29
-
30
-
31
-
32
-
33
-
34
-
35
-
36
-
37
-
 38
38 -
 39
39 -
 40
40 -
 41
41 -
 42
42 -
 43
43 -
 44
44 -
 45
45 -
 46
46 -
 47
47 -
 48
48 -
49
-
50
-
51
-
52
-
53
-
54
-
55
-
56
-
57
-
58
-
59
-
60
-
61
-
62
-
63
-
64
-
65
-
66
-
67
-
68
 |
 |