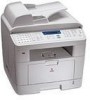
Xerox PE120 User Guide - Page 60
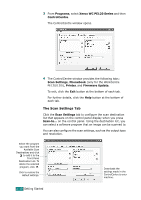
Start, Settings, Printers, Have Disk, The Add Printer Wizard will begin. Click - wc
 |
UPC - 095205224887
View all Xerox PE120 manuals
Add to My Manuals
Save this manual to your list of manuals |
Page 60 highlights
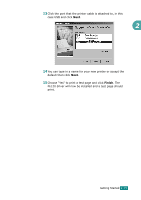
9 From within Microsoft Windows click Start and then Settings and then Printers. Double-click the Add Printer icon. 10 The Add Printer Wizard will begin. Click Next. Choose "Local Printer" and click Next. 11 At the next screen click Have Disk, and browse to your CD- ROM drive. Open the "driver" directory, then open the "Print" directory, then open the "AddPrint" directory and then choose "Win98x" directory and click OK. 12 The next screen will display the "Xerox WC PE120 series PCL6" driver, click Next. 2.34 Getting Started
-
 1
1 -
2
-
3
-
4
-
5
-
6
-
7
-
8
-
9
-
10
-
11
-
12
-
13
-
14
-
15
-
16
-
17
-
18
-
19
-
20
-
21
-
22
-
23
-
24
-
25
-
26
-
27
-
28
-
29
-
30
-
31
-
32
-
33
-
34
-
35
-
36
-
37
-
38
-
39
-
40
-
41
-
42
-
43
-
44
-
45
-
46
-
47
-
48
-
49
-
50
-
51
-
52
-
53
-
54
-
 55
55 -
 56
56 -
 57
57 -
 58
58 -
 59
59 -
 60
60 -
 61
61 -
 62
62 -
 63
63 -
 64
64 -
 65
65 -
66
-
67
-
68
-
69
-
70
-
71
-
72
-
73
-
74
-
75
-
76
-
77
-
78
-
79
-
80
-
81
-
82
-
83
-
84
-
85
-
86
-
87
-
88
-
89
-
90
-
91
-
92
-
93
-
94
-
95
-
96
-
97
-
98
-
99
-
100
-
101
-
102
-
103
-
104
-
105
-
106
-
107
-
108
-
109
-
110
-
111
-
112
-
113
-
114
-
115
-
116
-
117
-
118
-
119
-
120
-
121
-
122
-
123
-
124
-
125
-
126
-
127
-
128
-
129
-
130
-
131
-
132
-
133
-
134
-
135
-
136
-
137
-
138
-
139
-
140
-
141
-
142
-
143
-
144
-
145
-
146
-
147
-
148
-
149
-
150
-
151
-
152
-
153
-
154
-
155
-
156
-
157
-
158
-
159
-
160
-
161
-
162
-
163
-
164
-
165
-
166
-
167
-
168
-
169
-
170
-
171
-
172
-
173
-
174
-
175
-
176
-
177
-
178
-
179
-
180
-
181
-
182
-
183
-
184
-
185
-
186
-
187
-
188
-
189
-
190
-
191
-
192
-
193
-
194
-
195
-
196
-
197
-
198
-
199
-
200
-
201
-
202
-
203
-
204
-
205
-
206
-
207
-
208
-
209
-
210
-
211
-
212
-
213
-
214
-
215
-
216
-
217
-
218
-
219
-
220
-
221
-
222
-
223
-
224
-
225
-
226
-
227
-
228
-
229
-
230
-
231
-
232
-
233
-
234
-
235
-
236
-
237
-
238
-
239
-
240
-
241
-
242
-
243
-
244
-
245
-
246
-
247
-
248
-
249
-
250
-
251
-
252
-
253
-
254
-
255
-
256
-
257
-
258
-
259
-
260
-
261
-
262
-
263
-
264
-
265
-
266
-
267
-
268
-
269
-
270
-
271
-
272
-
273
-
274
-
275
-
276
-
277
-
278
-
279
-
280
-
281
-
282
-
283
 |
 |

Getting Started
2.34
9
From within Microsoft Windows click
Start
and then
Settings
and then
Printers
. Double-click the Add Printer
icon.
10
The Add Printer Wizard will begin. Click
Next
. Choose
"Local Printer" and click
Next
.
11
At the next screen click
Have Disk
, and browse to your CD-
ROM drive. Open the "driver" directory, then open the
"Print" directory, then open the "AddPrint" directory and
then choose "Win98x" directory and click
OK
.
12
The next screen will display the "Xerox WC PE120 series
PCL6" driver, click
Next
.