Yamaha ELB-02 ELB-02_Owners Manual - Page 136
Selecting the Song in the Folder, Playback Settings
 |
View all Yamaha ELB-02 manuals
Add to My Manuals
Save this manual to your list of manuals |
Page 136 highlights
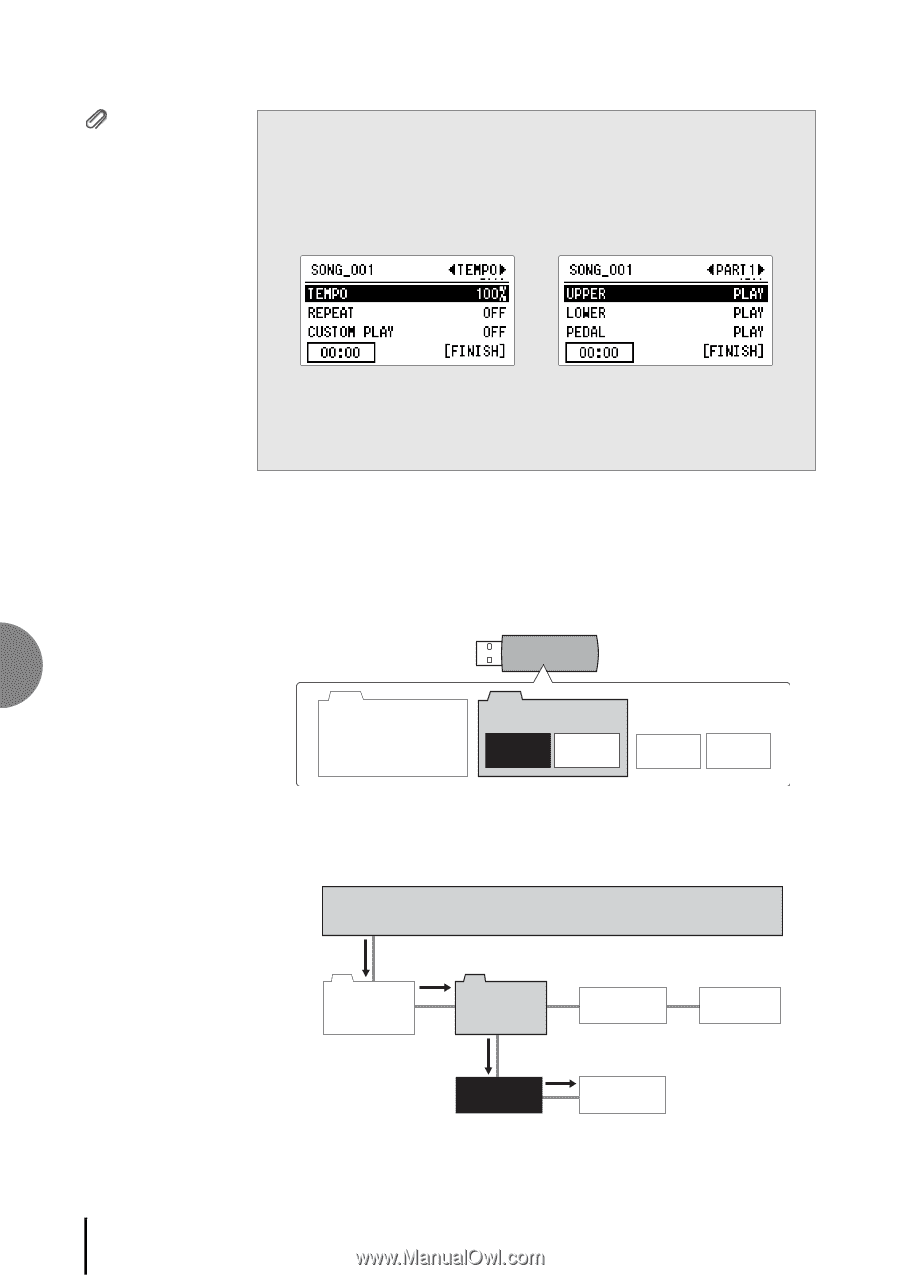
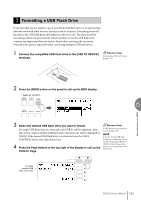
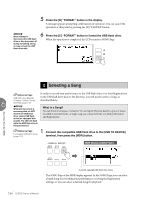
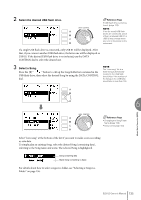
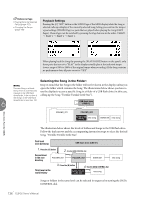
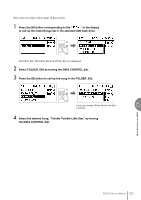
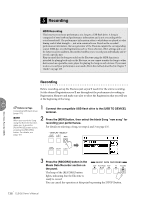
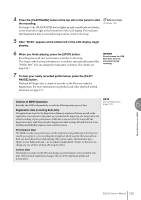
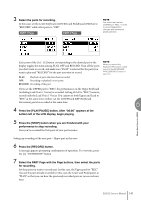
Reference Page • Playing Back the Selected Part(s) (page 157) • Changing the Tempo (page 158) Playback Settings Pressing the [C] "SET." button in the SONG Page of the MDR display while the Song is selected calls up a display of the currently selected Song, letting you confirm the tempo/ repeat settings (TEMPO Page) or parts that are played when playing the Song (PART Pages). These Pages can be switched by pressing the Page buttons in the order: TEMPO PART 1 PART 2 PART 3. When playing back the Song (by pressing the [PLAY/PAUSE] button on the panel), only those parts that are set to "PLAY" in the display actually play at the indicated tempo (over a range of 50% to 200% of the original tempo when recording). If the Song contains no performance data, all parts are set to "OFF." Selecting the Song in the Folder: NOTE Keep in mind that the Song in the folder will not be shown in the display unless you The new Song is a blank open the folder which contains the Song. The illustrations below shows you how to Song which is automatically use the display to access a specific Song in a folder of a USB flash drive (in this case, created in the USB flash drive/folder, if the number of calling up the Song "Twinkle Twinkle Little Star"). the Songs in the USB flash 6 drive/folder is less than 100. USB flash drive (USB 01) FOLDER_001 FOLDER_002 Twinkle Twinkle Little Star new song SONG 001 new song Music Data Recorder (MDR) The illustration below shows the levels of folders and Songs in the USB flash drive. Follow the dark arrows and the accompanying instruction steps to select the desired Song, "Twinkle Twinkle Little Star." First level (root directory) USB flash drive (USB 01) 1. Press the [B] button 2. Use the DATA CONTROL dial Second level in the root directory FOLDER_001 FOLDER_002 SONG 001 Third level in the root directory 3. Press the [B] button 4. Use the DATA CONTROL dial Twinkle Twinkle Little Star new song new song Songs or folders in the same level can be selected in sequence by turning the DATA CONTROL dial. 136 ELB-02 Owner's Manual
-
 1
1 -
2
-
3
-
4
-
5
-
6
-
7
-
8
-
9
-
10
-
11
-
12
-
13
-
14
-
15
-
16
-
17
-
18
-
19
-
20
-
21
-
22
-
23
-
24
-
25
-
26
-
27
-
28
-
29
-
30
-
31
-
32
-
33
-
34
-
35
-
36
-
37
-
38
-
39
-
40
-
41
-
42
-
43
-
44
-
45
-
46
-
47
-
48
-
49
-
50
-
51
-
52
-
53
-
54
-
55
-
56
-
57
-
58
-
59
-
60
-
61
-
62
-
63
-
64
-
65
-
66
-
67
-
68
-
69
-
70
-
71
-
72
-
73
-
74
-
75
-
76
-
77
-
78
-
79
-
80
-
81
-
82
-
83
-
84
-
85
-
86
-
87
-
88
-
89
-
90
-
91
-
92
-
93
-
94
-
95
-
96
-
97
-
98
-
99
-
100
-
101
-
102
-
103
-
104
-
105
-
106
-
107
-
108
-
109
-
110
-
111
-
112
-
113
-
114
-
115
-
116
-
117
-
118
-
119
-
120
-
121
-
122
-
123
-
124
-
125
-
126
-
127
-
128
-
129
-
130
-
 131
131 -
 132
132 -
 133
133 -
 134
134 -
 135
135 -
 136
136 -
 137
137 -
 138
138 -
 139
139 -
 140
140 -
 141
141 -
142
-
143
-
144
-
145
-
146
-
147
-
148
-
149
-
150
-
151
-
152
-
153
-
154
-
155
-
156
-
157
-
158
-
159
-
160
-
161
-
162
-
163
-
164
-
165
-
166
-
167
-
168
-
169
-
170
-
171
-
172
-
173
-
174
-
175
-
176
-
177
-
178
-
179
-
180
-
181
-
182
-
183
-
184
-
185
-
186
-
187
-
188
-
189
-
190
-
191
-
192
-
193
-
194
-
195
-
196
-
197
-
198
-
199
-
200
-
201
-
202
-
203
-
204
-
205
-
206
-
207
-
208
-
209
-
210
-
211
-
212
-
213
-
214
-
215
 |
 |