Yamaha ELB-02 ELB-02_Owners Manual - Page 14
Front Panel, MUSIC DATA RECORDER MDR
 |
View all Yamaha ELB-02 manuals
Add to My Manuals
Save this manual to your list of manuals |
Page 14 highlights
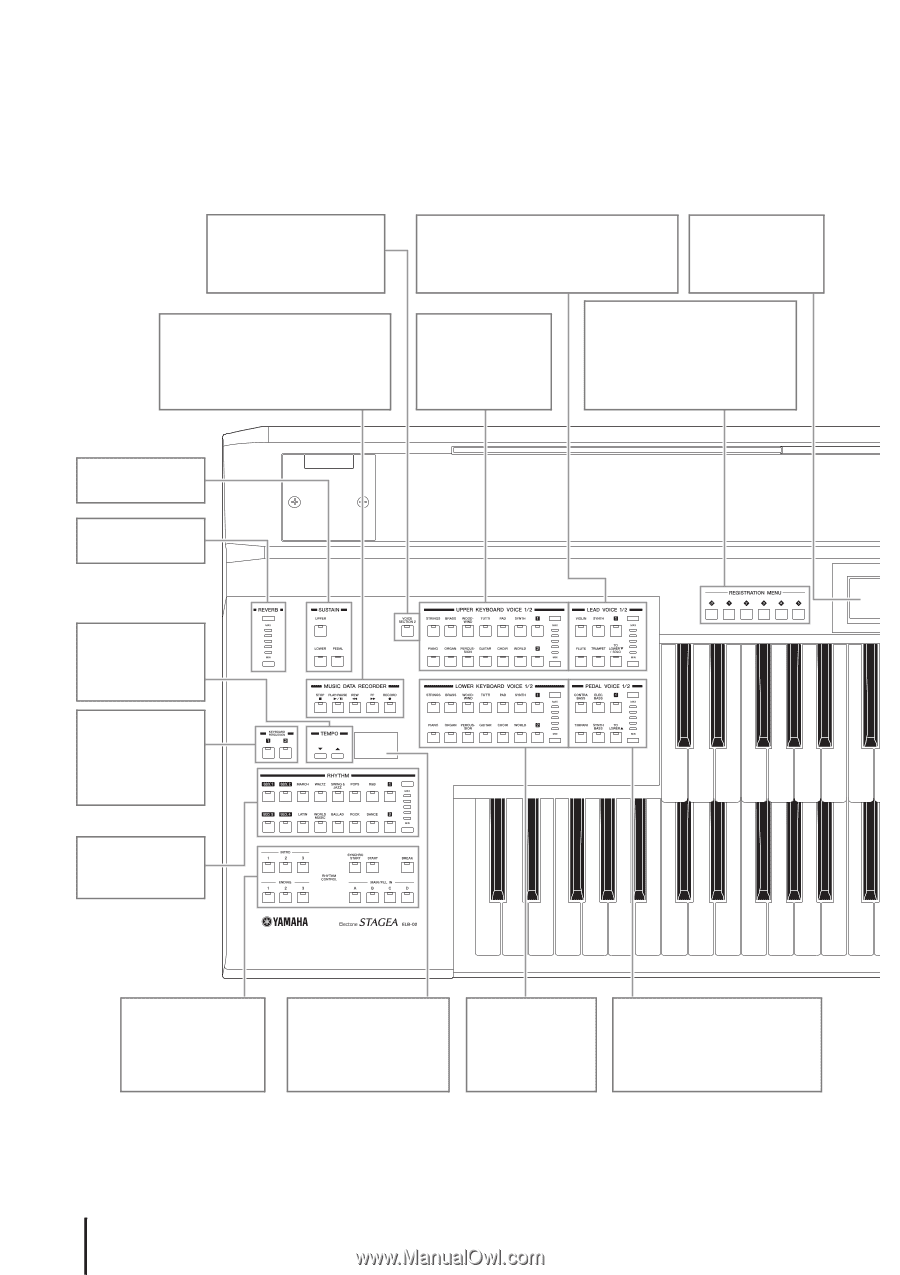
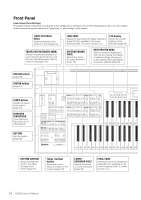
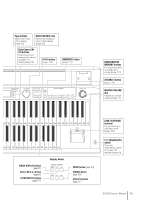
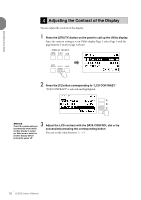
Front Panel Panel Setup (Panel Settings) By using the controls on the panel, you can make various settings such as selecting a Voice or Style, tuning the pitch, and so on. These settings of the instrument are together referred to as "panel setup" or "panel settings" in this manual. [VOICE SECTION 2] button Switches between Voice sections 1 and 2 (page 33). MUSIC DATA RECORDER (MDR) Allows recording and playback of your keyboard performances, and lets you store Registration data for future recall (page 127). LEAD VOICE Selects the Lead Voices for Upper Keyboard (page 29). Also available on the Lower Keyboard while "To Lower" function is on. LCD display Shows the current settings of the Electone (page 25). UPPER KEYBOARD VOICE Selects the Voices for Upper Keyboard (page 29). REGISTRATION MENU Selects convenient Registrations, which let you instantly reconfigure all relevant settings, allowing you to start playing with all appropriate sounds pre-selected (page 20). SUSTAIN buttons (page 63) REVERB buttons (page 61) TEMPO buttons Adjusts the speed of the rhythm (page 73). KEYBOARD PERCUSSION Turns Keyboard Percussion On or Off (page 88). RHYTHM Sets the rhythm (page 68). C2 D2 E2 F2 G2 A2 B2 C3 C1 D1 E1 F1 G1 A1 B1 C2 D2 E2 F2 G2 A2 B2 C3 RHYTHM CONTROL Starts and stops the rhythm, and adds changes to the rhythm (page 71). Tempo, Bar/Beat display Shows the current tempo or position in the measure (page 73). LOWER KEYBOARD VOICE Selects the Voices for Lower Keyboard (page 30). PEDAL VOICE Selects the Voices for Pedalboard (page 30). Also available on the Lower Keyboard while "To Lower" function is on. 14 ELB-02 Owner's Manual
-
 1
1 -
2
-
3
-
4
-
5
-
6
-
7
-
8
-
 9
9 -
 10
10 -
 11
11 -
 12
12 -
 13
13 -
 14
14 -
 15
15 -
 16
16 -
 17
17 -
 18
18 -
 19
19 -
20
-
21
-
22
-
23
-
24
-
25
-
26
-
27
-
28
-
29
-
30
-
31
-
32
-
33
-
34
-
35
-
36
-
37
-
38
-
39
-
40
-
41
-
42
-
43
-
44
-
45
-
46
-
47
-
48
-
49
-
50
-
51
-
52
-
53
-
54
-
55
-
56
-
57
-
58
-
59
-
60
-
61
-
62
-
63
-
64
-
65
-
66
-
67
-
68
-
69
-
70
-
71
-
72
-
73
-
74
-
75
-
76
-
77
-
78
-
79
-
80
-
81
-
82
-
83
-
84
-
85
-
86
-
87
-
88
-
89
-
90
-
91
-
92
-
93
-
94
-
95
-
96
-
97
-
98
-
99
-
100
-
101
-
102
-
103
-
104
-
105
-
106
-
107
-
108
-
109
-
110
-
111
-
112
-
113
-
114
-
115
-
116
-
117
-
118
-
119
-
120
-
121
-
122
-
123
-
124
-
125
-
126
-
127
-
128
-
129
-
130
-
131
-
132
-
133
-
134
-
135
-
136
-
137
-
138
-
139
-
140
-
141
-
142
-
143
-
144
-
145
-
146
-
147
-
148
-
149
-
150
-
151
-
152
-
153
-
154
-
155
-
156
-
157
-
158
-
159
-
160
-
161
-
162
-
163
-
164
-
165
-
166
-
167
-
168
-
169
-
170
-
171
-
172
-
173
-
174
-
175
-
176
-
177
-
178
-
179
-
180
-
181
-
182
-
183
-
184
-
185
-
186
-
187
-
188
-
189
-
190
-
191
-
192
-
193
-
194
-
195
-
196
-
197
-
198
-
199
-
200
-
201
-
202
-
203
-
204
-
205
-
206
-
207
-
208
-
209
-
210
-
211
-
212
-
213
-
214
-
215
 |
 |