Yamaha ELB-02 ELB-02_Owners Manual - Page 164
Song Delete/Folder Delete, Press the [B] DELETE button.
 |
View all Yamaha ELB-02 manuals
Add to My Manuals
Save this manual to your list of manuals |
Page 164 highlights
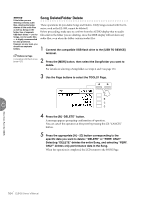
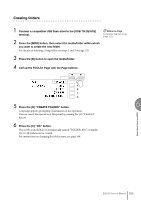
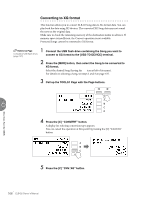
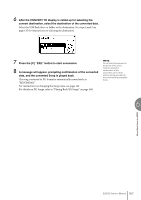
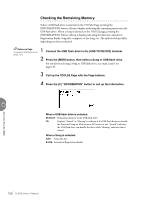
NOTICE If the folder you are deleting contains audio files, deleting the folder deletes all the audio files as well as Songs in the folder. Use of separate USB flash drives - one for Songs, one for audio files - is highly recommended for data protection. However, at very least, you should use separate folders. Reference Page Compatible USB flash drives (page 127) Song Delete/Folder Delete These operations let you delete Songs and folders. (Only Songs created with the ELseries, such as the EL-900, cannot be deleted.) Before proceeding, make sure to confirm from the AUDIO display that no audio files exist in the folder you are deleting, since the MDR display will not show any audio files, even when the folder contains audio files. 1 Connect the compatible USB flash drive to the [USB TO DEVICE] terminal. 2 Press the [MDR] button, then select the Song/folder you want to delete. For details on selecting a Song/folder, see steps 2 and 3 on page 135. 3 Use the Page buttons to select the TOOLS1 Page. Music Data Recorder (MDR) 6 4 Press the [B] "DELETE" button. A message appears prompting confirmation of operation. You can cancel the operation at this point by pressing the [D] "CANCEL" button. 5 Press the appropriate [A] - [D] button corresponding to the specific data you want to delete: "DELETE" or "PERF. ONLY." Selecting "DELETE" deletes the entire Song, and selecting "PERF. ONLY" deletes only performance data in the Song. When the operation is completed, the LCD returns to the SONG Page. 164 ELB-02 Owner's Manual
-
 1
1 -
2
-
3
-
4
-
5
-
6
-
7
-
8
-
9
-
10
-
11
-
12
-
13
-
14
-
15
-
16
-
17
-
18
-
19
-
20
-
21
-
22
-
23
-
24
-
25
-
26
-
27
-
28
-
29
-
30
-
31
-
32
-
33
-
34
-
35
-
36
-
37
-
38
-
39
-
40
-
41
-
42
-
43
-
44
-
45
-
46
-
47
-
48
-
49
-
50
-
51
-
52
-
53
-
54
-
55
-
56
-
57
-
58
-
59
-
60
-
61
-
62
-
63
-
64
-
65
-
66
-
67
-
68
-
69
-
70
-
71
-
72
-
73
-
74
-
75
-
76
-
77
-
78
-
79
-
80
-
81
-
82
-
83
-
84
-
85
-
86
-
87
-
88
-
89
-
90
-
91
-
92
-
93
-
94
-
95
-
96
-
97
-
98
-
99
-
100
-
101
-
102
-
103
-
104
-
105
-
106
-
107
-
108
-
109
-
110
-
111
-
112
-
113
-
114
-
115
-
116
-
117
-
118
-
119
-
120
-
121
-
122
-
123
-
124
-
125
-
126
-
127
-
128
-
129
-
130
-
131
-
132
-
133
-
134
-
135
-
136
-
137
-
138
-
139
-
140
-
141
-
142
-
143
-
144
-
145
-
146
-
147
-
148
-
149
-
150
-
151
-
152
-
153
-
154
-
155
-
156
-
157
-
158
-
 159
159 -
 160
160 -
 161
161 -
 162
162 -
 163
163 -
 164
164 -
 165
165 -
 166
166 -
 167
167 -
 168
168 -
 169
169 -
170
-
171
-
172
-
173
-
174
-
175
-
176
-
177
-
178
-
179
-
180
-
181
-
182
-
183
-
184
-
185
-
186
-
187
-
188
-
189
-
190
-
191
-
192
-
193
-
194
-
195
-
196
-
197
-
198
-
199
-
200
-
201
-
202
-
203
-
204
-
205
-
206
-
207
-
208
-
209
-
210
-
211
-
212
-
213
-
214
-
215
 |
 |
