Yamaha ELB-02 ELB-02_Owners Manual - Page 199
As necessary, set the detailed settings., Save the settings., Wireless LAN, Display, Default setting
 |
View all Yamaha ELB-02 manuals
Add to My Manuals
Save this manual to your list of manuals |
Page 199 highlights
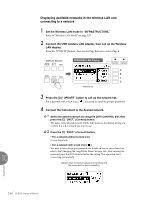
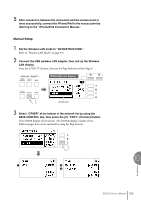
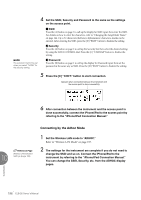
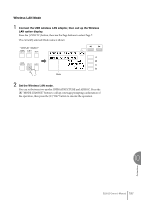
2 As necessary, set the detailed settings. Press the [A] - [D] buttons corresponding to "CHANGE" or "SHOW" in the display to call up the display for Setting/Input. Wireless LAN mode INFRASTRUCTURE mode ADHOC mode INFRASTRUCTURE mode / ADHOC mode Display DETAIL display Page 1 DETAIL display Page 2 ADHOC display Page 1 ADHOC display Page 2 ADHOC display Page 3 DETAIL display Item DHCP IP Address Subnet Mask Gateway DNS Server 1 DNS Server 2 SSID Channel Security Password DHCP IP Address Subnet Mask HOST NAME MAC address STATUS Default setting ON 0.0.0.0 0.0.0.0 0.0.0.0 0.0.0.0 0.0.0.0 ap-ELB-02-(last 6 characters of MAC address in lowercase); or simply "ap-ELB-02," if MAC address cannot be used. 11 - - ON 192.168.0.1 255.255.255.0 ELB-02-(last 6 characters of MAC address in lowercase); or simply "ELB-02," if MAC address cannot be used. - 00000000 Setting/Input Determines whether or not DHCP is used. If your router is compatible with DHCP, select "ON (set DNS automatically)" here. Select on or off by using the DATA CONTROL dial then press the [C] "CHANGE" button. Set the wireless LAN detailed settings. IP Address, Subnet Mask, Gateway, DNS Server1, DNS Server2 can be set when DHCP is set to Off but cannot be set when DHCP set to On. For details on confirmation and changes in the setting of the access point on the router side, refer to the owner's manual for the product you are using. For details on how to enter characters, refer to the "Changing the Song/Folder Name" on page 144. The setting range is 0.0.0.0-255.255.255.255. To find the specific MAC address, see "MAC address" below. • SSID, Security and Password can be set in the same way as those described in the section "Manual Setup" on page 195. The last 6 characters of the MAC address must be entered in lowercase. • Channel can be selected by the DATA CONTROL dial and set by pressing the button corresponding to "CHANGE." • DHCP and IP Address can be set in the same way as those of "INFRASTRUCTURE mode" in this table. • Subnet Mask can be selected in the list. To find the specific MAC address, see "MAC address" below. Set the Host name. Up to 57 characters (half size) including alphanumeric characters, the "_" (underscore) and "-" (hyphen) character. For details on how to enter characters, refer to the "Changing the Song/Folder Name" on page 144. After entering the characters, press the [D] "EXIT" button to finalize the setting. The last 6 characters of the MAC address must be entered in lowercase. Shows the MAC address of the USB wireless LAN adaptor. You cannot change the MAC address here. Shows the error code of network function. 10 Connections 3 Save the settings. Press the [D] "EXIT" button. A message appears prompting confirmation of operation when there is a change in the setting. Press the [C] "OK" button to execute the operation, or press the [D] button to cancel. When the operation is completed, the LCD returns to the previous display. ELB-02 Owner's Manual 199
-
 1
1 -
2
-
3
-
4
-
5
-
6
-
7
-
8
-
9
-
10
-
11
-
12
-
13
-
14
-
15
-
16
-
17
-
18
-
19
-
20
-
21
-
22
-
23
-
24
-
25
-
26
-
27
-
28
-
29
-
30
-
31
-
32
-
33
-
34
-
35
-
36
-
37
-
38
-
39
-
40
-
41
-
42
-
43
-
44
-
45
-
46
-
47
-
48
-
49
-
50
-
51
-
52
-
53
-
54
-
55
-
56
-
57
-
58
-
59
-
60
-
61
-
62
-
63
-
64
-
65
-
66
-
67
-
68
-
69
-
70
-
71
-
72
-
73
-
74
-
75
-
76
-
77
-
78
-
79
-
80
-
81
-
82
-
83
-
84
-
85
-
86
-
87
-
88
-
89
-
90
-
91
-
92
-
93
-
94
-
95
-
96
-
97
-
98
-
99
-
100
-
101
-
102
-
103
-
104
-
105
-
106
-
107
-
108
-
109
-
110
-
111
-
112
-
113
-
114
-
115
-
116
-
117
-
118
-
119
-
120
-
121
-
122
-
123
-
124
-
125
-
126
-
127
-
128
-
129
-
130
-
131
-
132
-
133
-
134
-
135
-
136
-
137
-
138
-
139
-
140
-
141
-
142
-
143
-
144
-
145
-
146
-
147
-
148
-
149
-
150
-
151
-
152
-
153
-
154
-
155
-
156
-
157
-
158
-
159
-
160
-
161
-
162
-
163
-
164
-
165
-
166
-
167
-
168
-
169
-
170
-
171
-
172
-
173
-
174
-
175
-
176
-
177
-
178
-
179
-
180
-
181
-
182
-
183
-
184
-
185
-
186
-
187
-
188
-
189
-
190
-
191
-
192
-
193
-
 194
194 -
 195
195 -
 196
196 -
 197
197 -
 198
198 -
 199
199 -
 200
200 -
 201
201 -
 202
202 -
 203
203 -
 204
204 -
205
-
206
-
207
-
208
-
209
-
210
-
211
-
212
-
213
-
214
-
215
 |
 |
