Yamaha ELB-02 ELB-02_Owners Manual - Page 202
Appendix, Assembly Instructions
 |
View all Yamaha ELB-02 manuals
Add to My Manuals
Save this manual to your list of manuals |
Page 202 highlights
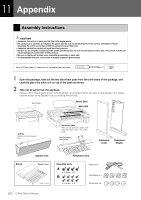
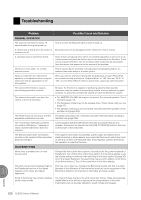
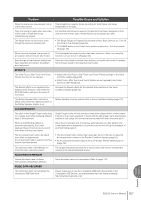
11 Appendix Assembly Instructions CAUTION • Assemble the unit on a hard and flat floor with ample space. • Be careful not to confuse or misplace the parts, and be sure to install all parts in the correct orientation. Please assemble the unit in accordance with the sequence described here. • Assembly should be carried out by at least two persons. • Be sure to use only the included screws of the specified sizes. Do not use any other screws. Use of incorrect screws can cause damage or malfunction of the product. • Be sure to tighten all screws upon completing assembly of each unit. • To disassemble the unit, reverse the assembly sequence given below. Have a Phillips-head (+) screwdriver of the appropriate size ready. 1 Open the package, take out the two styrofoam pads from the both sides of the package, and carefully place the main unit on top of the pads as shown. 2 Take out all parts from the package. Please confirm that all parts shown in the illustration are provided. When you take out the Speaker Unit, always hold the bottom of the Speaker Unit, not holding the Grill Net. Dust Cover Music Rest Main Unit Grill Net Attached to the Speaker Unit Styrofoam pads Take out the styrofoam pads, and place the Main Unit on top of the pads. Bundled pedal cord inside. Sideboard (Left) Sideboard (Right) Bench Speaker Unit Pedalboard Unit Bench Board Legs: 4 pcs. Assembly parts A 5 x 16 mm x 4 B 5 x 12 mm x 8 Power cord Cord holders x 4 Screw caps x 4 202 ELB-02 Owner's Manual
-
 1
1 -
2
-
3
-
4
-
5
-
6
-
7
-
8
-
9
-
10
-
11
-
12
-
13
-
14
-
15
-
16
-
17
-
18
-
19
-
20
-
21
-
22
-
23
-
24
-
25
-
26
-
27
-
28
-
29
-
30
-
31
-
32
-
33
-
34
-
35
-
36
-
37
-
38
-
39
-
40
-
41
-
42
-
43
-
44
-
45
-
46
-
47
-
48
-
49
-
50
-
51
-
52
-
53
-
54
-
55
-
56
-
57
-
58
-
59
-
60
-
61
-
62
-
63
-
64
-
65
-
66
-
67
-
68
-
69
-
70
-
71
-
72
-
73
-
74
-
75
-
76
-
77
-
78
-
79
-
80
-
81
-
82
-
83
-
84
-
85
-
86
-
87
-
88
-
89
-
90
-
91
-
92
-
93
-
94
-
95
-
96
-
97
-
98
-
99
-
100
-
101
-
102
-
103
-
104
-
105
-
106
-
107
-
108
-
109
-
110
-
111
-
112
-
113
-
114
-
115
-
116
-
117
-
118
-
119
-
120
-
121
-
122
-
123
-
124
-
125
-
126
-
127
-
128
-
129
-
130
-
131
-
132
-
133
-
134
-
135
-
136
-
137
-
138
-
139
-
140
-
141
-
142
-
143
-
144
-
145
-
146
-
147
-
148
-
149
-
150
-
151
-
152
-
153
-
154
-
155
-
156
-
157
-
158
-
159
-
160
-
161
-
162
-
163
-
164
-
165
-
166
-
167
-
168
-
169
-
170
-
171
-
172
-
173
-
174
-
175
-
176
-
177
-
178
-
179
-
180
-
181
-
182
-
183
-
184
-
185
-
186
-
187
-
188
-
189
-
190
-
191
-
192
-
193
-
194
-
195
-
196
-
 197
197 -
 198
198 -
 199
199 -
 200
200 -
 201
201 -
 202
202 -
 203
203 -
 204
204 -
 205
205 -
 206
206 -
 207
207 -
208
-
209
-
210
-
211
-
212
-
213
-
214
-
215
 |
 |
