Yamaha TYROS Owners Manual - Page 108
Style Playback (Auto Accompaniment), Chord Fingerings - 4 black
 |
View all Yamaha TYROS manuals
Add to My Manuals
Save this manual to your list of manuals |
Page 108 highlights
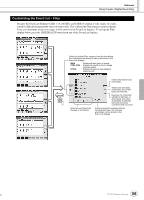
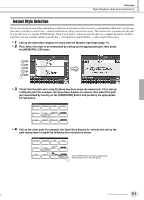
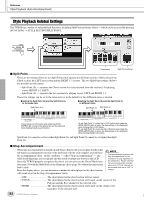
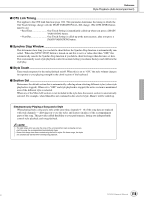
Reference Style Playback (Auto Accompaniment) Quick Guide on pages 32 - 37 This section explains important style-related operations not covered in the Quick Guide. For basic information on playing styles, refer to the Quick Guide. Chord Fingerings The chords (or simplified chord indications) you play in the left-hand section of the keyboard are used for several performance functions: • When [ACMP] is turned on (page 32), the left-hand section of the keyboard becomes the Chord section and the selected style is played back according to the chords specified in the left-hand section of the keyboard. The specified chords are also used for Vocal Harmony (page 47), the Harmony (Voice) effect (page 39), and the Multi Pads (when used with Chord Match; page 38). • When the [ACMP] is turned off (page 32) and the LEFT part is turned on, the notes played as the Left part are recognized as chords. These chords have no effect on style playback, but are used for Vocal Harmony (page 47), the Harmony (Voice) effect (page 39), and the Multi Pads (when used with Chord Match; page 38). There is also a convenient Chord Tutor function that shows you which notes you need to play to make certain chords. (Press [FUNCTION] → CHORD FINGERING.) The explanations here show how to specify chords. Call up the [FUNCTION] → CHORD FINGERING display and follow the instructions below. MENU LP FUNCTION SOUN CREA Selects the fingering type, which Chord Tutor determines how the chords are Specify the Chord Root and Type specified (which notes you should here, and the notes of the chord are play). See below for details. indicated in the keyboard illustration above. Depending on the chord, some notes may be omitted. I Seven types of Chord Fingerings ... G SINGLE FINGER Makes it simple to produce orchestrated accompaniment using major, seventh, minor and minor-seventh chords by pressing a minimum number of keys on the Chord section of the keyboard. This type is available only for style playback. The abbreviated chord fingerings described below are used: C C7 For a major chord, press the root For a seventh chord, simultaneously press the key only. root key and a white key to its left. 108 Cm For a minor chord, simultaneously Cm7 For a minor-seventh chord, simultaneously press the root key and a black key press the root key and both a white and black to its left. key to its left. G FINGERED Lets you finger your own chords on the Chord section of the keyboard, while the TYROS supplies appropriately orchestrated rhythm, bass, and chord accompaniment in the selected style. The Fingered recognizes the various chord types which are listed on the separate Data List booklet and can be looked up using the Chord Tutor function above. G FINGERED ON BASS Accepts the same fingerings as the Fingered, but the lowest note played in the Chord section of the keyboard is used as the bass note, allowing you to play "on bass" chords (in the Fingered mode the root of the chord is always used as the bass note). G MULTI FINGER Automatically detects Single Finger or Fingered chord fingerings, so you can use either type of fingering without having to switch fingering types. G AI FINGERED Basically the same as FINGERED, with the exception that less than three notes can be played to indicate the chords (based on the previously played chord, etc.). TYROS Owner's Manual 106
-
 1
1 -
2
-
3
-
4
-
5
-
6
-
7
-
8
-
9
-
10
-
11
-
12
-
13
-
14
-
15
-
16
-
17
-
18
-
19
-
20
-
21
-
22
-
23
-
24
-
25
-
26
-
27
-
28
-
29
-
30
-
31
-
32
-
33
-
34
-
35
-
36
-
37
-
38
-
39
-
40
-
41
-
42
-
43
-
44
-
45
-
46
-
47
-
48
-
49
-
50
-
51
-
52
-
53
-
54
-
55
-
56
-
57
-
58
-
59
-
60
-
61
-
62
-
63
-
64
-
65
-
66
-
67
-
68
-
69
-
70
-
71
-
72
-
73
-
74
-
75
-
76
-
77
-
78
-
79
-
80
-
81
-
82
-
83
-
84
-
85
-
86
-
87
-
88
-
89
-
90
-
91
-
92
-
93
-
94
-
95
-
96
-
97
-
98
-
99
-
100
-
101
-
102
-
 103
103 -
 104
104 -
 105
105 -
 106
106 -
 107
107 -
 108
108 -
 109
109 -
 110
110 -
 111
111 -
 112
112 -
 113
113 -
114
-
115
-
116
-
117
-
118
-
119
-
120
-
121
-
122
-
123
-
124
-
125
-
126
-
127
-
128
-
129
-
130
-
131
-
132
-
133
-
134
-
135
-
136
-
137
-
138
-
139
-
140
-
141
-
142
-
143
-
144
-
145
-
146
-
147
-
148
-
149
-
150
-
151
-
152
-
153
-
154
-
155
-
156
-
157
-
158
-
159
-
160
-
161
-
162
-
163
-
164
-
165
-
166
-
167
-
168
-
169
-
170
-
171
-
172
-
173
-
174
-
175
-
176
 |
 |
