Yamaha TYROS Owners Manual - Page 160
Appendix, Installing the Optional Speakers
 |
View all Yamaha TYROS manuals
Add to My Manuals
Save this manual to your list of manuals |
Page 160 highlights
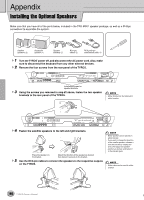
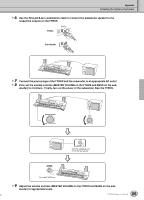
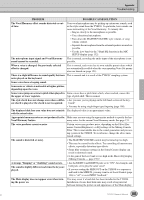
Appendix Installing the Optional Speakers Make sure that you have all of the parts below, included in the TRS-MS01 speaker package, as well as a Phillips screwdriver to assemble the system. Satellite speakers (2) Subwoofer speaker (1) Speaker brackets (2) RCA pin cables (2) RCA pin/8-pin combination cable (1) 1 Turn the TYROS' power off, and disconnect the AC power cord. Also, make sure to disconnect the keyboard from any other external devices. 2 Remove the four screws from the rear panel of the TYROS. TO RIGHT SPEAKER ASSIGNABLE FOOT PEDAL 1 2 3 (SUSTAIN) (DSP VARIATION) (VOLUME) MIDI A IN OUT MIDI B IN OUT VIDEO OUT USB NTSC / PAL LINE OUT SUB MAIN 2 1 R L / L+R AUX IN / LOOP RETURN TRIM R MIN MAX L / L+R LOOP SEND R L / L+R MIC / LINE IN INPUT TRIM MIN MAX TO SUB WOOFER R L AC INLET TO LEFT SPEAKER Installation screws for speaker brackets 3 Using the screws you removed in step #2 above, fasten the two speaker brackets to the rear panel of the TYROS. • Either bracket can be fastened to either location. TO RIGHT SPEAKER ASSIGNABLE FOOT PEDAL 1 2 3 (SUSTAIN) (DSP VARIATION) (VOLUME) MIDI A IN OUT MIDI B IN OUT VIDEO OUT USB NTSC / PAL LINE OUT SUB MAIN 2 1 R L / L+R AUX IN / LOOP RETURN TRIM R MIN MAX L / L+R LOOP SEND R L / L+R MIC / LINE IN INPUT TRIM MIN MAX TO SUB WOOFER R L AC INLET TO LEFT SPEAKER 4 Fasten the satellite speakers to the left and right brackets. Place the speaker on the bracket. Adjust the direction of the speaker as desired, then fasten it securely to the bracket. 5 Use the RCA pin cables to connect the speakers to the respective outputs on the TYROS. • Either speaker can be placed on either bracket. • If you want to change the direction of the satellite speaker, unfasten it from the bracket by rotating the lever, then adjust the speaker position as desired, and fasten it to the bracket again. • Either cable can be used for either location. 160 TYROS Owner's Manual 158
-
 1
1 -
2
-
3
-
4
-
5
-
6
-
7
-
8
-
9
-
10
-
11
-
12
-
13
-
14
-
15
-
16
-
17
-
18
-
19
-
20
-
21
-
22
-
23
-
24
-
25
-
26
-
27
-
28
-
29
-
30
-
31
-
32
-
33
-
34
-
35
-
36
-
37
-
38
-
39
-
40
-
41
-
42
-
43
-
44
-
45
-
46
-
47
-
48
-
49
-
50
-
51
-
52
-
53
-
54
-
55
-
56
-
57
-
58
-
59
-
60
-
61
-
62
-
63
-
64
-
65
-
66
-
67
-
68
-
69
-
70
-
71
-
72
-
73
-
74
-
75
-
76
-
77
-
78
-
79
-
80
-
81
-
82
-
83
-
84
-
85
-
86
-
87
-
88
-
89
-
90
-
91
-
92
-
93
-
94
-
95
-
96
-
97
-
98
-
99
-
100
-
101
-
102
-
103
-
104
-
105
-
106
-
107
-
108
-
109
-
110
-
111
-
112
-
113
-
114
-
115
-
116
-
117
-
118
-
119
-
120
-
121
-
122
-
123
-
124
-
125
-
126
-
127
-
128
-
129
-
130
-
131
-
132
-
133
-
134
-
135
-
136
-
137
-
138
-
139
-
140
-
141
-
142
-
143
-
144
-
145
-
146
-
147
-
148
-
149
-
150
-
151
-
152
-
153
-
154
-
 155
155 -
 156
156 -
 157
157 -
 158
158 -
 159
159 -
 160
160 -
 161
161 -
 162
162 -
 163
163 -
 164
164 -
 165
165 -
166
-
167
-
168
-
169
-
170
-
171
-
172
-
173
-
174
-
175
-
176
 |
 |
