Yamaha TYROS Owners Manual - Page 21
Music Rest
 |
View all Yamaha TYROS manuals
Add to My Manuals
Save this manual to your list of manuals |
Page 21 highlights
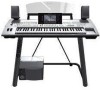
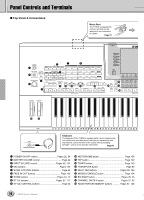
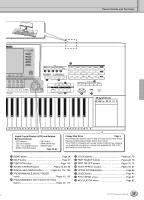
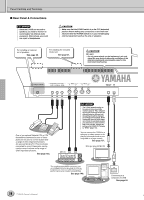
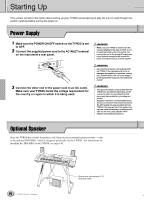
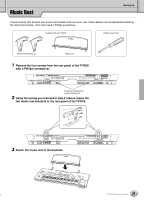
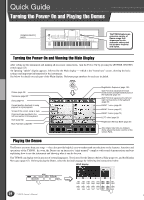
Music Rest Starting Up Check carefully that all parts (two music rest brackets and one music rest, shown below) are included before following the instructions below. You'll also need a Phillips screwdriver. Supplied with the TYROS Phillips screwdriver Music rest brackets (2) Music rest 1 Remove the four screws from the rear panel of the TYROS with a Phillips screwdriver. TO RIGHT SPEAKER ASSIGNABLE FOOT PEDAL 1 2 3 (SUSTAIN) (DSP VARIATION) (VOLUME) MIDI A IN OUT MIDI B IN OUT VIDEO OUT USB NTSC / PAL LINE OUT SUB MAIN 2 1 R L / L+R AUX IN / LOOP RETURN TRIM R MIN MAX L / L+R LOOP SEND R L / L+R MIC / LINE IN INPUT TRIM MIN MAX TO SUB WOOFER R L AC INLET TO LEFT SPEAKER Screws for attaching the music rest brackets 2 Using the screws you removed in step #1 above, fasten the two music rest brackets to the rear panel of the TYROS. TO RIGHT SPEAKER ASSIGNABLE FOOT PEDAL 1 2 3 (SUSTAIN) (DSP VARIATION) (VOLUME) MIDI A IN OUT MIDI B IN OUT VIDEO OUT USB NTSC / PAL 3 Attach the music rest to the brackets. LINE OUT SUB MAIN 2 1 R L / L+R AUX IN / LOOP RETURN TRIM R MIN MAX L / L+R LOOP SEND R L / L+R MIC / LINE IN INPUT TRIM MIN MAX TO SUB WOOFER R L AC INLET TO LEFT SPEAKER 21 TYROS Owner's Manual 19
-
 1
1 -
2
-
3
-
4
-
5
-
6
-
7
-
8
-
9
-
10
-
11
-
12
-
13
-
14
-
15
-
 16
16 -
 17
17 -
 18
18 -
 19
19 -
 20
20 -
 21
21 -
 22
22 -
 23
23 -
 24
24 -
 25
25 -
 26
26 -
27
-
28
-
29
-
30
-
31
-
32
-
33
-
34
-
35
-
36
-
37
-
38
-
39
-
40
-
41
-
42
-
43
-
44
-
45
-
46
-
47
-
48
-
49
-
50
-
51
-
52
-
53
-
54
-
55
-
56
-
57
-
58
-
59
-
60
-
61
-
62
-
63
-
64
-
65
-
66
-
67
-
68
-
69
-
70
-
71
-
72
-
73
-
74
-
75
-
76
-
77
-
78
-
79
-
80
-
81
-
82
-
83
-
84
-
85
-
86
-
87
-
88
-
89
-
90
-
91
-
92
-
93
-
94
-
95
-
96
-
97
-
98
-
99
-
100
-
101
-
102
-
103
-
104
-
105
-
106
-
107
-
108
-
109
-
110
-
111
-
112
-
113
-
114
-
115
-
116
-
117
-
118
-
119
-
120
-
121
-
122
-
123
-
124
-
125
-
126
-
127
-
128
-
129
-
130
-
131
-
132
-
133
-
134
-
135
-
136
-
137
-
138
-
139
-
140
-
141
-
142
-
143
-
144
-
145
-
146
-
147
-
148
-
149
-
150
-
151
-
152
-
153
-
154
-
155
-
156
-
157
-
158
-
159
-
160
-
161
-
162
-
163
-
164
-
165
-
166
-
167
-
168
-
169
-
170
-
171
-
172
-
173
-
174
-
175
-
176
 |
 |
