Yamaha TYROS Owners Manual - Page 135
Part Settings
 |
View all Yamaha TYROS manuals
Add to My Manuals
Save this manual to your list of manuals |
Page 135 highlights
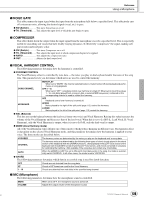
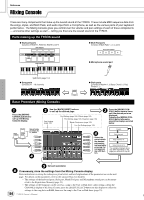
Reference Mixing Console Part Settings The explanations here apply to step #5 of the Basic Procedure on page 134. The parameters explained below can be set on the display pages called up in step #2 of the Basic Procedure on page 134. VOL/VOICE page parameters SONG AUTO REVOICE See page 136. VOICE Calls up the VOICE display, from which you can select the desired voice for each part. When the Style channels are called up in step #3 of the Basic Procedure on page 134, neither Organ Flutes voices nor User voices can be selected. When the Song channels are called up in step #3 of the Basic Procedure on page 134, User voices cannot be selected. Please note that the voice of the Multi Pad cannot be changed via the Mixing Console. PANPOT Determines the stereo position of the selected part (channel). A setting of 0 pans the sound hard left, while 64 is at center, and 127 is at hard right. VOLUME Determines the level of each part or channel, giving you fine control over the balance of all the parts. FILTER page parameters HARMONIC CONTENT Allows you to adjust the resonance effect (page 87) for each part. BRIGHTNESS Determines the brightness of the sound for each part by adjusting the cutoff frequency (page 87). • The RHY1 channel in the STYLE PART display can be assigned to any voice except the Organ Flute voice. • When playing GM song data, channel 10 (in the SONG CH 9 16 page) can only be used for a Drum Kit voice. • When changing the rhythm/percussion voices (drum kits, etc.) of the style and song from the VOICE parameter, the detailed settings related to the drum voice are reset, and in some cases you may be unable to restore the original sound. In the case of song playback, you can restore the original sound by returning to the beginning of the song and playing back from that point. In the case of style play, you can restore the original sound by selecting the same style again. TUNE page parameters PORTAMENTO TIME Portamento is a function that creates a smooth transition in pitch from the first note played on the keyboard to the next. The Portamento Time determines the pitch transition time. Higher values result in a longer pitch change time. Setting this to "0" results in no effect. This parameter is available when the selected keyboard part is set to Mono (page 81). PITCH BEND RANGE Determines the range of the PITCH BEND wheel for each keyboard part. The range is from "0" to "12" with each step corresponding to one semitone. OCTAVE Determines the range of the pitch change in octaves, over two octaves up or down for each keyboard part. The value set here is added to the setting via the [OCTAVE] button. TUNING Determines the pitch of each keyboard part. TRANSPOSE Allows the pitch to be transposed up or down in semitone increments. Setting this to "MASTER" transposes the overall sound of the instrument, while "SONG" transposes song playback, and "KEYBOARD" transposes the keyboard pitch, as well as that of style playback and the Multi Pads (since these are also affected by keyboard play in the lefthand section). EFFECT page parameters TYPE Page 138 REVERB Adjusts the Reverb Send Level (page 137) for each part or channel. CHORUS Adjusts the Chorus Send Level (page 137) for each part or channel. DSP Adjusts the DSP Effect Dry/Wet Level for each part or channel. • As described at left, in addition to the Master Transpose setting, there are two other transpose controls: Keyboard Transpose and Song Transpose. These can be used to match both the song and your keyboard performance to a certain key. For example, let's say you wish to both play and sing along with a certain recorded song. The song data is in F, but you feel most comfortable singing in D, and you are accustomed to playing the keyboard part in C. To match up the keys, set the Master Transpose to "0," the Keyboard Transpose to "2," and the Song Transpose to "-3." This brings the keyboard part up and the song data down to your comfortable singing key. EQ page parameters TYPE EDIT EQ HIGH EQ LOW Page 139 Page 139 Determines the center frequency of the high EQ band that is attenuated/boosted for each part. Determines the center frequency of the low EQ band that is attenuated/ boosted for each part. 135 TYROS Owner's Manual 133
-
 1
1 -
2
-
3
-
4
-
5
-
6
-
7
-
8
-
9
-
10
-
11
-
12
-
13
-
14
-
15
-
16
-
17
-
18
-
19
-
20
-
21
-
22
-
23
-
24
-
25
-
26
-
27
-
28
-
29
-
30
-
31
-
32
-
33
-
34
-
35
-
36
-
37
-
38
-
39
-
40
-
41
-
42
-
43
-
44
-
45
-
46
-
47
-
48
-
49
-
50
-
51
-
52
-
53
-
54
-
55
-
56
-
57
-
58
-
59
-
60
-
61
-
62
-
63
-
64
-
65
-
66
-
67
-
68
-
69
-
70
-
71
-
72
-
73
-
74
-
75
-
76
-
77
-
78
-
79
-
80
-
81
-
82
-
83
-
84
-
85
-
86
-
87
-
88
-
89
-
90
-
91
-
92
-
93
-
94
-
95
-
96
-
97
-
98
-
99
-
100
-
101
-
102
-
103
-
104
-
105
-
106
-
107
-
108
-
109
-
110
-
111
-
112
-
113
-
114
-
115
-
116
-
117
-
118
-
119
-
120
-
121
-
122
-
123
-
124
-
125
-
126
-
127
-
128
-
129
-
 130
130 -
 131
131 -
 132
132 -
 133
133 -
 134
134 -
 135
135 -
 136
136 -
 137
137 -
 138
138 -
 139
139 -
 140
140 -
141
-
142
-
143
-
144
-
145
-
146
-
147
-
148
-
149
-
150
-
151
-
152
-
153
-
154
-
155
-
156
-
157
-
158
-
159
-
160
-
161
-
162
-
163
-
164
-
165
-
166
-
167
-
168
-
169
-
170
-
171
-
172
-
173
-
174
-
175
-
176
 |
 |
