ZyXEL NBG6616 User Guide - Page 82
Advanced WAN Screen
 |
View all ZyXEL NBG6616 manuals
Add to My Manuals
Save this manual to your list of manuals |
Page 82 highlights
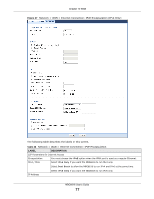
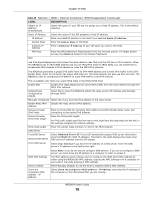
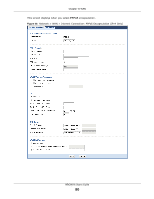
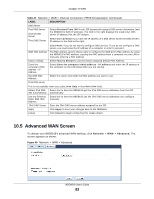
Chapter 10 WAN Table 27 Network > WAN > Internet Connection: PPPoE Encapsulation (continued) LABEL DNS Server First DNS Server Second DNS Server Third DNS Server DESCRIPTION Select Obtained From ISP if your ISP dynamically assigns DNS server information (and the NBG6616's WAN IP address). The field to the right displays the (read-only) DNS server IP address that the ISP assigns. Select User-Defined if you have the IP address of a DNS server. Enter the DNS server's IP address in the field to the right. WAN MAC Address Factory default Clone the computer's MAC address - IP Address Set WAN MAC Address IPv6 DNS server Select None if you do not want to configure DNS servers. If you do not configure a DNS server, you must know the IP address of a computer in order to access it. The MAC address section allows users to configure the WAN port's MAC address by using the NBG6616's MAC address, copying the MAC address from a computer on your LAN or manually entering a MAC address. Select Factory default to use the factory assigned default MAC Address. Select Clone the computer's MAC address - IP Address and enter the IP address of the computer on the LAN whose MAC you are cloning. Select this option and enter the MAC address you want to use. This is not available when you select IPv4 Only in the IPv6/IPv4 field. Obtain IPv6 DNS Select this to have the NBG6616 get the IPv6 DNS server addresses from the ISP info Automatically automatically. Use the following Static DNS IPv6 Address Select this to have the NBG6616 use the IPv6 DNS server addresses you configure manually. IPv6 DNS Server Enter the IPv6 DNS server address assigned by the ISP. Apply Click Apply to save your changes back to the NBG6616. Cancel Click Cancel to begin configuring this screen afresh. 10.5 Advanced WAN Screen To change your NBG6616's advanced WAN settings, click Network > WAN > Advanced. The screen appears as shown. Figure 49 Network > WAN > Advanced NBG6616 User's Guide 82
-
 1
1 -
2
-
3
-
4
-
5
-
6
-
7
-
8
-
9
-
10
-
11
-
12
-
13
-
14
-
15
-
16
-
17
-
18
-
19
-
20
-
21
-
22
-
23
-
24
-
25
-
26
-
27
-
28
-
29
-
30
-
31
-
32
-
33
-
34
-
35
-
36
-
37
-
38
-
39
-
40
-
41
-
42
-
43
-
44
-
45
-
46
-
47
-
48
-
49
-
50
-
51
-
52
-
53
-
54
-
55
-
56
-
57
-
58
-
59
-
60
-
61
-
62
-
63
-
64
-
65
-
66
-
67
-
68
-
69
-
70
-
71
-
72
-
73
-
74
-
75
-
76
-
 77
77 -
 78
78 -
 79
79 -
 80
80 -
 81
81 -
 82
82 -
 83
83 -
 84
84 -
 85
85 -
 86
86 -
 87
87 -
88
-
89
-
90
-
91
-
92
-
93
-
94
-
95
-
96
-
97
-
98
-
99
-
100
-
101
-
102
-
103
-
104
-
105
-
106
-
107
-
108
-
109
-
110
-
111
-
112
-
113
-
114
-
115
-
116
-
117
-
118
-
119
-
120
-
121
-
122
-
123
-
124
-
125
-
126
-
127
-
128
-
129
-
130
-
131
-
132
-
133
-
134
-
135
-
136
-
137
-
138
-
139
-
140
-
141
-
142
-
143
-
144
-
145
-
146
-
147
-
148
-
149
-
150
-
151
-
152
-
153
-
154
-
155
-
156
-
157
-
158
-
159
-
160
-
161
-
162
-
163
-
164
-
165
-
166
-
167
-
168
-
169
-
170
-
171
-
172
-
173
-
174
-
175
-
176
-
177
-
178
-
179
-
180
-
181
-
182
-
183
-
184
-
185
-
186
-
187
-
188
-
189
-
190
-
191
-
192
-
193
-
194
-
195
-
196
-
197
-
198
-
199
-
200
-
201
-
202
-
203
-
204
-
205
-
206
-
207
-
208
-
209
-
210
-
211
-
212
-
213
-
214
-
215
-
216
-
217
-
218
-
219
-
220
-
221
-
222
-
223
-
224
-
225
-
226
-
227
-
228
-
229
-
230
-
231
-
232
-
233
-
234
-
235
-
236
-
237
-
238
-
239
-
240
-
241
 |
 |
