ZyXEL PLA450 v2 User Guide - Page 125
Wall-mounting Instructions, for the size of screws to use and how far apart to, place them.
 |
View all ZyXEL PLA450 v2 manuals
Add to My Manuals
Save this manual to your list of manuals |
Page 125 highlights
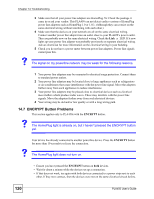
Chapter 15 Product Specifications and Wall-Mounting Instructions Table 38 Standards Supported (continued) STANDARD DESCRIPTION RFC 2236 Internet Group Management Protocol, Version 2. RFC 2516 A Method for Transmitting PPP Over Ethernet (PPPoE) IEEE 802.11 Also known by the brand Wi-Fi, denotes a set of Wireless LAN/WLAN standards developed by working group 11 of the IEEE LAN/MAN Standards Committee (IEEE 802). IEEE 802.11b Uses the 2.4 gigahertz (GHz) band IEEE 802.11g Uses the 2.4 gigahertz (GHz) band IEEE 802.11d Standard for Local and Metropolitan Area Networks: Media Access Control (MAC) Bridges IEEE 802.1x Port Based Network Access Control. IEEE 802.11e QoS IEEE 802.11 e Wireless LAN for Quality of Service Microsoft PPTP MS PPTP (Microsoft's implementation of Point to Point Tunneling Protocol) HomePlug AV The HomePlug AV standard specifies how network devices communicate using standard electrical wiring. Wall-mounting Instructions Do the following to hang your PLA450 on a wall. " See Table 36 on page 123 for the size of screws to use and how far apart to place them. 1 Locate a high position on a wall that is free of obstructions. Use a sturdy wall. 2 Drill two holes for the screws. Make sure the distance between the centers of the holes matches what is listed in the product specifications appendix. 1 Be careful to avoid damaging pipes or cables located inside the wall when drilling holes for the screws. 3 Do not screw the screws all the way into the wall. Leave a small gap of about 0.5 cm between the heads of the screws and the wall. 4 Make sure the screws are snugly fastened to the wall. They need to hold the weight of the PLA450 with the connection cables. 5 Align the holes on the back of the PLA450 with the screws on the wall. Hang the PLA450 on the screws. PLA450 User's Guide 125
-
 1
1 -
2
-
3
-
4
-
5
-
6
-
7
-
8
-
9
-
10
-
11
-
12
-
13
-
14
-
15
-
16
-
17
-
18
-
19
-
20
-
21
-
22
-
23
-
24
-
25
-
26
-
27
-
28
-
29
-
30
-
31
-
32
-
33
-
34
-
35
-
36
-
37
-
38
-
39
-
40
-
41
-
42
-
43
-
44
-
45
-
46
-
47
-
48
-
49
-
50
-
51
-
52
-
53
-
54
-
55
-
56
-
57
-
58
-
59
-
60
-
61
-
62
-
63
-
64
-
65
-
66
-
67
-
68
-
69
-
70
-
71
-
72
-
73
-
74
-
75
-
76
-
77
-
78
-
79
-
80
-
81
-
82
-
83
-
84
-
85
-
86
-
87
-
88
-
89
-
90
-
91
-
92
-
93
-
94
-
95
-
96
-
97
-
98
-
99
-
100
-
101
-
102
-
103
-
104
-
105
-
106
-
107
-
108
-
109
-
110
-
111
-
112
-
113
-
114
-
115
-
116
-
117
-
118
-
119
-
 120
120 -
 121
121 -
 122
122 -
 123
123 -
 124
124 -
 125
125 -
 126
126 -
 127
127 -
 128
128 -
 129
129 -
 130
130 -
131
-
132
-
133
-
134
-
135
-
136
-
137
-
138
-
139
-
140
-
141
-
142
-
143
-
144
-
145
-
146
-
147
-
148
-
149
-
150
-
151
-
152
-
153
-
154
-
155
-
156
-
157
-
158
-
159
-
160
-
161
-
162
-
163
-
164
-
165
-
166
-
167
-
168
-
169
-
170
-
171
-
172
-
173
-
174
-
175
-
176
-
177
-
178
-
179
-
180
-
181
-
182
-
183
-
184
-
185
-
186
-
187
-
188
-
189
-
190
 |
 |