ZyXEL PLA450 v2 User Guide - Page 27
The WPS Button, 2.1 Overview, 2.2 Push Button Configuration
 |
View all ZyXEL PLA450 v2 manuals
Add to My Manuals
Save this manual to your list of manuals |
Page 27 highlights
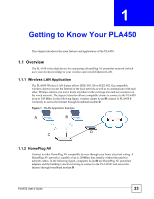
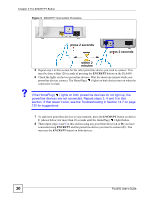
CHAPTER 2 The WPS Button 2.1 Overview Your PLA450 supports WiFi Protected Setup (WPS), which is an easy way to set up a secure wireless network. WPS is an industry standard specification, defined by the WiFi Alliance. WPS allows you to quickly set up a wireless network with strong security, without having to configure security settings manually. Each WPS connection works between two devices. Both devices must support WPS (check each device's documentation to make sure). Depending on the devices you have, you can either press a button (on the device itself, or in its configuration utility) or enter a PIN (a unique Personal Identification Number that allows one device to authenticate the other) in each of the two devices. When WPS is activated on a device, it has two minutes to find another device that also has WPS activated. Then, the two devices connect and set up a secure network by themselves. 2.2 Push Button Configuration WPS Push Button Configuration (PBC) is initiated by pressing a button on each WPS-enabled device, and allowing them to connect automatically. You do not need to enter any information. Not every WPS-enabled device has a physical WPS button. Some may have a WPS PBC button in their configuration utilities instead of or in addition to the physical button. Take the following steps to set up WPS using the button. 1 Ensure that the two devices you want to set up are within wireless range of one another. 2 Look for a WPS button on each device. If the device does not have one, log into its configuration utility and locate the button (see the device's User's Guide for how to do this - for the PLA450, see Section 6.10 on page 77). 3 Press the button on one of the devices (it doesn't matter which). 4 Within two minutes, press the button on the other device. The registrar sends the network name (SSID) and security key through an secure connection to the enrollee. If you need to make sure that WPS worked, check the list of associated wireless clients in the AP's configuration utility. If you see the wireless client in the list, WPS was successful. For information on using the WPS PIN method, see Section 6.5.1 on page 64. PLA450 User's Guide 27
-
 1
1 -
2
-
3
-
4
-
5
-
6
-
7
-
8
-
9
-
10
-
11
-
12
-
13
-
14
-
15
-
16
-
17
-
18
-
19
-
20
-
21
-
 22
22 -
 23
23 -
 24
24 -
 25
25 -
 26
26 -
 27
27 -
 28
28 -
 29
29 -
 30
30 -
 31
31 -
 32
32 -
33
-
34
-
35
-
36
-
37
-
38
-
39
-
40
-
41
-
42
-
43
-
44
-
45
-
46
-
47
-
48
-
49
-
50
-
51
-
52
-
53
-
54
-
55
-
56
-
57
-
58
-
59
-
60
-
61
-
62
-
63
-
64
-
65
-
66
-
67
-
68
-
69
-
70
-
71
-
72
-
73
-
74
-
75
-
76
-
77
-
78
-
79
-
80
-
81
-
82
-
83
-
84
-
85
-
86
-
87
-
88
-
89
-
90
-
91
-
92
-
93
-
94
-
95
-
96
-
97
-
98
-
99
-
100
-
101
-
102
-
103
-
104
-
105
-
106
-
107
-
108
-
109
-
110
-
111
-
112
-
113
-
114
-
115
-
116
-
117
-
118
-
119
-
120
-
121
-
122
-
123
-
124
-
125
-
126
-
127
-
128
-
129
-
130
-
131
-
132
-
133
-
134
-
135
-
136
-
137
-
138
-
139
-
140
-
141
-
142
-
143
-
144
-
145
-
146
-
147
-
148
-
149
-
150
-
151
-
152
-
153
-
154
-
155
-
156
-
157
-
158
-
159
-
160
-
161
-
162
-
163
-
164
-
165
-
166
-
167
-
168
-
169
-
170
-
171
-
172
-
173
-
174
-
175
-
176
-
177
-
178
-
179
-
180
-
181
-
182
-
183
-
184
-
185
-
186
-
187
-
188
-
189
-
190
 |
 |