ZyXEL PLA450 v2 User Guide - Page 52
Creating and Using a Profile, Security, Settings, Profile, Add New Profile, Scan Info
 |
View all ZyXEL PLA450 v2 manuals
Add to My Manuals
Save this manual to your list of manuals |
Page 52 highlights
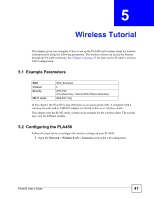
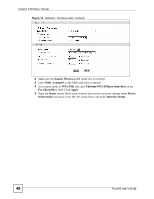
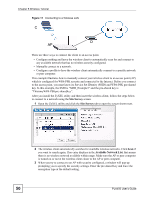
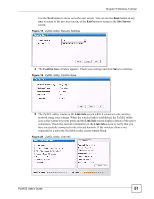
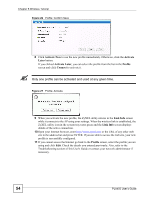
Chapter 5 Wireless Tutorial 6 Open your Internet browser and enter http://www.zyxel.com or the URL of any other web site in the address bar. If you are able to access the web site, your wireless connection is successfully configured. If you cannot access the web site, try changing the encryption type in the Security Settings screen, check the Troubleshooting section of this User's Guide or contact your network administrator. 5.3.2 Creating and Using a Profile A profile lets you automatically connect to the same wireless network every time you use the wireless client. You can also configure different profiles for different networks, for example if you connect a notebook computer to wireless networks at home and at work. This example illustrates how to set up a profile and connect the wireless client to an access point configured for WPA-PSK security. In this example, the SSID is "SSID_Example3", the profile name is "PN_Example3" and the pre-shared key is "ThisismyWPA-PSKpresharedkey". You have chosen the profile name "PN_Example3". 1 Open the ZyXEL utility and click the Profile tab to open the screen shown next. Click Add to configure a new profile. Figure 21 ZyXEL Utility: Profile 2 The Add New Profile screen appears. The wireless client automatically searches for available wireless networks, which are displayed in the Scan Info box. Click on Scan if you want to search again. You can also configure your profile for a wireless network that is not in the list. Figure 22 ZyXEL Utility: Add New Profile 52 PLA450 User's Guide
-
 1
1 -
2
-
3
-
4
-
5
-
6
-
7
-
8
-
9
-
10
-
11
-
12
-
13
-
14
-
15
-
16
-
17
-
18
-
19
-
20
-
21
-
22
-
23
-
24
-
25
-
26
-
27
-
28
-
29
-
30
-
31
-
32
-
33
-
34
-
35
-
36
-
37
-
38
-
39
-
40
-
41
-
42
-
43
-
44
-
45
-
46
-
 47
47 -
 48
48 -
 49
49 -
 50
50 -
 51
51 -
 52
52 -
 53
53 -
 54
54 -
 55
55 -
 56
56 -
 57
57 -
58
-
59
-
60
-
61
-
62
-
63
-
64
-
65
-
66
-
67
-
68
-
69
-
70
-
71
-
72
-
73
-
74
-
75
-
76
-
77
-
78
-
79
-
80
-
81
-
82
-
83
-
84
-
85
-
86
-
87
-
88
-
89
-
90
-
91
-
92
-
93
-
94
-
95
-
96
-
97
-
98
-
99
-
100
-
101
-
102
-
103
-
104
-
105
-
106
-
107
-
108
-
109
-
110
-
111
-
112
-
113
-
114
-
115
-
116
-
117
-
118
-
119
-
120
-
121
-
122
-
123
-
124
-
125
-
126
-
127
-
128
-
129
-
130
-
131
-
132
-
133
-
134
-
135
-
136
-
137
-
138
-
139
-
140
-
141
-
142
-
143
-
144
-
145
-
146
-
147
-
148
-
149
-
150
-
151
-
152
-
153
-
154
-
155
-
156
-
157
-
158
-
159
-
160
-
161
-
162
-
163
-
164
-
165
-
166
-
167
-
168
-
169
-
170
-
171
-
172
-
173
-
174
-
175
-
176
-
177
-
178
-
179
-
180
-
181
-
182
-
183
-
184
-
185
-
186
-
187
-
188
-
189
-
190
 |
 |