Alpine INA-W910 Owner's Manual (english) - Page 124
Calibration when connected to HCE-C300R, on the unit.
 |
View all Alpine INA-W910 manuals
Add to My Manuals
Save this manual to your list of manuals |
Page 124 highlights
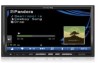
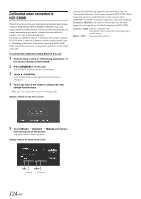
Calibration when connected to HCE-C300R Obstacle detection performance adjustment and guidance mark settings of HCE-C300R (REAR VIEW CAMERA SYSTEM) require that camera installation information be entered and calibration performed. If camera information is not entered, accurate detection will not be possible, so be sure to perform calibration. For details on calibration, refer to "Calibration" in the owner's manual of HCE-C300R. To perform calibration with the supplied switch, refer to "Performing Calibration" in the owner's manual of HCE-C300R. When connected to this unit, you can perform operations via the screen of this unit. To activate the Calibration Setup Mode in this unit 1 Perform steps 1 and 2 in "Performing Calibration" of the owner's manual of HCE-C300R. 2 Press SOURCE/ on the unit. The SOURCE selection screen is displayed. 3 Touch (CAMERA). The Camera mode is activated and the Top menu is displayed. 4 Touch any area of the screen to display the view change function keys. • Make sure view change function is set to ON (page 66). Display example for Top menu screen Continue with the following operations after performing step 4 in "Performing Calibration" of the owner's manual of HCE-C300R. While doing such operations, touch the button on the screen to select "CHANGE" or "DONE" to perform calibration on this unit. Touching [Corner] and [Back] on the screen of this unit performs the same operation as pressing the switch which is supplied by HCE-C300R. [Corner] = VIEW: Selects a desired item. (The switch that is selected is enclosed by a yellow frame.) [Back] = SET.: Executes the selection. 5 Touch [Back] [Corner] [Back] according to the instructions on the screen. The Setup Mode screen appears. Display example for Setup mode screen 124-EN
-
 1
1 -
2
-
3
-
4
-
5
-
6
-
7
-
8
-
9
-
10
-
11
-
12
-
13
-
14
-
15
-
16
-
17
-
18
-
19
-
20
-
21
-
22
-
23
-
24
-
25
-
26
-
27
-
28
-
29
-
30
-
31
-
32
-
33
-
34
-
35
-
36
-
37
-
38
-
39
-
40
-
41
-
42
-
43
-
44
-
45
-
46
-
47
-
48
-
49
-
50
-
51
-
52
-
53
-
54
-
55
-
56
-
57
-
58
-
59
-
60
-
61
-
62
-
63
-
64
-
65
-
66
-
67
-
68
-
69
-
70
-
71
-
72
-
73
-
74
-
75
-
76
-
77
-
78
-
79
-
80
-
81
-
82
-
83
-
84
-
85
-
86
-
87
-
88
-
89
-
90
-
91
-
92
-
93
-
94
-
95
-
96
-
97
-
98
-
99
-
100
-
101
-
102
-
103
-
104
-
105
-
106
-
107
-
108
-
109
-
110
-
111
-
112
-
113
-
114
-
115
-
116
-
117
-
118
-
 119
119 -
 120
120 -
 121
121 -
 122
122 -
 123
123 -
 124
124 -
 125
125 -
 126
126 -
 127
127 -
 128
128 -
 129
129 -
130
-
131
 |
 |
