Alpine INA-W910 Owner's Manual (english) - Page 73
Adjusting the Graphic Equalizer Curve (G-EQ), Setting the Time Correction Unit (T.Corr Parameter)
 |
View all Alpine INA-W910 manuals
Add to My Manuals
Save this manual to your list of manuals |
Page 73 highlights
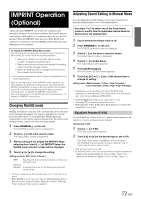
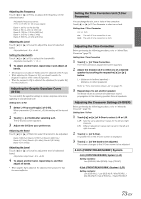
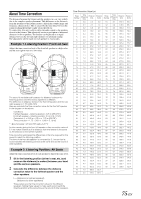
Adjusting the Frequency Touch [ ] or [ ] of Freq. to adjust the frequency of the selected band. Adjustable frequency bands: 20 Hz to 20 kHz (in 1/3 octave steps) Band-1: 20 Hz~80 Hz (63 Hz) Band-2: 50 Hz~200 Hz (150 Hz) Band-3: 125 Hz~3.2 kHz (400 Hz) Band-4: 315 Hz~8 kHz (1 kHz) Band-5: 800 Hz~20 kHz (2.5 kHz) Adjusting the Level Touch [ ] or [ ] of Level to adjust the level of selected band. Adjustable level: -6 to +6 dB Setting the Bandwidth Touch [ ] or [ ] of Q to select the bandwidth. Adjustable bandwidth: 1, 1.5, 3 4 To adjust another band, repeat step 3 and adjust all bands. • The frequencies of adjacent bands cannot be adjusted within 4 steps. • While adjusting the Parametric EQ, you should consider the frequency response of the connected speakers. • When the parametric EQ is adjusted, the adjustment for graphic EQ becomes ineffective. Adjusting the Graphic Equalizer Curve (G-EQ) You can modify the equalizer settings to create a response curve more appealing to your personal taste. Setting item: G-EQ 1 Select L+R by touching [ ] of G-EQ. When parametric EQ is set to L+R, this setting will be turned off. 2 Touch [ ] of G-EQ after selecting L+R. The G-EQ list screen appears. 3 Adjust the G-EQ to your preference. Adjusting the Band Touch [ ] or [ ] of Band to select the band to be adjusted. Band-1 (63 Hz) / Band-2 (150 Hz) / Band-3 (400 Hz) / Band-4 (1 kHz) / Band-5 (2.5 kHz) / Band-6 (6.3 kHz) / Band-7 (17.5 kHz) Adjusting the Level Touch [ ] or [ ] of Level to adjust the level of selected band. Adjustable output level: -6 to +6 dB 4 To adjust another band, repeat step 3, and then adjust all bands. • When graphic EQ is adjusted, the adjustment for parametric EQ becomes ineffective. Setting the Time Correction Unit (T.Corr Parameter) You can change the unit, (cm or inch) of time correction. Touch [ ] or [ ] of T.Corr Parameter to select cm or Inch. Setting item: T.Corr Parameter cm Inch cm: The unit of time correction is cm. Inch: The unit of time correction is Inch. Adjusting the Time Correction Before performing the following procedures, refer to "About Time Correction" (page 75). Setting item: Time Correction 1 Touch [ ] of Time Correction. The Time Correction adjustment screen appears. 2 Adjust the distance (0.0 to 336.6 cm) of a desired speaker by touching the respective [ ] or [ ] button. L = (distance to farthest speaker) - (distance to other speakers) Refer to "Time Correction Value List" on page 75. 3 Repeat step 2 to set another speaker. Set these values to achieve simultaneous sound propagation to the listening position from all speakers. Adjusting the Crossover Settings (X-OVER) Before performing the following procedures, refer to "About the Crossover" (page 76). Setting item: X-Over 1 Touch [ ] or [ ] of X-Over to select L+R or L/R. L+R: L/R: Sets the same adjustment values for the left and right channels. Different adjustment values can be set for the left and right channels. 2 Touch [ ] of X-Over. A speaker list on the X-Over screen is displayed. 3 Touch [ ] of the band to be adjusted. The screen changes to the X-Over screen to be adjusted. 4.2ch (FRONT/REAR/SUBW.) System 4.2ch (FRONT/REAR/SUBW.) System / (L+R) Setting contents: Low (SUB-W) / Mid (REAR) / High (FRONT) 4.2ch (FRONT/REAR/SUBW.) System / (L/R) Setting contents: Low (SUB-W)-L / Low (SUB-W)-R / Mid (REAR)-L / Mid (REAR)-R / High (FRONT)-L / High (FRONT)-R 73-EN
-
 1
1 -
2
-
3
-
4
-
5
-
6
-
7
-
8
-
9
-
10
-
11
-
12
-
13
-
14
-
15
-
16
-
17
-
18
-
19
-
20
-
21
-
22
-
23
-
24
-
25
-
26
-
27
-
28
-
29
-
30
-
31
-
32
-
33
-
34
-
35
-
36
-
37
-
38
-
39
-
40
-
41
-
42
-
43
-
44
-
45
-
46
-
47
-
48
-
49
-
50
-
51
-
52
-
53
-
54
-
55
-
56
-
57
-
58
-
59
-
60
-
61
-
62
-
63
-
64
-
65
-
66
-
67
-
 68
68 -
 69
69 -
 70
70 -
 71
71 -
 72
72 -
 73
73 -
 74
74 -
 75
75 -
 76
76 -
 77
77 -
 78
78 -
79
-
80
-
81
-
82
-
83
-
84
-
85
-
86
-
87
-
88
-
89
-
90
-
91
-
92
-
93
-
94
-
95
-
96
-
97
-
98
-
99
-
100
-
101
-
102
-
103
-
104
-
105
-
106
-
107
-
108
-
109
-
110
-
111
-
112
-
113
-
114
-
115
-
116
-
117
-
118
-
119
-
120
-
121
-
122
-
123
-
124
-
125
-
126
-
127
-
128
-
129
-
130
-
131
 |
 |