Alpine INA-W910 Owner's Manual (english) - Page 90
Camera Operation (Optional
 |
View all Alpine INA-W910 manuals
Add to My Manuals
Save this manual to your list of manuals |
Page 90 highlights
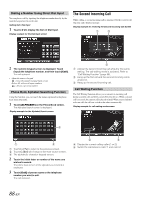
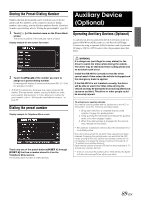
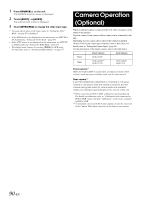
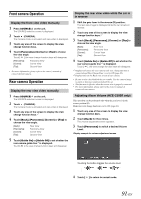
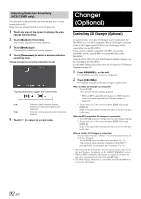
1 Press SOURCE/ on the unit. The SOURCE selection screen is displayed. 2 Touch [AUX1]* or [AUX2]. The external input screen is displayed. 3 Touch [NTSC/PAL] to change the video input type. * The name that is given as the source name in "Setting the AUX1 Mode" on page 67 is displayed. • .If the AUX1 mode is not displayed on the main menu, set AUX1 IN to ON by following "Setting the AUX1 Mode" (page 67). • If the AUX2 source is not displayed on the main menu, set AUX2 IN to AUX by following "Setting the AUX2 Mode" (page 67). • The display mode changes by touching [WIDE] for AUX mode. For operation, refer to "Switching Display Modes" on page 55. Camera Operation (Optional) When an optional camera is connected, the view video of camera can be output to the monitor. Topview camera, Front camera or Rear camera can be connected to this unit. Depending on your camera, please choose the connection method (Direct or RCA) and camera type (Topview, Front or Rear) first. For details, refer to "Setting the Camera Input" (page 66). For the information of the Alpine camera, refer to the table below. Direct Camera RCA Camera Front Rear HCE-C200F HCE-C300R *1 HCE-C117D - HCE-C200R HCE-C115 Front camera*2 When the HCE-C200F is connected, conditions in front of the vehicle, such as a poor-visibility road, can be determined. Rear camera*2 If an HCE-C300R/HCE-C200R/HCE-C117D/HCE-C115 series camera is connected, when the vehicle is reversed, the rear camera view (guide marks for vehicle width and available distance) is displayed automatically on the screen of this unit. *1 When connecting to HCE-C300R, calibration must be performed. For details on calibration, refer to "Calibration when connected to HCE-C300R" (page 124) and "Calibration" in the owner's manual of HCE-C300R. *2 A commodity camera (with RCA video output) can also be connected to the Camera Video Input connector as the front or rear camera. 90-EN
-
 1
1 -
2
-
3
-
4
-
5
-
6
-
7
-
8
-
9
-
10
-
11
-
12
-
13
-
14
-
15
-
16
-
17
-
18
-
19
-
20
-
21
-
22
-
23
-
24
-
25
-
26
-
27
-
28
-
29
-
30
-
31
-
32
-
33
-
34
-
35
-
36
-
37
-
38
-
39
-
40
-
41
-
42
-
43
-
44
-
45
-
46
-
47
-
48
-
49
-
50
-
51
-
52
-
53
-
54
-
55
-
56
-
57
-
58
-
59
-
60
-
61
-
62
-
63
-
64
-
65
-
66
-
67
-
68
-
69
-
70
-
71
-
72
-
73
-
74
-
75
-
76
-
77
-
78
-
79
-
80
-
81
-
82
-
83
-
84
-
 85
85 -
 86
86 -
 87
87 -
 88
88 -
 89
89 -
 90
90 -
 91
91 -
 92
92 -
 93
93 -
 94
94 -
 95
95 -
96
-
97
-
98
-
99
-
100
-
101
-
102
-
103
-
104
-
105
-
106
-
107
-
108
-
109
-
110
-
111
-
112
-
113
-
114
-
115
-
116
-
117
-
118
-
119
-
120
-
121
-
122
-
123
-
124
-
125
-
126
-
127
-
128
-
129
-
130
-
131
 |
 |